
131 타입스크립트 리서치
source: categories/study/vue-experiance/vue-experiance_9-99_32.md
131 타입스크립트 리서치
타입스크립트란?
- 자바스크립트에 타입을 부여한 언어
- 자바스크립트의 확장된 언어라고 보면됨
- 타입스크립트는 자바스크립트와 다르게 브라우저에서 실행하기 위해 파일을 한번 변환해줘야됨
- 이 변환 과정을 컴파일(compile)이라고 부름
왜 타입스크립트를 써야됨?
- 타입 추론을 통해 해당 데이터가 어떤 프로퍼티를 가지고 있는지 에디터상에서 추론 가능
1. 에러 사전 방지
2. 코드 가이드 및 자동 완성 (개발 생산성 향상)
- 타입스크립트를 안 쓰던 시절, 해당 데이터가 어떤 구조인지, 어떤 프로퍼티를 가지고 있는지를
JsDocs주석 문법으로 정의
/**
 * @typedef {object} User
 * @property {string} name
 * @property {string} email
 * @property {string} address
 */

/**
 * @returns {Promise<User>}
 */
function fetchUser() {
   return axios.get(url);
}

// 아래와 같이 .을 찍으면 어떤 프로퍼티가 있는지 에디터상에서 자동 추론된다. (name, email, address)
fetchUser().then(res => {
   res.
})
function sum(a: number, b: number): number {
   return a + b;
}

const result = sum(10, 20);
// 아래와 같이 .을 찍으면 result 타입이 number란 것을 알고 있으므로
// number 관련 메소드, 프로퍼티들이 자동으로 뜬다.
result.
자바스크립트를 타입스크립트처럼 코딩하는 방법
/**
 *
 * @param {number} a 첫번째 숫자
 * @param {number} b 두번째 숫자
 *
 */

// 위와 같이 주석으로 정리해두면 아래 a, b 파라미터에서 자동으로 위와 같은 내용으로 추론이된다.
function sum(a, b) {
   return a + b;
}
타입스크립트 기초 - 변수와 함수 타입 정의하기
1. 문자열, 숫자, 배열
// 문자열
const str: string = 'hello';
// 숫자열
const num: number = 10;
// 배열
const arr: Array<number> = [1, 2, 3];
// 배열
const arr2: Array<string> = ['a', 'b', 'c'];
// 배열
const arr3: number[] = [4, 5, 6];
// 배열
const arr4: string[] = ['d', 'e', 'f'];
2. 튜플, 객체, 진위값
튜플
// 튜플
const arr: [string, number] = ['a', 1];
객체
// 객체
const obj: object = {};
// 객체
const obj: {name: string; age: number;} = {
   name: 'capt',
   age: 30,
};
진위값
// 진위값
let show: boolean = true;
3. 함수 타입 - 파라미터, 반환값, 옵셔널 파라미터
function sum(a: number, b: number): number {
   return a + b;
}
function sum(a: string, b?: string): number {
   return a + b;
}

log('hi');
log('hello', 'bye');
4. any, void
any
let todoItems: any;
any타입은 지양하는걸 추천- 최대한 정확한 타입을 명시해주는 것이 좋음
tsconfig.json - any
"noImplicitAny": true,:any타입이라도 붙여! 라는 뜻
{
   "compilerOptions": {
      "noImplicitAny": true,
   }
}
void: 반환값이 없을 때
void: 반환값이 없다 라고 명시적으로 지정해주는 것
function addTodo(todo): void {
   todoItems.push(todo);
}
5. type, interface
type
type Todo = {
   id: number;
   title: string;
   done: boolean;
}

let todoItems: Todo[];
interface
interface Todo = {
   id: number;
   title: string;
   done: boolean;
}

let todoItems: Todo[];
interface
interface User {
   age: number;
   name: string;
}

const hj: User = {
   age: 34,
   name: 'hyungju-lee',
}
interface User {
   age: number;
   name: string;
}

function getUser(user: User) {
   console.log(user);
}

const hj = { name: 'hyungju-lee' }
getUser(hj); // age 프로퍼티가 없기 때문에 에러 발생
함수 구조를 정의하는 interface
interface SumFunction {
   (a: number, b: number): number;
}

let sum: SumFunction;
sum = function (a: number, b: number): number {
   return a + b;
}
인덱싱 방식을 정의하는 interface
interface StringArray {
   [index: number]: string;
}

const arr: StringArray = ['a', 'b', 'c'];
arr[0]; // 'a'
interface 딕셔너리 패턴
interface StringRegexDictionary {
   [key: string]: RegExp;
}

const obj: StringRegexDictionary = {
   sth: /abc/,
   cssFile: 'css', // TS2332: Type 'string' is not assignable to type 'RegExp'
}
interface StringRegexDictionary {
   [key: string]: RegExp;
}

const obj: StringRegexDictionary = {
   sth: /abc/,
   cssFile: /\.css$/,
   jsFile: /\.js$/,
}
interface 확장
interface Person {
   name: string;
   age: number;
}

interface Developer extends Person {
   language: string;
}

let hj: Developer = {
   language: 'ts',
   age: 100,
   name: '형주',
}
type 별칭
// string 타입을 사용할 때
const name: string = 'capt';

// type 별칭을 사용할 때
type Myname = string;
const name2: Myname = 'capt';
type Developer = {
   name: string;
   skill: string;
}
type User<T> = {
   name: T
}
type 별칭 코드 예제
interface Person {
   name: string;
   age: number;
}

type Person2 = {
   name: string;
   age: number;
}

let hyungju: Person = {
   name: '형주',
   age: 34,
}

let hyungju2: Person2 = {
   name: '형주',
   age: 34,
}
type 별칭과 interface 차이점
- type 별칭은 새로운 타입 값을 하나 생성하는 것이 아니라 정의한 타입에 대해 나중에 쉽게 참고할 수 있게 일므을 부여하는 것과 같다.
- 이러한 특징은 VSCode 상의 프리뷰 상태로 다른 타입과 어떤 차이점이 있는지 확인해볼 수 있다.
interface Developer {
   name: string;
   skill: string;
}

let capt: Developer; // Developer에 마우스 커서를 올려놓으면 interface Developer라고 뜸
type Developer = {
   name: string;
   skill: string;
}

let capt: Developer; // Developer에 마우스 커서를 올려놓으면 type Developer = { name: string; skill: string } 이라고 뜸
type 별칭은 확장이 되지 않는다
type과interface의 가장 큰 차이는type은 확장(extends)이 되지 않는다는 것interface는 확장이 가능한데 반해type별칭은 확장이 불가능함- 따라서 가능한한
type보다는interface로 선언해서 사용하는 것을 추천함
좋은 소프트웨어는 언제나 확장이 용이해야 한다는 원칙에 따라 가급적 확장 가능한 interface로 선언하면 좋다.
연산자를 이용한 타입 정의 - Union Type
function logMessage(value: string) {
   console.log(value);
}

logMessage('hello');
logMessage(100); // 에러발생
function logMessage(value: any) {
   console.log(value);
}

logMessage('hello');
logMessage(100);
logMessage(true);

// 에러발생 x
// 하지만 이렇게하면 타입을 정의하는 의미가 없다.
// 아래와 같이 | (or) 연산자로 타입을 하나 더 정의
// 원래 or 연산자는 || 이거지만 타입스크립트에선 | 이걸로 씀
// 이를 타입스크립트에서 유니언 타입이라고 함
function logMessage(value: string | number) {
   console.log(value);
}

logMessage('hello');
logMessage(100);
union type의 장점
// 유니온 타입은 특정 파라미터나 변수에 여러가지 타입을 지정하고 싶을 때 사용
let hyungju: string | number | boolean;
function logMessage(value: string | number) {
  console.log(value);
}

logMessage('hello');
logMessage(100);
any타입으로 설정하면 해당 코드를 타입스크립트가 추론하는 시점에서 해당 데이터의 정확한 타입을 추론할 수 없음- 때문에 구체적인
string의 API 속성이라던지number의 API 속성이라던지 그런 것들을 추론할 수 없다. - 하지만 위와 같이
union type으로string,number타입을 지정하면, 추론 시점에서의 정확한 타입을 추론할 수 있다. - 이것이
union type의 장점이다.
type guard
function logMessage(value: string | number) {
  if (typeof value === 'number') {
    value.toLocaleString();
  }
  if (typeof value === 'string') {
    value.toString();
  }
}
위와 같이 if문으로 특정 타입으로 타입의 범위를 좁혀나가는(필터링 하는) 과정을 type guard라고 한다.
에러 처리 (type guard)
function logMessage(value: string | number) {
  if (typeof value === 'number') {
    value.toLocaleString();
  }
  if (typeof value === 'string') {
    value.toString();
  }
  throw new TypeError('value must be string or number');
}
union type 특징
interface Developer {
  name: string;
  skill: string;
}

interface Person {
  name: string;
  age: number;
}

function askSomeone(someone: Developer | Person) {
  // 아래와 같이 .을 입력하는 순간 추론되는 프로퍼티가 아직은 name밖에 없다.
  someons.
}
// skill, age 프로퍼티가 없는 것은 아직 어떤 형태의 객체가 들어올지 모르는 상황에서 skill, age 프로퍼티를 모두 추론해놓는다면 에러가 발생할 수도 있다고 판단
// 즉, 위와 같이 union type을 썼을 땐, 완전히 100% 보장된 속성들만 표시를함
// skill, age 프로퍼티도 추론되게 하고 싶다면 type guard를 이용해 특정 타입으로 제한을 한 다음에 그 타입으로 인자가 들어왔을 때 처리하는 방식으로 해야됨
intersection type - &
let hj: string & number & boolean;
// 위 hj에 마우스 커서를 올려놓으면 let hj: never이 뜬다.
// 즉, 이런 타입은 절대 있을 수 없다는 뜻
interface Developer {
  name: string;
  skill: string;
}

interface Person {
  name: string;
  age: number;
}

function askSomeone(someone: Developer & Person) {
  // .를 찍는 순간 name, skill, age 프로퍼티가 모두 추론된다.
  // union type과는 다르게 intersection type은 합집합이기 때문이다.
  someone.
}
union type,|은type guard처리가 필요한 반면,intersection type으로 정의한 것은type guard가 필요없다.
union type과 intersection type 차이점
interface Developer {
    name: string;
    skill: string;
}

interface Person {
    name: string;
    age: number
}

function askSomeone(someone: Developer | Person) {

}

askSomeone({ name: '디벨로퍼', skill: '웹 개발' });
askSomeone({ name: '디벨로퍼', age: 100 });
interface Developer {
    name: string;
    skill: string;
}

interface Person {
    name: string;
    age: number
}

function askSomeone(someone: Developer & Person) {

}

askSomeone({ name: '디벨로퍼', skill: '웹 개발', age: 34 });
askSomeone({ name: '디벨로퍼', age: 100 , skill: '개발'});
union type- 여러 타입 중 하나의 타입만 만족하면 되므로 상황에 따라 원하는 타입을 만족하는 데이터를 넘기면됨
intersection type- 얄짤없이 인터섹션으로 선언된 모든 타입을 만족하는 데이터를 넘겨야함
enum
enum은 특정 값들의 집합을 의미하는 자료형- 드롭다운과 같은 정해져있는 목록의 값들을 지정할 때 사용하면 좋다.
숫자형 enum
// enum에 값을 지정하지 않으면 기본적으로 숫자형 enum으로 설정된다.
enum Shoes {
  Nike,
  Adidas,
}

const myShoes = Shoes.Nike;
console.log(myShoes); // 0
// 아래와 같이 Nike에 10이란 숫자형을 할당하면
// Adidas엔 11이란 숫자형이 자동으로 할당된다.
enum Shoes {
  Nike = 10,
  Adidas,
}
문자형 enum
enum Shoes {
  Nike = '나이키',
  Adidas = '아디다스',
}

const myShoes = Shoes.Nike;
console.log(myShoes); // 나이키
enum 활용 사례
function askQuestion(answer: string) {
  if (answer === 'yes') {
    console.log('정답입니다');
  }
  if (answer === 'no') {
    console.log('오답입니다');
  }
}

// 아래와 같이 파라미터로 정답을 뜻하는 여러가지 단어가 들어올 수 있다.
// 이때 이것을 제한할 수 있는 것이 enum이다.
askQuestion('yes');
askQuestion('y');
askQuestion('예스');
askQuestion('정답');
enum Answer {
  Yes = 'Y',
  No = 'N',
}

function askQuestion(answer: Answer) {
  if (answer === 'yes') {
    console.log('정답입니다');
  }
  if (answer === 'no') {
    console.log('오답입니다');
  }
}

// 위와 같이 파라미터 타입을 enum으로하면 enum에서 제공하는 값만 파라미터로 넣을 수 있다.
askQuestion(Answer.Yes);
askQuestion('Yes'); // 문자열 Yes는 에러가 난다. 파라미터 타입을 enum 타입으로 지정했기 때문이다.
드롭다운 등의 목록이 필요한 곳에서 enum을 활용하면 예외 처리할게 많이 줄어들고 좋다.
Class
Class 소개
class Person {
  constructor(name, age) {
    console.log('생성되었습니다.');
    this.name = name;
    this.age = age;
  }
}

const hj = new Person('형주', 34); // 생성되었습니다.
console.log(hj); // Person {name: '형주', age: 34}
자바스크립트 prototype 소개
const user = { name: 'hj', age: 100 }
const admin = { name: 'hj', age: 100, role: 'admin' }
- 위와 같이 중복되는 코드들을 줄여나갈 수 있는 방식으로 프로토타입 상속이라는 개념이 있다.
const user = { name: 'hj', age: 100 }
const admin = {};

admin.__proto__ = user;
admin.name; // hj
admin.age; // 100

admin;
// {}
// __proto__: Object
//    age: 100
//    name: 'hj'
//      __proto__: Object

admin.role = 'admin';
admin;
// {role: 'admin'}
// role: 'admin'
//    __proto__: Object
//    age: 100
//    name: 'hj'
//      __proto__: Object
자바스크립트 prototype 활용 사례
Built-in 자바스크립트 API 또는 자바스크립트 Native API
- 아래와 같이 자바스크립트 코딩을 하면서 자연스럽게
prototype을 활용하고 있었다는 것을 알 수 있다. - 그리고 단순히 객체의 정보를 확장하는 것 뿐만아니라, 실제 빌트인 오브젝트에 정의되어있는 기능(메소드)들을 바로바로 가져다쓸 수 있도록 구성되어있다.
const obj = { a: 10 };
obj.toString(); // "[object Object]"
Object.keys(obj); // ["a"]
obj.hasOwnProperty("a"); // true
obj;
// {a: 10}
// a: 10
// __proto__:
//     constructor: ƒ Object()
//     hasOwnProperty: ƒ hasOwnProperty()
//     isPrototypeOf: ƒ isPrototypeOf()
//     propertyIsEnumerable: ƒ propertyIsEnumerable()
//     toLocaleString: ƒ toLocaleString()
//     toString: ƒ toString()
//     valueOf: ƒ valueOf()
//     __defineGetter__: ƒ __defineGetter__()
//     __defineSetter__: ƒ __defineSetter__()
//     __lookupGetter__: ƒ __lookupGetter__()
//     __lookupSetter__: ƒ __lookupSetter__()
//     get __proto__: ƒ __proto__()
//     set __proto__: ƒ __proto__()
const arr = [];
arr;
// []
//     length: 0
//     __proto__: Array(0)
//     concat: ƒ concat()
//     constructor: ƒ Array()
//     copyWithin: ƒ copyWithin()
//     entries: ƒ entries()
//     every: ƒ every()
//     fill: ƒ fill()
//     filter: ƒ filter()
//     find: ƒ find()
//     findIndex: ƒ findIndex()
//     flat: ƒ flat()
//     flatMap: ƒ flatMap()
//     forEach: ƒ forEach()
//     includes: ƒ includes()
//     indexOf: ƒ indexOf()
//     join: ƒ join()
//     keys: ƒ keys()
//     lastIndexOf: ƒ lastIndexOf()
//     length: 0
//     map: ƒ map()
//     pop: ƒ pop()
//     push: ƒ push()
//     reduce: ƒ reduce()
//     reduceRight: ƒ reduceRight()
//     reverse: ƒ reverse()
//     shift: ƒ shift()
//     slice: ƒ slice()
//     some: ƒ some()
//     sort: ƒ sort()
//     splice: ƒ splice()
//     toLocaleString: ƒ toLocaleString()
//     toString: ƒ toString()
//     unshift: ƒ unshift()
//     values: ƒ values()
//     Symbol(Symbol.iterator): ƒ values()
//     Symbol(Symbol.unscopables): {copyWithin: true, entries: true, fill: true, find: true, findIndex: true, …}
//     __proto__: Object
prototype과 class와의 관계
class Person {
  constructor(name, age) {
    console.log('생성되었습니다');
    this.name = name;
    this.age = age;
  }
}

const hj = new Person('형주', 35); // 생성되었습니다.
console.log(hj); // Person {name: "형주", age: 35}
function Person(name, age) {
  this.name = name;
  this.age = age;
}

const hj = new Person('형주', 35);
console.log(hj); // Person {name: "형주", age: 35}
타입스크립트의 Class 문법
class Person {
  name: string;
  age: number;

  constructor(name: string, age: number) {
    console.log('생성되었습니다');
    this.name = name;
    this.age = age;
  }
}

const hj = new Person('형주', 35); // 생성되었습니다
console.log(hj); // Person {name: '형주', age: 35}
class 내부 변수의 범위 - 타입스크립트
class Person {
  // 변수의 접근 범위도 지정 가능
  private name: string; // 이 클래스 안에서만 사용가능
  public age: number;
  readonly log: string; // 접근만 가능하고 실제 값은 수정 불가능

  constructor(name: string, age: number) {
    console.log('생성되었습니다.');
    this.name = name;
    this.age = age;
  }
}
Classes ————————
TypeScript는 ES2015에 도입된 class 키워드를 완벽하게 지원합니다.
다른 JavaScript 언어 기능과 마찬가지로 TypeScript는 타입 주석 및 기타 구문을 추가하여 클래스와 다른 타입간의 관계를 표현할 수 있도록 합니다.
Class Members ————————
다음은 가장 기본적인 클래스입니다.
비어있는 클래스입니다.
class Point {}
이 클래스는 아직 유용하지 않으므로 member를 추가해 보겠습니다.
Fields ————————
필드 선언은 클래스에 쓰기 가능한 공용 속성을 만듭니다.
class Point {
  x: number;
  y: number;
}

const pt = new Point();
pt.x = 0;
pt.y = 0;
다른 위치와 마찬가지로 타입 주석은 선택 사항이지만 지정하지 않으면 암시적으로 any입니다.
필드에는 이니셜라이저도 있을 수 있습니다.
클래스가 인스턴스화될 때 자동으로 실행됩니다.
class Point {
  x = 0;
  y = 0;
}

const pt = new Point();
// Prints 0, 0
console.log(`${pt.x}, ${pt.y}`);
const, let 및 var와 마찬가지로 클래스 속성의 이니셜라이저는 해당 유형을 유추하는 데 사용됩니다.
class Point {
  x = 0;
  y = 0;
}

const pt = new Point();
pt.x = "0"; // error
// Type 'string' is not assignable to type 'number'.
–strictPropertyInitialization ————————
true로 설정하면 클래스 속성이 선언되었지만 생성자에서 설정되지 않은 경우 TypeScript에서 오류가 발생합니다.
strictPropertyInitialization 설정은 클래스 필드를 생성자에서 초기화해야 하는지 여부를 제어합니다.
class BadGreeter {
  name: string; // error
  // Property 'name' has no initializer and is not definitely assigned in the constructor.
}
class GoodGreeter {
  name: string;

  constructor() {
    this.name = "hello";
  }
}
필드는 생성자 자체에서 초기화해야 합니다.
TypeScript는 초기화를 감지하기 위해 생성자에서 호출하는 메서드를 분석하지 않습니다.
파생(서브, 하위) 클래스가 해당 메서드를 재정의하고 멤버를 초기화하지 못할 수 있기 때문입니다.
생성자가 아닌 다른 수단을 통해 필드를 확실히 초기화하려는 경우(예: 외부 라이브러리가 클래스의 일부를 채우고 있을 수 있음) 한정 할당 어설션 연산자인 !를 사용할 수 있습니다.
class OKGreeter {
  // Not initialized, but no error
  name!: string;
}
readonly ————————
필드에는 readonly 수정자가 접두사로 붙을 수 있습니다.
이렇게 하면 생성자 외부의 필드에 대한 할당이 방지됩니다.
class Greeter {
  readonly name: string = "world";

  constructor(otherName?: string) {
    if (otherName !== undefined) {
      this.name = otherName;
    }
  }

  err() {
    this.name = "not ok"; // error
    // Cannot assign to 'name' because it is a read-only property.
  }
}
const g = new Greeter();
g.name = "also not ok"; // error
// Cannot assign to 'name' because it is a read-only property.
Constructors ————————
클래스 생성자는 함수와 매우 유사합니다.
타입 주석, 기본값 및 오버로드가 있는 매개변수를 추가할 수 있습니다.
class Point {
  x: number;
  y: number;

  // Normal signature with defaults
  constructor(x = 0, y = 0) {
    this.x = x;
    this.y = y;
  }
}
class Point {
  // Overloads
  constructor(x: number, y: string);
  constructor(s: string);
  constructor(xs: any, y?: any) {
    // TBD
  }
}
클래스 생성자 서명과 함수 서명 사이에는 몇가지 차이점이 있습니다.
- 생성자는 타입 매개변수를 가질 수 없습니다.
이는 나중에 배울 외부 클래스 선언에 속합니다. - 생성자는 반환 타입 주석을 가질 수 없습니다.
클래스 인스턴스 유형은 항상 반환되는 유형입니다.
Super Calls ————————
JavaScript에서와 마찬가지로 기본 클래스가 있는 경우 this를 사용하기 전에 생성자 본문에서 super()를 호출해야합니다.
class Base {
  k = 4;
}

class Derived extends Base {
  constructor() {
    // Prints a wrong value in ES5; throws exception in ES6
    console.log(this.k);
    // 'super' must be called before accessing 'this' in the constructor of a derived class.
    super();
  }
}
super를 호출하는 것을 잊어버리는 것은 JavaScript에서 저지르기 쉬운 실수이지만 TypeScript는 필요할 때 알려줄 것입니다.
Methods ————————
클래스의 함수 속성을 메서드라고 합니다.
메서드는 함수 및 생성자와 동일한 타입 주석을 모두 사용할 수 있습니다.
class Point {
  x = 10;
  y = 10;

  scale(n: number): void {
    this.x *= n;
    this.y *= n;
  }
}
표준 타입 주석 외에 TypeScript는 메소드에 새로운 것을 추가하지 않습니다.
메소드 본문 내에서 this.를 통해 필드 및 기타 메소드에 엑세스하는 것은 여전히 필수입니다.
메소드 본문의 규정되지 않은 이름은 항상 둘러싸는 범위의 무엇인가를 참조합니다.
let x: number = 0;

class C {
  x: string = "hello";

  m() {
    // This is trying to modify 'x' from line 1, not the class property
    x = "world"; // error
    // Type 'string' is not assignable to type 'number'.
  }
}
Getters / Setters ————————
클래스에는 접근자가 있을 수도 있습니다.
class C {
  _length = 0;
  get length() {
    return this._length;
  }
  set length(value) {
    this._length = value;
  }
}
class C {
    _length = 0;
    get length() {
        console.log('get');
        return this._length;
    }
    set length(value) {
        console.log('set');
        this._length = value;
    }
}

const a = new C();
a.length;
// get
// 0
a.length = 3;
// set
// 3
a._length;
// 3
a._length = 4;
// 4
추가 로직이 없는 필드 지원 get / set 쌍은 JavaScript에서 거의 유용하지 않습니다.get / set 작업 중에 추가 논리를 추가할 필요가 없는 경우 공개 필드를 노출하는 것이 좋습니다.
TypeScript에는 접근자에 대한 몇 가지 특별한 추론 규칙이 있습니다.
get이 존재하지만 설정되지 않은 경우 속성은 자동으로 읽기 전용입니다.setter매개변수의 유형이 지정되지 않은 경우getter의 반환 유형에서 유추됩니다.getter와setter는 동일한Member Visibility를 가져야 합니다.
TypeScript 4.3부터 다른 타입의 접근자를 가져오고 설정하는 것이 가능합니다.
class Thing {
  _size = 0;

  get size(): number {
    return this._size;
  }

  set size(value: string | number | boolean) {
    let num = Number(value);

    // Don't allow NaN, Infinity, etc

    if (!Number.isFinite(num)) {
      this._size = 0;
      return;
    }

    this._size = num;
  }
}
Index Signatures (인덱스 서명) ————————
클래스는 인덱스 서명을 선언할 수 있습니다.
이들은 다른 객체 유형에 대한 색인 서명과 동일하게 작동합니다.
class MyClass {
  [s: string]: boolean | ((s: string) => boolean);

  check(s: string) {
    return this[s] as boolean;
  }
}
인덱스 서명 유형은 메소드 유형도 캡처해야 하므로 이러한 유형을 유용하게 사용하기가 쉽지 않습니다.
일반적으로 인덱싱된 데이터는 클래스 인스턴스 자체가 아닌 다른 위치에 저장하는 것이 좋습니다.
Class Heritage (클래스 상속) ————————
객체 지향 기능이 있는 다른 언어와 마찬가지로 JavaScript의 클래스는 기본 클래스에서 상속할 수 있습니다.
implements Clauses (충족 구문) ————————
implements 구문을 사용하여 클래스가 특정 인터페이스를 충족하는지 확인할 수 있습니다.
클래스가 올바르게 구현하지 못하면 오류가 발생합니다.
interface Pingable {
  ping(): void;
}

class Sonar implements Pingable {
  ping() {
    console.log("ping!");
  }
}

class Ball implements Pingable { // error
  // Class 'Ball' incorrectly implements interface 'Pingable'.
  // Property 'ping' is missing in type 'Ball' but required in type 'Pingable'.
  pong() {
    console.log("pong!");
  }
}
클래스는 여러 인터페이스를 구현할 수도 있습니다.
(이렇게 작성하면 됩니다. class C implements A, B {})
Cautions (주의 사항) ————————
implements절은 클래스가 인터페이스 유형으로 처리될 수 있는지 확인하는 것일 뿐이라는 점을 이해하는 것이 중요합니다.
클래스의 유형이나 메서드는 전혀 변경하지 않습니다.
일반적인 오류 소스는 implements 절이 클래스 유형을 변경한다고 가정하는 것입니다.
그렇지 않습니다!
interface Checkable {
  check(name: string): boolean;
}

class NameChecker implements Checkable {
  check(s) { // error
    // Parameter 's' implicitly has an 'any' type.
    // Notice no error here
    return s.toLowercse() === "ok";
  }
}
s매개변수에any타입이라도 명시해야됩니다. 물론any라고 명시해도toLowercse메소드 에러를 잡아내진 못합니다.interface에서check메소드의 매개변수가string타입이라고 명시해놨지만,class안에서check메소드 안에서 해당 매개변수를string이라고 추론하진 못합니다.- 그 때문에
toLowercse메소드가 에러인지도 잡아내지 못합니다. - 즉,
check메소드의 매개변수s가string타입이란걸 명시해야toLowercse메소드 오류를 잡아냅니다.
implements로Checkable인터페이스를 충족하는지 검사하지만 이런 추론까지 다 연결되진 않습니다.
위 예에서 우리는 아마도 s의 유형이 check의 name: string 매개변수에 의해 영향을 받을 것이라고 예상했을 것입니다.
그렇지 않습니다.
implements 절은 클래스 본문이 확인되거나 해당 유형이 유추되는 방식을 변경하지 않습니다.
마찬가지로 선택적 속성을 사용하여 interface를 구현하면 해당 속성이 생성되지 않습니다.
interface A {
  x: number;
  y?: number;
}
class C implements A {
  x = 0;
}
const c = new C();
c.y = 10; // error
// Property 'y' does not exist on type 'C'.
extends Clauses ————————
클래스는 기본 클래스에서 extends 할 수 있습니다.
파생 클래스에는 기본 클래스의 모든 속성과 메소드가 있으며 추가 멤버도 정의합니다.
class Animal {
  move() {
    console.log("Moving along!");
  }
}

class Dog extends Animal {
  woof(times: number) {
    for (let i = 0; i < times; i++) {
      console.log("woof!");
    }
  }
}

const d = new Dog();
// Base class method
d.move();
// Derived class method
d.woof(3);
Overriding Methods ————————
파생 클래스는 기본 클래스 필드 또는 속성을 재정의할 수도 있습니다.
super를 사용할 수 있습니다.
super는 기본 클래스 메서드에 엑세스하는 구문입니다.
JavaScript 클래스는 단순한 조회 객체이기 때문에 super 필드라는 개념이 없습니다.
TypeScript는 파생 클래스가 항상 기본 클래스의 하위 유형이 되도록 합니다.
예를 들어, 다음은 메서드를 재정의하는 법적 방법입니다.
class Base {
  greet() {
    console.log("Hello, world!");
  }
}

class Derived extends Base {
  greet(name?: string) {
    if (name === undefined) {
      super.greet();
    } else {
      console.log(`Hello, ${name.toUpperCase()}`);
    }
  }
}

const d = new Derived();
d.greet();
d.greet("reader");
파생 클래스가 기본 클래스의 계약을 따르는 것이 중요합니다.
기본 클래스 참조를 통해 파생 클래스 인스턴스를 참조하는 것은 매우 일반적이고 항상 합법적이라는 것을 기억하십시오.
// Alias the derived instance through a base class reference
const b: Base = d;
// No problem
b.greet();
Derived가 Base의 계약을 따르지 않았다면?
class Base {
  greet() {
    console.log("Hello, world!");
  }
}

class Derived extends Base {
  // Make this parameter required
  greet(name: string) { // error
    // Property 'greet' in type 'Derived' is not assignable to the same property in base type 'Base'.
    // Type '(name: string) => void' is not assignable to type '() => void'.
    console.log(`Hello, ${name.toUpperCase()}`);
  }
}
오류에도 불구하고 이 코드를 컴파일하면 이 샘플은 충돌합니다.
const b: Base = new Derived();
// Crashes because "name" will be undefined
b.greet();
Type-only Field Declarations (유형 전용 필드 선언) ————————
target >= ES2022 또는 useDefineForClassFields가 true인 경우 클래스 필드는 상위 클래스 생성자가 완료된 후 초기화되어 상위 클래스에서 설정한 값을 덮어씁니다.
이것은 상속된 필드에 대해 보다 정확한 유형을 다시 선언하려는 경우에만 문제가 될 수 있습니다.
이러한 경우를 처리하기 위해 이 필드 declare에 대한 런타임 효과가 없어야함을 TypeScript에 나타내도록 선언을 작성할 수 있습니다.
interface Animal {
  dateOfBirth: any;
}

interface Dog extends Animal {
  breed: any;
}

class AnimalHouse {
  resident: Animal;
  constructor(animal: Animal) {
    this.resident = animal;
  }
}

class DogHouse extends AnimalHouse {
  // Does not emit JavaScript code,
  // only ensures the types are correct
  declare resident: Dog;
  constructor(dog: Dog) {
    super(dog);
  }
}
Initialization Order ————————
JavaScript 클래스가 초기화하는 순서는 경우에 따라 놀랄 수 있습니다.
이 코드를 고려해 보겠습니다.
class Base {
  name = "base";
  constructor() {
    console.log("My name is " + this.name);
  }
}

class Derived extends Base {
  name = "derived";
}

// Prints "base", not "derived"
const d = new Derived(); // My name is base
- 여기서 무슨일이 일어난거야?
JavaScript에서 정의한 클래스 초기화 순서는 다음과 같습니다.Base클래스 필드가 초기화됩니다.Base클래스 생성자가 실행됩니다.Derived클래스 필드가 초기화됩니다.Derived클래스 생성자가 실행됩니다.
이것은 Derived 클래스 필드 초기화가 아직 실행되지 않았기 때문에 Base 클래스 생성자가 생성한 name에 대한 값을 봤음을 의미합니다.
Inheriting Built-in Types (기본 제공 유형 상속) ————————
참고: Array, Error, Map 등과 같은 내장 유형을 상속할 계획이 없거나 컴파일 대상이 명시적으로 ES6/ES2015 이상으로 설정된 경우 이 섹션을 건너뛸 수 있습니다.
ES2015에서 객체를 반환하는 생성자는 암시적으로 모든 super(...) 호출자를 this 값으로 대체합니다.
생성된 생성자 코드는 super(...)의 잠재적인 반환 값을 캡쳐하고 이를 대체해야 합니다.
결과적으로 Error, Array 및 기타 하위 분류가 더 이상 예상대로 작동하지 않을 수 있습니다.
이는 Error, Array 등에 대한 생성자 함수가 프로토타입 체인을 조정하기 위해 ECMAScript 6의 new.target을 사용하기 때문입니다.
그러나 ECMAScript 5에서 생성자를 호출할 때 new.target에 대한 값을 보장할 방법이 없습니다.
다른 하위 컴파일러는 일반적으로 기본적으로 동일한 제한이 있습니다.
다음과 같은 하위 클래스의 경우:
class MsgError extends Error {
  constructor(m: string) {
    super(m);
  }
  sayHello() {
    return "hello " + this.message;
  }
}
다음을 찾을 수 있습니다.:
- 메서드는 이러한 하위 클래스를 구성하여 반환된 객체에서 정의되지 않을 수 있으므로
sayHello를 호출하면 오류가 발생합니다. instanceof는 하위 클래스의 인스턴스와 해당 인스턴스 사이에서 중단되므로(new MsgError()) instanceof MsgError는false를 반환합니다.
권장 사항으로 super(...) 호출 직후 프로토타입을 수동으로 조정할 수 있습니다.
class MsgError extends Error {
  constructor(m: string) {
    super(m);

    // Set the prototype explicitly.
    // prototype을 명시적으로 설정합니다.
    Object.setPrototypeOf(this, MsgError.prototype);
  }

  sayHello() {
    return "hello " + this.message;
  }
}
그러나 MsgError의 모든 하위 클래스도 수동으로 프로토타입을 설정해야 합니다.
Object.setPrototypeOf를 지원하지 않는 런타임의 경우 대신 __proto__를 사용할 수 있습니다.
불행히도 이러한 해결 방법은 Internet Explorer 10 및 이전 버전에서 작동하지 않습니다.
프로토타입에서 인스턴스 자체로 메서드를 수동으로 복사할 수 있지만(즉, MsgError.prototype이 여기에) 프로토타입 체인 자체는 수정할 수 없습니다.
Member Visibility ————————
TypeScript를 사용하여 특정 메서드나 속성이 클래스 외부의 코드에 표시되는지 여부를 제어할 수 있습니다.
public ————————
클래스 멤버의 기본 가시성은 public입니다.
public 멤버는 어디에서나 엑세스할 수 있습니다.
class Greeter {
  public greet() {
    console.log('hi!');
  }
}

const g = new Greeter();
g.greet();
public은 이미 기본 가시성 수정자이기 때문에 클래스 멤버에 작성할 필요가 없지만 스타일/가독성을 위해 선택할 수 있습니다.
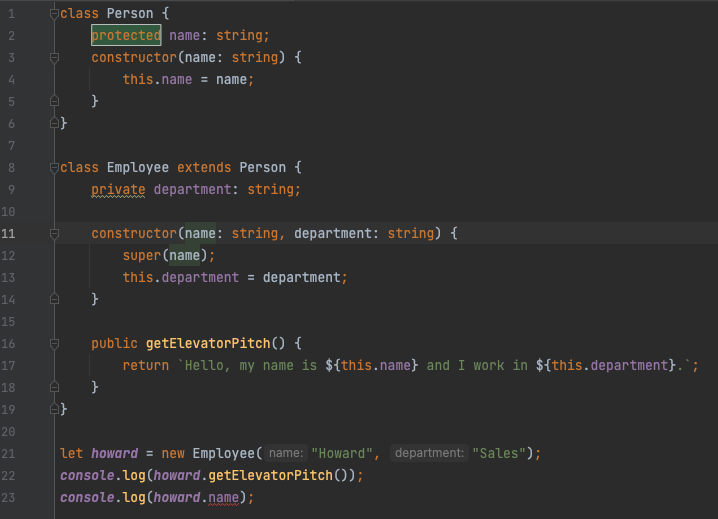
protected ————————
protected 멤버는 선언된 클래스의 하위 클래스에서만 볼 수 있습니다.
class Greeter {
  public greet() {
    console.log("Hello, " + this.getName());
  }
  protected getName() {
    return "hi";
  }
}

class SpecialGreeter extends Greeter {
  public howdy() {
    // OK to access protected member here
    console.log("Howdy, " + this.getName());
  }
}
const g = new SpecialGreeter();
g.greet(); // OK
g.howdy(); // OK
g.getName(); // error
// Property 'getName' is protected and only accessible within class 'Greeter' and its subclasses.
Exposure of protected members ————————
파생(서브, 하위) 클래스는 기본 클래스 계약을 따라야하지만 더 많은 기능을 가진 기본 클래스의 하위 유형을 노출하도록 선택할 수 있습니다.
여기에는 protected된 member를 공개하는 것이 포함됩니다.
class Base {
  protected m = 10;
}
class Derived extends Base {
  // No modifier, so default is 'public'
  m = 15;
}
const d = new Derived();
console.log(d.m); // OK
Derived는 이미 m을 자유롭게 읽고 쓸 수 있으므로 이 상황의 ‘보안'을 의미 있게 변경하지 않습니다.
여기서 주목해야할 주요 사항은 파생 클래스에서 이러한 노출이 의도되지 않은 경우 protected modifier를 반복하는데 주의해야 한다는 것입니다.
Cross-hierarchy protected access (계층간 보호 엑세스) ————————
다른 OOP 언어는 기본 클래스 참조를 통해 보호되는 멤버에 엑세스하는 것이 합법적인지 여부에 대해 동의하지 않습니다.
class Base {
  protected x: number = 1;
}
class Derived1 extends Base {
  protected x: number = 5;
}
class Derived2 extends Base {
  f1(other: Derived2) {
    other.x = 10;
  }
  f2(other: Base) {
    other.x = 10; // error
    // Property 'x' is protected and only accessible through an instance of class 'Derived2'. This is an instance of class 'Base'.
  }
}
예를 들어, Java는 이를 합법적인 것으로 간주합니다.
반면에 C#과 C++는 이 코드가 불법이어야 한다고 선택했습니다.
TypeScript는 C# 및 C++와 함께 사용합니다.
Derived2의 x에 엑세스하는 것은 Derived2의 하위 클래스에서만 합법적이어야 하고 Derived1은 그 중 하나가 아니기 때문입니다.
더욱이 Derived1 참조를 통해 x에 엑세스하는 것이 불법인 경우(확실히 그래야합니다!) 기본 클래스 참조를 통해 x에 엑세스하면 상황이 개선되지 않습니다.
파생 클래스에서 보호된 멤버에 엑세스할 수 없는 이유도 참조하십시오.
C#의 추론을 더 많이 설명합니다.
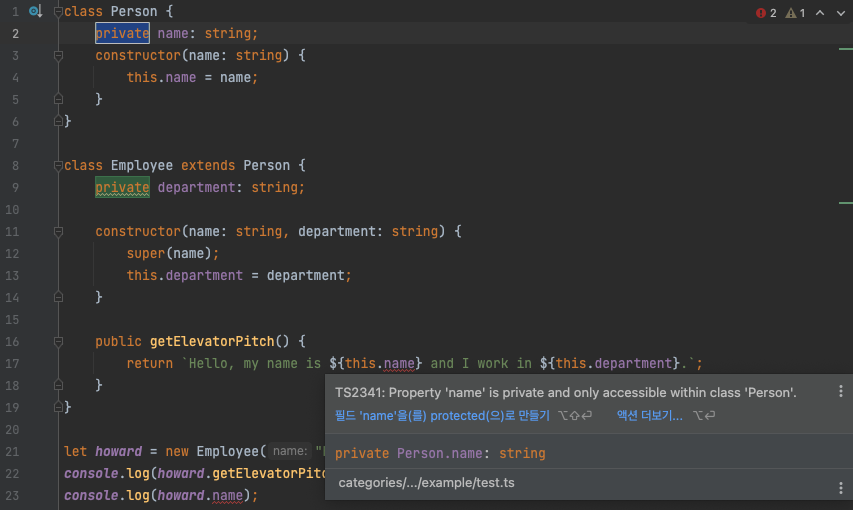
private ————————
private는 protected와 비슷하지만 하위 클래스에서도 멤버에 대한 엑세스를 허용하지 않습니다.
class Base {
  private x = 0;
}
const b = new Base();
// Can't access from outside the class
console.log(b.x); // error
// Property 'x' is private and only accessible within class 'Base'.
class Derived extends Base {
  showX() {
    // Can't access in subclasses
    console.log(this.x); // error
    // Property 'x' is private and only accessible within class 'Base'.
  }
}
private 멤버는 파생 클래스에서 볼 수 없기 때문에 파생 클래스는 가시성을 높일 수 없습니다.
class Base {
  private x = 0;
}
class Derived extends Base {
  // Class 'Derived' incorrectly extends base class 'Base'.
  // Property 'x' is private in type 'Base' but not in type 'Derived'.
  x = 1;
}
Cross-instance private access (인스턴스간 비공개 엑세스) ————————
다른 OOP 언어는 동일한 클래스의 다른 인스턴스가 서로의 private 멤버에 엑세스할 수 있는지 여부에 대해 동의하지 않습니다.
JAVA, C#, C++, Swift 및 PHP와 같은 언어는 이를 허용하지만 Ruby는 허용하지 않습니다.
TypeScript는 인스턴스간 private 접근을 허용합니다.
class A {
  private x = 10;

  public sameAs(other: A) {
    // No error
    return other.x === this.x;
  }
}
Caveats (주의 사항) ————————
TypeScript 타입 시스템의 다른 측면과 마찬가지로 private 및 protected는 타입 검사 중에만 적용됩니다.
즉, in 또는 단순 속성 조회와 같은 JavaScript 런타임 구성은 여전히 private 또는 protected 멤버에 엑세스 할 수 있습니다.
class MySafe {
  private secretKey = 12345;
}
// In a JavaScript file...
const s = new MySafe();
// Will print 12345
console.log(s.secretKey);
private은 또한 타입 검사 중에 대괄호 표기법을 사용하여 액세스할 수 있습니다.
이렇게 하면 private-declared 필드가 단위 테스트와 같은 항목에 대해 잠재적으로 더 쉽게 액세스할 수 있지만 이러한 필드는 soft private이고 개인 정보를 엄격하게 적용하지 않는다는 단점이 있습니다.
class MySafe {
  private secretKey = 12345;
}

const s = new MySafe();

// Not allowed during type checking
console.log(s.secretKey); // error
// Property 'secretKey' is private and only accessible within class 'MySafe'.

// OK
console.log(s["secretKey"]);
TypeScript의 private와 달리 JavaScript의 private 필드(#)는 컴파일 후 비공개로 유지되며 이전에 언급한 대괄호 표기법 액세스와 같은 이스케이프 해치를 제공하지 않아 hard private이 됩니다.
class Dog {
  #barkAmount = 0;
  personality = "happy";

  constructor() {}
}
"use strict";
class Dog {
    #barkAmount = 0;
    personality = "happy";
    constructor() { }
}
ES2021 이하로 컴파일할 때 TypeScript는 # 대신 WeakMaps를 사용합니다.
"use strict";
var _Dog_barkAmount;
class Dog {
    constructor() {
        _Dog_barkAmount.set(this, 0);
        this.personality = "happy";
    }
}
_Dog_barkAmount = new WeakMap();
악의적인 행위자로부터 클래스의 값을 보호해야 하는 경우, 클로져, WeakMaps 또는 private field와 같은 엄격한 런타임 개인 정보를 제공하는 매커니즘을 사용해야 합니다.
런타임 중에 이러한 추가된 개인 정보 확인은 성능에 영향을 미칠 수 있습니다.
Static Members ————————
클래스에는 static 멤버가 있을 수 있습니다.
이 멤버는 클래스의 특정 인스턴스와 연결되지 않습니다.
클래스 생성자 객체 자체를 통해 액세스할 수 있습니다.
class MyClass {
  static x = 0;
  static printX() {
    console.log(MyClass.x);
  }
}
console.log(MyClass.x);
MyClass.printX();
static 멤버는 동일한 public, protected 및 private 가시성 수정자를 사용할 수도 있습니다.
class MyClass {
  private static x = 0;
}
console.log(MyClass.x); // error
// Property 'x' is private and only accessible within class 'MyClass'.
static 멤버도 상속됩니다.
class Base {
  static getGreeting() {
    return "Hello world";
  }
}
class Derived extends Base {
  myGreeting = Derived.getGreeting();
}
Special Static Names ————————
일반적으로 Function 프로토타입의 속성을 덮어쓰는 것은 안전하지 않거나 불가능합니다.
클래스는 그 자체로 new로 호출할 수 있는 함수이기 때문에 특정 static 이름을 사용할 수 없습니다.
name, length 및 call과 같은 함수 속성은 static 멤버로 정의하는 데 유효하지 않습니다.
class S {
  static name = "S!";
  // Static property 'name' conflicts with built-in property 'Function.name' of constructor function 'S'.
}
Why No Static Classes? (정적 클래스가 없는 이유?) ————————
TypeScript(그리고 JavaScript)에는 예를 들어 C#과 같은 방식으로 정적 클래스라는 구성이 없습니다.
이러한 구조는 해당 언어가 모든 데이터와 함수를 클래스 내부에 강제로 포함하기 때문에 존재합니다.
TypeScript에는 해당 제한 사항이 없으므로 필요하지 않습니다.
단일 인스턴스만 있는 클래스는 일반적으로 JavaScript, TypeScript에서 일반 개체로 표시됩니다.
예를 들어, TypeScript에서는 정적 클래스 구문이 필요하지 않습니다.
일반 객체(또는 최상위 함수)도 이 작업을 수행하기 때문입니다.
// Unnecessary "static" class
class MyStaticClass {
  static doSomething() {}
}

// Preferred (alternative 1)
function doSomething() {}

// Preferred (alternative 2)
const MyHelperObject = {
  dosomething() {},
};
static Blocks in Classes (클래스의 정적 블록) ————————
static Blocks을 사용하면 포함하는 클래스 내의 개인 필드에 엑세스할 수 있는 자체 범위가 있는 일련의 명령문을 작성할 수 있습니다.
이것은 우리가 문장을 작성할 수 있는 능력, 변수 누출이 없고, 클래스 내부에 대한 완전한 접근을 가진 초기화 코드를 작성할 수 있다는 것을 의미합니다.
class Foo {
    static #count = 0;

    get count() {
        return Foo.#count;
    }

    static {
        try {
            const lastInstances = loadLastInstances();
            Foo.#count += lastInstances.length;
        }
        catch {}
    }
}
Generic Classes ————————
인터페이스와 마찬가지로 클래스는 제네릭일 수 있습니다.
제네릭 클래스가 new로 인스턴스화되면 해당 유형 매개변수는 함수 호출에서와 같은 방식으로 유추됩니다.
class Box<Type> {
  contents: Type;
  constructor(value: Type) {
    this.contents = value;
  }
}

const b = new Box("hello!");
// const b: Box<string>
클래스는 인터페이스와 동일한 방식으로 제네릭 제약 조건 및 기본값을 사용할 수 있습니다.
Type Parameters in Static Members (정적 멤버의 타입 매개변수) ————————
이 코드는 합법적이지 않으며 그 이유가 명확하지 않을 수 있습니다.
(그냥 static 멤버는 제네릭으로 넘어오는 타입을 참조할 수 없다는 뜻인듯. 그게 규칙인듯. 그래서 왜 이런건지는 명확한 이유가 없다는 뜻인듯)
class Box<Type> {
  static defaultValue: Type; // error
  // Static members cannot reference class type parameters.
  // 정적 맴버는 클래스 타입 매개변수를 참조할 수 없습니다.
}
유형은 항상 완전히 지워집니다.
런타임에는 Box.defaultValue 속성 슬롯이 하나만 있습니다.
이는 Box<string>.defaultValue(가능한 경우)를 설정하면 Box<number>.defaultValue로도 변경된다는 것을 의미합니다.
이는 좋지 않습니다.
제네릭 클래스의 static 멤버는 클래스의 형식 매개변수를 참조할 수 없습니다.
this at Runtime in Classes (클래스의 런타임에서의 this) ————————
TypeScript는 JavaScript의 런타임 동작을 변경하지 않으며 JavaScript는 몇가지 독특한 런타임 동작으로 유명하다는 것을 기억하는 것이 중요합니다.
this에 대한 JavaScript의 처리는 실제로 이례적입니다.
class MyClass {
  name = "MyClass";
  getName() {
    return this.name;
  }
}
const c = new MyClass();
const obj = {
  name: "obj",
  getName: c.getName,
};

// Prints "obj", not "MyClass"
console.log(obj.getName());
간단히 말해서 기본적으로 함수 내부의 this 값은 함수가 호출된 방식에 따라 다릅니다.
이 예제에서 함수는 obj 참조를 통해 호출되었기 때문에 this의 값은 클래스 인스턴스가 아니라 obj였습니다.
이것은 당신이 원하는 일이 거의 없습니다!
TypeScript는 이러한 종류의 오류를 완화하거나 방지하는 몇 가지 방법을 제공합니다.
Arrow Function ————————
this 컨텍스트를 잃는 방식으로 자주 호출되는 함수가 있는 경우, 메서드 정의 대신 화살표 함수 속성을 사용하는 것이 합리적일 수 있습니다.
class MyClass {
  name = "MyClass";
  getName = () => {
    return this.name;
  };
}
const c = new MyClass();
const g = c.getName;
// Prints "MyClass" instead of crashing
console.log(g());
여기에는 몇 가지 장단점이 있습니다.
this값은TypeScript로 확인되지 않은 코드의 경우에도 런타임시 정확함을 보장합니다.- 이렇게 하면 각 클래스 인스턴스가 이러한 방식으로 정의된 각 함수의 고유한 복사본을 갖기 때문에 더 많은 메모리를 사용합니다.
프로토타입 체인으로 가져올 수 없기 때문에 복사되는 건가?
그래서 메모리가 더 많이 사용되는 건가?
화살표 함수에 이런 단점이 있었다니.. 몰랐네.. - 파생 클래스에서는
super.getName을 사용할 수 없습니다. 프로토타입 체인에 기본 클래스 메서드를 가져올 항목이 없기 때문입니다.
![]()
![]()
this parameters ————————
메소드 또는 함수 정의에서 this라는 초기 매개변수는 TypeScript에서 특별한 의미를 갖습니다.
다음 매개변수는 컴파일 중에 지워집니다.
// TypeScript input with 'this' parameter
function fn(this: SomeType, x: number) {
  /* ... */
}
// JavaScript output
function fn(x) {
  /* ... */
}
TypeScript는 this 매개변수를 사용하여 함수를 호출하는 것이 올바른 컨텍스트에서 수행되는지 확인합니다.
화살표 함수를 사용하는 대신 메서드 정의에 이 매개변수를 추가하여 메서드가 올바르게 호출되도록 정적으로 적용할 수 있습니다.
class MyClass {
  name = "MyClass";
  getName(this: MyClass) {
    return this.name;
  }
}
const c = new MyClass();
// OK
c.getName();

// Error, would crash
const g = c.getName;
console.log(g());
// The 'this' context of type 'void' is not assignable to method's 'this' of type 'MyClass'.
이 방법은 화살표 함수 접근 방식의 반대 트레이드오프를 만듭니다.
JavaScript호출자는 인식하지 못한 채 여전히 클래스 메서드를 잘못 사용할 수 있습니다.- 클래스 인스턴스당 하나가 아닌 클래스 정의당 하나의 함수만 할당됩니다.
- 기본 메서드 정의는 여전히
super를 통해 호출할 수 있습니다.
this Types ————————
클래스에서 this라는 특수 유형은 현재 클래스의 유형을 동적으로 참조합니다.
이것이 얼마나 유용한지 봅시다.
class Box {
  contents: string = "";
  set(value: string) { // (method) Box.set(value: string): this
    this.contents = value;
    return this; // 반환값으로 this를 return한다.
  }
}
여기서 TypeScript는 집합의 반환 유형을 Box가 아닌 this로 유추했습니다.
이제 Box의 하위 클래스를 만들어 보겠습니다.
class ClearableBox extends Box {
  clear() {
    this.contents = "";
  }
}

const a = new ClearableBox();
const b = a.set("hello"); // a.set 메소드는 this를 return한다. 여기서 this는 a, 즉, ClearableBox 인스턴스이다.
// const b: ClearableBox // 그래서 이렇게 b의 타입이 ClearableBox로 추론되는 것이다.
매개변수 유형 주석에서 this를 사용할 수도 있습니다.
class Box {
  content: string = "";
  sameAs(other: this) { // other 매개변수의 타입을 this로 지정했다.
    return other.content === this.content;
  }
}
이것은 other를 작성하는 것과 다릅니다.
Box - 파생 클래스가 있는 경우 sameAs 메서드는 이제 동일한 파생 클래스의 다른 인스턴스만 허용합니다.
class Box {
  content: string = "";
  sameAs(other: this) {
    return other.content === this.content;
  }
}

class DerivedBox extends Box {
  otherContent: string = "?";
}

const base = new Box();
const derived = new DerivedBox();
derived.sameAs(base); // error
// Argument of type 'Box' is not assignable to parameter of type 'DerivedBox'.
// Property 'otherContent' is missing in type 'Box' but required in type 'DerivedBox'.

// derived는 DerivedBox의 인스턴스이다. 즉, 인스턴스가 생성될 때 sameAs 메서드의 other 매개변수의 타입이 정의되었다.
// 바로 this, 즉, derived 자신이다. 즉, DerivedBox가 other 매개변수의 타입으로 정의되었다.
// 그런데 매개변수로 base를 전달했으니 타입이 일치하지 않는다. 때문에 에러가 발생한 것이다.
this - based type guards ————————
클래스 및 인터페이스의 메서드에 대한 return 위치에서 this type을 사용할 수 있습니다.
타입 축소(예: if문)와 혼합되면 대상 개체의 유형이 지정된 유형으로 축소됩니다.
class FileSystemObject {
  // this를 FileRep으로 정의했다.
  // 이 isFile 메서드를 호출하는 대상은 FileRep 인스턴스여야 할 것이다.
  isFile(): this is FileRep {
    return this instanceof FileRep;
  }

  // this를 Directory로 정의했다.
  // 이 isDirectory 메서드를 호출하는 대상은 Directory 인스턴스여야 할 것이다.
  isDirectory(): this is Directory {
    return this instanceof Directory;
  }

  // this를 Networked & this로 정의했다.
  // Networked는 interface이다.
  // this는 현재 클래스를 가리킨다.
  // 즉, isNetworked 메서드를 호출하는 대상은 interface Networked와 FileSystemObject의 멤버를 다 가지고있는 개체여야 할 것이다.
  // 즉, 현재 FileSystemObject의 필드는 path, networked.. 가 있고, interface Networked의 속성은 host가 있다. 이를 충족시켜야된다.
  isNetworked(): this is Networked & this {
    return this.networked;
  }
  constructor(public path: string, private networked: boolean) {}
}

class FileRep extends FileSystemObject {
  constructor(path: string, public content: string) {
    super(path, false);
  }
}

class Directory extends FileSystemObject {
  children: FileSystemObject[];
}

interface Networked {
  host: string;
}

const fso: FileSystemObject = new FileRep("foo/bar.txt", "foo");

// 타입 가드, 타입 축소 -------------
if (fso.isFile()) {
  fso.content;
} else if (fso.isDirectory()) {
  fso.children;
} else if (fso.isNetworked()) {
  fso.host;
}
this 기반 타입 가드의 일반적인 사용 사례는 특정 필드의 지연 유효성 검사(lazy validation)를 허용하는 것입니다.
예를 들어 이 경우는 hasValue가 true로 확인되었을 때 box 안에 있는 값에서 undefined를 제거합니다.
class Box<T> {
  value?: T;

  hasValue(): this is { value: T } {
    return this.value !== undefined;
  }
}

const box = new Box();
box.value = "Gameboy";

box.value; // (property) Box<unknown>.value?: unknown
// 클래스 안에 value라는 필드는 무조건 있는 거.. 그런데 여기서 그럼 ?는 무슨 의미일까..
// 아 여기서 ?도 있는지 없는지는 모르지만, 클래스 내부에서 위와 같이 기재되어있으면 일단 있다고 판단하는건가본데?
// 여튼 여기서는 value가 있다는 가정에서 box.value를 에러로 처리 안하고, 대신 타입을 위와 같이 추론..

// 그리고 this.value 값이 undefined가 아니라면!
if (box.hasValue()) {
  box.value; // (property) value: unknown // 이렇게 추론된다.
}
Parameter Properties ————————
TypeScript는 생성자 매개변수를 동일한 이름과 값을 가진 클래스 속성으로 바꾸는 특수 구문을 제공합니다.
이를 매개변수 속성이라고하며 가시성 수정자 public, private, protected 또는 readonly 중 하나를 생성자 인수에 접두사로 붙여 생성됩니다.
결과 필드는 다음 수정자를 가져옵니다.
class Params {
  constructor (
    public readonly x: number,
    protected y: number,
    private z: number,
  ) {
    // No body necessary
  }
}
const a = new Params(1, 2, 3);
console.log(a.x); // (property) Params.x: number
console.log(a.z); // error
// Property 'z' is private and only accessible within class 'Params'.
Class Expressions (클래스 표현식) ————————
클래스 표현식은 클래스 서넝ㄴ과 매우 유사합니다.
유일한 실제 차이점은 클래스 표현식에 이름이 필요하지 않다는 것입니다.
하지만 바인딩된 식별자를 통해 클래스 표현식을 참조할 수는 있습니다.
const someClass = class<Type> {
  content: Type;
  constructor (value: Type) {
    this.content = value;
  }
}

const m = new someClass("Hello, world");
// const m: someClass<string>
abstract Classes and Members (추상 클래스 및 멤버) ————————
TypeScript의 클래스, 메서드 및 필드는 추상적일 수 있습니다.
추상 메서드 또는 추상 필드는 구현이 제공되지 않은 것입니다.
이러한 멤버는 직접 인스턴스화할 수 없는 추상 클래스 내부에 있어야합니다.
추상 클래스의 역할은 모든 추상 멤버를 구현하는 하위 클래스의 기본 클래스 역할을 하는 것입니다.
클래스에 추상 멤버가 없는 경우 이를 구체(concrete)라고 합니다.
예를 살펴보겠습니다.
abstract class Base {
  abstract getName(): string;

  printName() {
    console.log("Hello, " + this.getName());
  }
}

const b = new Base();
// Cannot create an instance of an abstract class.
Base는 추상적이기 때문에 new로 인스턴스화 할 수 없습니다.
대신 파생 클래스를 만들고 추상 멤버를 구현해야 합니다.
class Derived extends Base {
  getName() {
    return "world";
  }
}

const d = new Derived();
d.printName();
기본 클래스의 추상 멤버 구현을 잊어버리면 오류가 발생합니다.
class Derived extends Base { // error
  // Non-abstract class 'Derived' does not implement inherited abstract member 'getName' from class 'Base'.
}
Abstract Construct Signatures (추상 구상 서명) ————————
때로는 추상 클래스에서 파생된 클래스의 인스턴스를 생성하는 클래스 생성자 함수를 수락하고 싶을 때가 있습니다.
예를 들어 다음 코드를 작성할 수 있습니다.
function greet(ctor: typeof Base) {
  const instance = new ctor(); // error
  // Cannot create an instance of an abstract class.
  instance.printName();
}
TypeScript는 추상 클래스를 인스턴스화 하려고 한다고 올바르게 알려줍니다.
결국, greet의 정의가 주어지면 이 코드를 작성하는 것은 완벽하게 합법적이며 결국 추상 클래스를 구성하게 됩니다.
abstract class Base {
    abstract getName(): string;

    printName() {
        console.log("Hello, " + this.getName());
    }
}

function greet(ctor: typeof Base) { // 생성자 함수가 Base 클래스 생성자 함수 유형이어야 한다는 뜻이다.
    const instance = new ctor(); // new ctor(); 이 코드가 error // Base는 추상 클래스이므로 Base 추상 클래스 생성자 함수 유형이라는 것만으로 에러발생
    // Cannot create an instance of an abstract class.
    // 추상 클래스의 인스턴스를 생성할 수 없다.
    instance.printName();
}

// Bad!
greet(Base); // TypeScript에서 여기서 error가 발생하진 않음
대신 구성 서명이 있는 무언가를 받아들이는 함수를 작성하길 원합니다.
abstract class Base {
    abstract getName(): string;

    printName() {
        console.log("Hello, " + this.getName());
    }
}

class Derived extends Base {
  getName() {
    return "world";
  }
}

function greet(ctor: new () => Base) { // 이렇게 매개변수 타입을 정의하면, (new () 즉, 생성자 함수가 Base 클래스 유형의 인스턴스를 반환한다는 뜻이다.)
  const instance = new ctor();
  instance.printName();
}
greet(Derived);
greet(Base); // error // TypeScript에서 이곳에서 에러가 난다.
// Argument of type 'typeof Base' is not assignable to parameter of type 'new () => Base'.
// 'typeof Base' 유형의 인수는 'new () => Base' 유형의 매개변수에 할당할 수 없습니다.
// Cannot assign an abstract constructor type to a non-abstract constructor type.
// 추상 생성자 유형을 비추상 생성자 유형에 할당할 수 없습니다.
이제 TypeScript는 호출할 수 있는 클래스 생성자 함수에 대해 올바르게 알려줍니다.
Derived는 구체적이기 때문에 호출할 수 있지만 Base는 호출할 수 없습니다.
Relationships Between Classes (클래스간 관계) ————————
대부분의 경우 TypeScript의 클래스는 다른 유형과 마찬가지로 구조적으로 비교됩니다.
예를 들어, 이 두 클래스는 동일하기 때문에 서로 대신 사용할 수 있습니다.
class Point1 {
  x = 0;
  y = 0;
}

class Point2 {
  x = 0;
  y = 0;
}

// OK
const p: Point1 = new Point2();
유사하게, 명시적 상속이 없더라도 클래스간의 하위 유형 관계는 존재합니다.
class Person {
  name: string;
  age: number;
}

class Employee {
  name: string;
  age: number;
  salary: number;
}

// OK
const p: Person = new Employee();
이것은 간단하게 들리지만 다른 것보다 낯설게 보이는 몇 가지 경우가 있습니다.
빈 클래스에는 멤버(구성원)가 없습니다.
구조적 유형 시스템에서 멤버가 없는 유형은 일반적으로 다른 것의 상위 유형입니다.
따라서 빈 클래스를 작성하면(하지 마세요!), 그 대신 어떤 것도 사용할 수 있습니다.
class Empty {}

function fn(x: Empty) {
  // can't do anything with 'x', so I won't
}

// All OK!
fn(window);
fn({});
fn(fn);
제네릭 (Generics)
- 제네릭은 C#, JAVA 등의 언어에서 재사용성이 높은 컴포넌트를 만들 때 자주 사용되는 기능임
- 특히, 한가지 타입보다 여러가지 타입에서 동작하는 컴포넌트를 생성하는데 사용됨
제네릭 한줄 정의와 예시
- 제네릭이란 타입을 마치 함수의 파라미터처럼 사용하는 것을 의미
function getText<T>(text: T): T {
  return text;
}

getText<string>('hi'); // hi
getText<number>(10); // 10
getText<boolean>(true); // true

// 위 어떠한 경우에서도 에러가 발생하지 않는다.
// 파라미터 타입, 함수 반환 타입을 제네릭으로 설정해주기 때문이다.
제네릭을 사용하는 이유
function logText(text: string): string {
  return text;
}
- 위 함수의 인자와 반환값을 여러 가지 타입을 모두 허용하고 싶다면 아래와 같이
any타입을 이용해야됨
function logText(text: any): any {
  return text;
}
- 하지만 위와 같이
any타입으로 수정하면 인자로 어떤 타입이 들어가고 어떤 타입이 반환되는지 추론할 수가 없다. - 왜냐하면
any라는 타입은 타입 추론을 하지 않기 때문 - 이를 해결하기 위해 제네릭 사용
function logText<T>(text: T): T {
  return text;
}

// #1
const text = logText<string>("Hello Generic");
// #2
const text = logText("Hello Generic");
- 보통
#2방법이 코드도 더 짧고 가독성이 좋기 때문에 사용 - 하지만 만약 복잡한 코드에서
#2코드로 타입 추론이 되지 않는다면#1코드를 사용하면됨
제네릭 타입 변수
function logText<T>(text: T): T {
  console.log(text.length); // Error: T doesn't have .length
  return text;
}
- 위 코드를 컴파일할 때, 컴파일러에서 위와 같은 에러 발생
- 왜냐하면
text인자에length프로퍼티가 있다는 단서는 어디에도 없기 때문 - 이럴 경우엔 아래와 같이 정의해주면 됨
function logText<T>(text: T[]): T[] {
  console.log(text.length); // text 인자의 타입이 배열이기 때문에 length 프로퍼티를 허용
  return text;
}
function logText<T>(text: Array<T>): Array<T> {
  console.log(text.length); // text 인자의 타입이 배열이기 때문에 length 프로퍼티를 허용
  return text;
}
제네릭 타입
- 아래
#1,#2코드는 같은 의미
function logText<T>(text: T): T {
  return text;
}
// #1 // str 변수에 logText 함수를 할당 // logText 함수의 타입은 <T>(text: T) => T
let str: <T>(text: T) => T = logText;
// #2 // str 변수에 logText 함수를 할당 // logText 함수의 타입은 {<T>(text: T): T}
let str: {<T>(text: T): T} = logText;
- 위 코드를
interface형태로 작성한다면?
interface GenericLogTextFn {
  <T>(text: T): T;
}
function logText<T>(text: T): T {
  return text;
}
let myString: GenericLogTextFn = logText; // Okay
- 위 코드에서 만약
interface에 인자 타입을 강조하고 싶다면?
interface GenericLogTextFn<T> {
  (text: T): T;
}
function logText<T>(text: T): T {
  return text;
}
let myString: GenericLogTextFn<string> = logText;
- 이와 같은 방식으로 제네릭
interface뿐만 아니라class도 생성할 수 있음 - 다만,
enum과namespace는 제네릭으로 생성할 수 없다.
제네릭 클래스
class GenericMath<T> {
  pi: T;
  sum: (s: T, y: T) => T;
}

let math = new GenericMath<number>();
- 제네릭
class를 선언할 때class이름 오른쪽에<T>를 붙여준다. - 그리고 해당 클래스로 인스턴스를 생성할 때 타입에 어떤 값이 들어갈지를 지정하면 된다.
- 조금 전에 살펴본
interface처럼 제네릭class도class안에 정의된 속성들이 정해진 타입으로 잘 동작하게 보장할 수 있다.
WARNING
참고! Generic classes are only generic over their instance side rather than their static side, so when working with classes, static members can not use the class’s type parameter
제네릭 클래스는 정적 측면이 아닌 인스턴스 측면에서만 제네릭이므로 클래스로 작업할 때 정적 멤버는 클래스의 유형 매개변수를 사용할 수 없습니다.
제네릭 제약 조건
제네릭 타입 변수에서 살펴본 내용 말고도 제네릭 함수에 어느정도 타입 추론 힌트를 줄 수 있는 방법이 있음- 잠시 이전 코드를 보겠음
function logText<T>(text: T): T {
  console.log(text.length); // Error: T doesn't have .length
  return text;
}
- 인자의 타입에 선언한
T는 아직 어떤 타입인지 구체적으로 정의하지 않았기 때문에length프로퍼티를 추론할 수 없다. - 이럴 때 만약 해당 타입을 정의하지 않고도
length프로퍼티 정도는 허용하려면 아래와 같이 작성한다.
interface LengthWise {
  length: number;
}

function logText<T extends LengthWise>(text: T): T {
  console.log(text.length);
  return text;
}

logText(10); // Error, 숫자 타입에는 length 프로퍼티가 존재하지 않으므로 오류 발생
logText({ length: 0, value: 'hi' }); // text.length 코드는 객체의 속성 접근 같이 동작하므로 오류 없음
- 위와 같이 작성하게되면 타입에 대한 강제는 아니지만
length에 대해 동작하는 인자만 넘겨받을 수 있게된다.
제네릭: 객체의 속성을 제약하는 방법
- 두 객체를 비교할 때도 제네릭 제약 조건을 사용할 수 있음
function getProperty<T, O extends keyof T>(obj: T, key: O) {
  return obj[key];
}
let obj = { a: 1, b: 2, c: 3 };

getProperty(obj, "a"); // okay
getProperty(obj, "z"); // error: "z"는 "a", "b", "c" 속성에 해당하지 않습니다.
- 제네릭을 선언할 때
<O extends keyof T>부분에서 첫 번째 인자로 받는 객체에 없는 속성들은 접근할 수 없게끔 제한함
제네릭의 기본 문법
function getText<T>(text: T): T {
    return text;
}

getText<string>('hi');
getText<number>(10);
getText<boolean>(true);
기존 타입 정의 방식과 제네릭의 차이점 - 함수 중복 선언의 단점
function logText(text: string) {
    console.log(text);
    text.split('').reverse().join('');
    return text;
}

logText('a');
logText(10); // error
logText(true); // error
- 위의 에러를 해결하기 위해 아래와 같이 코드 중복 작성
- 코드를 중복 작성하게되면 유지보수 측면에서 안좋게 됨
- 같은 형식의 코드를 계속해서 생성해나가야하기 때문
- 제네릭을 사용하면 이런 문제를 해결할 수 있음
function logText(text: string) {
    console.log(text);
    return text;
}

function logNumber(num: number) {
    console.log(num);
    return num;
}

logText('a');
logNumber(10);
기존 문법과 제네릭의 차이점 - 유니온 타입을 이용한 선언 방식의 문제점
유니온 타입
function logText(text: string | number) {
    console.log(text);
    return text;
}

logText('a');
logText(10);
유니온 타입 단점
- 이렇게 유니온 타입은
input에 대한 것은 해결하지만 반환값에 대한 문제는 해결하지 못하는 단점이 있다.
function logText(text: string | number) {
    console.log(text);
    text. // 속성들을 볼 때 string과 number의 교집합, string과 number에 모두 있는 속성들에 대해서만 preview를 제공한다.
          // 이 함수 내부에서의 text의 타입은 string 또는 number가 된다.
    return text;
}

logText('a');
logText(10);
function logText(text: string | number) {
    console.log(text);
    return text;
}

const a = logText('a'); // 또한 변수 a에 담긴 값을 추론할 때 string 또는 number라고 추론한다. 왼쪽과 같이 string이 담김에도 불구하고.
a.split(''); // error: 따라서 a에 string이 들어왔음에도 불구하고 왼쪽처럼 split 메소드를 사용하면 error가 발생한다.
// 정확하게 a의 타입이 string이라고 추론이 되어야만 split 메소드를 사용할 수 있다.
// 왜냐하면 number라면 split이 없으므로.
logText(10);
제네릭의 장점과 타입 추론에서의 이점
function logText<T>(text: T): T {
  console.log(text);
  return text;
}

const str = logText<string>('a');
str.split(''); // 타입 추론할 때 error가 발생하지 않는다. str에 string 타입의 데이터가 들어왔다는 것을 타입 추론을 통해 '확신'할 수 있기 때문이다.
제네릭 실사용 예시
interface Dropdown<T> {
  value: T;
  selected: boolean;
}

const obj: Dropdown = { value: 'abc', selected: false } // error: Type을 정의해주지 않았기 때문에 추론과정에서 error 발생
interface Dropdown<T> {
  value: T;
  selected: boolean;
}

const obj: Dropdown<string> = { value: 'abc', selected: false }
interface DropdownItem<T> {
  value: T;
  selected: boolean;
}

const emails: DropdownItem<string>[] = [
  { value: 'naver.com', selected: true },
  { value: 'gmail.com', selected: false },
  { value: 'hanmail.net', selected: false },
]

const numberOfProducts: DropdownItem<number>[] = [
  {value: 1, selected: true},
  {value: 2, selected: false},
  {value: 3, selected: false},
];

function createDropdownItem(item: DropdownItem<string> | DropdownItem<number>) {
  const option = document.createElement('option');
  option.value = item.value.toString();
  option.innerText = item.value.toString();
  option.selected = item.selected;
  return option;
}

// NOTE: 이메일 드롭 다운 아이템 추가
emails.forEach(function (email) {
    const item = createDropdownItem(email); // 이제 error가 발생하지 않는다.
    const selectTag = document.querySelector('#email-dropdown');
    selectTag.appendChild(item);
});

numberOfProducts.forEach(function (email) {
    const item = createDropdownItem(email); // 여기서도 error가 발생하지 않는다.
    const selectTag = document.querySelector('#email-dropdown');
    selectTag.appendChild(item);
});
제네릭 실사용 예시 : 함수도 제네릭으로
interface DropdownItem<T> {
    value: T;
    selected: boolean;
}

const emails: DropdownItem<string>[] = [
    {value: 'naver.com', selected: true},
    {value: 'gmail.com', selected: false},
    {value: 'hanmail.net', selected: false},
];

const numberOfProducts: DropdownItem<number>[] = [
    {value: 1, selected: true},
    {value: 2, selected: false},
    {value: 3, selected: false},
];

function createDropdownItem<T>(item: DropdownItem<T>) {
    const option = document.createElement('option');
    option.value = item.value.toString();
    option.innerText = item.value.toString();
    option.selected = item.selected;
    return option;
}

// NOTE: 이메일 드롭 다운 아이템 추가
emails.forEach(function (email) {
    const item = createDropdownItem<string>(email); // 이제 error가 발생하지 않는다.
    const selectTag = document.querySelector('#email-dropdown');
    selectTag.appendChild(item);
});

numberOfProducts.forEach(function (email) {
    const item = createDropdownItem<number>(email); // 여기서도 error가 발생하지 않는다.
    const selectTag = document.querySelector('#email-dropdown');
    selectTag.appendChild(item);
});
제네릭 타입 제한 - 다시 복습
function logTextLength<T>(text: T): T {
    console.log(text.length); // error: 추론과정에서 text에 length 프로퍼티가 없다는 error이다.
                              // 왜? text에 타입이 어떤건지 모르니깐.
    return text;
}

logTextLength('hi');
function logTextLength<T>(text: T[]): T[] {
    console.log(text.length); // 여기서의 error는 해결. 배열이 들어온다는 걸 알았으니. 배열엔 length 프로퍼티가 있다.
    return text;
}

logTextLength('hi'); // 하지만 여기서 error 발생. 인자 데이터형이 배열이되어야하는데 string이 들어왔으므로 에러발생
function logTextLength<T>(text: T[]): T[] {
    console.log(text.length);
    return text;
}

logTextLength(['hi']); // 때문에 이렇게 배열형태로 전달해야됨. 이것이 제네릭의 타입 제한임.
정의된 타입으로 타입을 제한하기 - 복습
function logTextLength<T>(text: T[]): T[] {
    console.log(text.length);
    text.forEach(function (text) {
        console.log(text);
    })
    return text;
}

logTextLength(['hi']);
// 제네릭 타입 제한 2 - 정의된 타입 이용하기
interface LengthType {
    length: number;
}

function logTextLength<T>(text: T): T {
    text.length; // error: 추론과정에서 text에 length라는 프로퍼티가 있는지없는지 모르므로 에러발생
    return text;
}
// 제네릭 타입 제한 2 - 정의된 타입 이용하기
interface LengthType {
    length: number;
}

function logTextLength<T extends LengthType>(text: T): T {
    text.length; // 위와 같이 정의하면 length라는 프로퍼티가 있다고 생각하고 추론과정에서 error가 안난다.
    return text;
}

logTextLength('a'); // string은 기본적으로 length 프로퍼티가 있기 때문에 추론과정에서 에러가 발생하지 않는다.
logTextLength(10); // number는 length 프로퍼티가 없으므로 에러발생
logTextLength({ length: 10 }); // 이렇게 length 프로퍼티만 보장이된다면 error가 발생하지 않는다.
keyof로 제네릭 타입 제한하기
interface ShoppingItem {
    name: string;
    price: number;
    stock: number;
}

// 위 name, price, stock 중 하나만 받겠다 또는 위 interface에 정의된 속성들만 받겠다 라는 식으로 제한을 걸 수 있다.
function getShoppingItemOption<T> (itemOption: T): T {
    return itemOption;
}

getShoppingItemOption<number>(10);
getShoppingItemOption<string>('a');
interface ShoppingItem {
    name: string;
    price: number;
    stock: number;
}

// 위 name, price, stock 중 하나만 받겠다 또는 위 interface에 정의된 속성들만 받겠다 라는 식으로 제한을 걸 수 있다.
function getShoppingItemOption<T extends keyof ShoppingItem> (itemOption: T): T {
    return itemOption;
}

getShoppingItemOption(10); // error: ShoppingItem에 정의된 key인 name, price, stock만 들어갈 수 있는데 다른게 들어왔으므로 추론과정에서 error 발생
getShoppingItemOption<number>(10); // error
getShoppingItemOption<string>('a'); // error

getShoppingItemOption('name'); // 이건 error가 발생하지 않는다. ShoppingItem 안에 name 키가 있으므로.
타입스크립트 실사용 1
tsconfig.json strict 설정
{
  "compilerOptions": {
    "allowJs": true,
    "checkJs": true,
    "target": "es5",
    "lib": [
      "es2015",
      "dom",
      "dom.iterable"
    ],
    "noImplicitAny": true,
    "strict": true,
    "strictFunctionTypes": true
  },
  "include": [
    "./src/**/*"
  ]
}
- 위의
strict옵션true설정으로 업격한 검사를 이미 강제하고 있다. strictFunctionTypes옵션은strict옵션에 포함되긴 하지만 명시적으로 추가- 위와 같이
true로 바꾸는 순간 타입을 지정하지 않은 것들에 타입 추론 과정에서 에러로 간주
eslintrc.js 파일 수정
module.exports = {
  root: true,
  env: {
    browser: true,
    node: true,
    jest: true,
  },
  extends: [
    'plugin:@typescript-eslint/eslint-recommended',
    'plugin:@typescript-eslint/recommended',
  ],
  plugins: ['prettier', '@typescript-eslint'],
  rules: {
    'prettier/prettier': [
      'error',
      {
        singleQuote: true,
        semi: true,
        useTabs: false,
        tabWidth: 2,
        printWidth: 80,
        bracketSpacing: true,
        arrowParens: 'avoid',
      },
    ],
    // 아래 두개 주석처리
    // 그러면 반환 타입이 없는 에러가 잡힌다.
    // 이렇게 eslint를 어덯게 설정하느냐에 따라 고민할 부분이 많아진다.
    // '@typescript-eslint/no-explicit-any': 'off',
    // "@typescript-eslint/explicit-function-return-type": 'off',
    'prefer-const': 'off',
  },
  parserOptions: {
    parser: '@typescript-eslint/parser',
  },
};
endOfLint - 라인 끝에 에러로 잡히는거 해결하려면?
module.exports = {
  root: true,
  env: {
    browser: true,
    node: true,
    jest: true,
  },
  extends: [
    'plugin:@typescript-eslint/eslint-recommended',
    'plugin:@typescript-eslint/recommended',
  ],
  plugins: ['prettier', '@typescript-eslint'],
  rules: {
    'prettier/prettier': [
      'error',
      {
        singleQuote: true,
        semi: true,
        useTabs: false,
        tabWidth: 2,
        printWidth: 80,
        bracketSpacing: true,
        arrowParens: 'avoid',
        // 아래와 같이 추가해준다.
        endOfLine: 'auto'
      },
    ],
    // 아래 두개 주석처리
    // 그러면 반환 타입이 없는 에러가 잡힌다.
    // 이렇게 eslint를 어덯게 설정하느냐에 따라 고민할 부분이 많아진다.
    // '@typescript-eslint/no-explicit-any': 'off',
    // "@typescript-eslint/explicit-function-return-type": 'off',
    'prefer-const': 'off',
  },
  parserOptions: {
    parser: '@typescript-eslint/parser',
  },
};
interface PhoneNumberDictionary {
  [phone: string]: {
    num: number;
  }
}

interface Contact {
  name: string;
  address: string;
  phones: PhoneNumberDictionary;
}

// api
// TODO: 아래 함수의 반환 타입을 지정해보세요.
// fetchContacts에 마우스 커서를 올려놓으면 : function fetchContacts(): Promise<unknown> 이라고 뜸
// fetchContacts(): Promise 라고 반환타입을 지정하면 TS2314: Generic type 'Promise' requires 1 type argument(s). 라는 에러가 뜸 // 힌트 interface Promise<T>
// 함수 반환값이 Promise라서 반환값 타입으로 Promise를 정의했는데, 왜 에러가 발생할까?
// 그리고 갑자기 설명에 제네릭이 뜨는 이유는 뭘까?
function fetchContacts() {
  // TODO: 아래 변수의 타입을 지정해보세요.
  const contacts = [
    {
      name: 'Tony',
      address: 'Malibu',
      phones: {
        home: {
          num: 11122223333,
        },
        office: {
          num: 44455556666,
        }
      }
    },
    {
      name: 'Banner',
      address: 'NewYork',
      phones: {
        home: {
          num: 77788889999,
        },
      }
    },
    {
      name: '마동석',
      address: '서울시 강남구',
      phones: {
        home: {
          num: 213423452,
        },
        studio: {
          num: 314882045,
        }
      }
    },
  ]
  return new Promise(resolve => {
    setTimeout(() =>  resolve(contacts), 2000);
  })
}

// main
class AddressBook {
  // TODO: 아래 변수의 타입을 지정해보세요.
  contacts = [];

  constructor() {
    this.fetchData();
  }

  fetchData() {
    fetchContacts().then(response => {
      this.contacts = response;
    });
  }

  /* TODO: 아래 함수들의 파라미터 타입과 반환 타입을 지정해보세요 */
  findContactByName(name) {
    return this.contacts.filter(contact => contact.name === name);
  }

  findContactByAddress(address) {
    return this.contacts.filter(contact => contact.address === address);
  }

  findContactByPhone(phoneNumber, phoneType: string) {
    return this.contacts.filter(
      contact => contact.phones[phoneType].num === phoneNumber
    );
  }

  addContact(contact) {
    this.contacts.push(contact);
  }

  displayListByName() {
    return this.contacts.map(contact => contact.name);
  }

  displayListByAddress() {
    return this.contacts.map(contact => contact.address);
  }
  /* ------------------------------------------------ */
}

new AddressBook();
Promise를 이용한 API 함수 타입 정의
function fetchItems() {
  const items = ['a', 'b', 'c'];
  return items;
}

let result = fetchItems(); // fetchItems에 마우스 커서 올려놓으면, function fetchItems(): string[]; 이란 타입이 추론된다.
- 위 함수의 반환값 타입을 정의하지 않았음에도 불구하고 반환값이
string[]타입일 거라는 것을 추론하고 있다. - 그것은 함수 내부의 코드를 보고
return items에서items가string[]타입이란 것을 알 수 있기 때문이다.
function fetchItems() {
  const items = ['a', 'b', 'c'];
  return new Promise(resolve => {
    resolve(items);
  })
}
// fetchItems에 마우스 커서를 올려놓으면, function fetchItems(): Promise<unknown> 이라고 추론된다.
- 그런데 서버에서 데이터를 받아오는 상황을 가정하고
Promise, 즉, 비동기 상황으로 코드를 작성하면 위와 같이 추론과정을 거친 반환값 타입이Promise<unknown>이다. - 그러니까 위 코드처럼
new Promise를 반환하게되면 추론 과정에서Promise인스턴스를 반환하는건 알겠는데, 그 안에서 반환하는 것은 무슨 타입인지 모르겠다는 것이다. - 즉, 타입스크립트가
Promise인스턴스 안에 들어오는 코드에 대해선 알 수가 없다는 것이다. - 그래서 위와 같이 타입이
Promise<unknown>이라고 뜨는 것이다.
function fetchItems(): Promise<string[]> {
  const items: string[] = ['a', 'b', 'c'];
  return new Promise(resolve => {
    resolve(items);
  })
}
- 실제 서비스에선 위와 같은 목업 코드 말고
axios와 같은Promise객체 기반 라이브러리를 통해 코드를 작성할 것이다. - 그럴 때 위와 같이 타입을 정의해주면된다.
function fetchItems(): Promise<number[]> {
  const items: string[] = ['a', 'b', 'c'];
  return new Promise(function (resolve) {
    resolve(items); // error: 왼쪽 item은 number로 이루어진 배열이되어야하는데 현재 추론과정에선 string으로 이루어진 배열이므로 에러가 발생한다.
  });
}

fetchItems();
interface PhoneNumberDictionary {
    [phone: string]: {
        num: number;
    }
}

interface Contact {
    name: string;
    address: string;
    phones: PhoneNumberDictionary;
}

// api
// TODO: 아래 함수의 반환 타입을 지정해보세요.
function fetchContacts(): Promise<Contact[]> {
    // TODO: 아래 변수의 타입을 지정해보세요.
    const contacts: Contact[] = [
        {
            name: 'Tony',
            address: 'Malibu',
            phones: {
                home: {
                    num: 11122223333,
                },
                office: {
                    num: 44455556666,
                }
            }
        },
        {
            name: 'Banner',
            address: 'NewYork',
            phones: {
                home: {
                    num: 77788889999,
                },
            }
        },
        {
            name: '마동석',
            address: '서울시 강남구',
            phones: {
                home: {
                    num: 213423452,
                },
                studio: {
                    num: 314882045,
                }
            }
        },
    ]
    return new Promise(resolve => {
        setTimeout(() =>  resolve(contacts), 2000);
    })
}

// main
class AddressBook {
    // TODO: 아래 변수의 타입을 지정해보세요.
    contacts: Contact[] = [];

    constructor() {
        this.fetchData();
    }

    fetchData(): void {
        fetchContacts().then(response => {
            this.contacts = response;
        });
    }

    /* TODO: 아래 함수들의 파라미터 타입과 반환 타입을 지정해보세요 */
    findContactByName(name: string): Contact[] {
        return this.contacts.filter(contact => contact.name === name);
    }

    findContactByAddress(address: string): Contact[] {
        return this.contacts.filter(contact => contact.address === address);
    }

    findContactByPhone(phoneNumber, phoneType: string) {
        return this.contacts.filter(
            contact => contact.phones[phoneType].num === phoneNumber
        );
    }

    addContact(contact) {
        this.contacts.push(contact);
    }

    displayListByName() {
        return this.contacts.map(contact => contact.name);
    }

    displayListByAddress() {
        return this.contacts.map(contact => contact.address);
    }
    /* ------------------------------------------------ */
}

new AddressBook();
enum을 이용한 타입 정의
interface PhoneNumberDictionary {
    [phone: string]: {
        num: number;
    }
}

interface Contact {
    name: string;
    address: string;
    phones: PhoneNumberDictionary;
}

enum PhoneType {
    Home = 'home',
    Office = 'office',
    Studio = 'studio',
}

// api
// TODO: 아래 함수의 반환 타입을 지정해보세요.
function fetchContacts(): Promise<Contact[]> {
    // TODO: 아래 변수의 타입을 지정해보세요.
    const contacts: Contact[] = [
        {
            name: 'Tony',
            address: 'Malibu',
            phones: {
                home: {
                    num: 11122223333,
                },
                office: {
                    num: 44455556666,
                }
            }
        },
        {
            name: 'Banner',
            address: 'NewYork',
            phones: {
                home: {
                    num: 77788889999,
                },
            }
        },
        {
            name: '마동석',
            address: '서울시 강남구',
            phones: {
                home: {
                    num: 213423452,
                },
                studio: {
                    num: 314882045,
                }
            }
        },
    ]
    return new Promise(resolve => {
        setTimeout(() =>  resolve(contacts), 2000);
    })
}

// main
class AddressBook {
    // TODO: 아래 변수의 타입을 지정해보세요.
    contacts: Contact[] = [];

    constructor() {
        this.fetchData();
    }

    fetchData(): void {
        fetchContacts().then(response => {
            this.contacts = response;
        });
    }

    /* TODO: 아래 함수들의 파라미터 타입과 반환 타입을 지정해보세요 */
    findContactByName(name: string): Contact[] {
        return this.contacts.filter(contact => contact.name === name);
    }

    findContactByAddress(address: string): Contact[] {
        return this.contacts.filter(contact => contact.address === address);
    }

    findContactByPhone(phoneNumber, phoneType: PhoneType) {
        return this.contacts.filter(
            contact => contact.phones[phoneType].num === phoneNumber
        );
    }

    addContact(contact) {
        this.contacts.push(contact);
    }

    displayListByName() {
        return this.contacts.map(contact => contact.name);
    }

    displayListByAddress() {
        return this.contacts.map(contact => contact.address);
    }
    /* ------------------------------------------------ */
}

new AddressBook();
주요 메소드 타입 정의 및 실습 마무리
interface PhoneNumberDictionary {
    [phone: string]: {
        num: number;
    }
}

interface Contact {
    name: string;
    address: string;
    phones: PhoneNumberDictionary;
}

enum PhoneType {
    Home = 'home',
    Office = 'office',
    Studio = 'studio',
}

// api
// TODO: 아래 함수의 반환 타입을 지정해보세요.
function fetchContacts(): Promise<Contact[]> {
    // TODO: 아래 변수의 타입을 지정해보세요.
    const contacts: Contact[] = [
        {
            name: 'Tony',
            address: 'Malibu',
            phones: {
                home: {
                    num: 11122223333,
                },
                office: {
                    num: 44455556666,
                }
            }
        },
        {
            name: 'Banner',
            address: 'NewYork',
            phones: {
                home: {
                    num: 77788889999,
                },
            }
        },
        {
            name: '마동석',
            address: '서울시 강남구',
            phones: {
                home: {
                    num: 213423452,
                },
                studio: {
                    num: 314882045,
                }
            }
        },
    ]
    return new Promise(resolve => {
        setTimeout(() =>  resolve(contacts), 2000);
    })
}

// main
class AddressBook {
    // TODO: 아래 변수의 타입을 지정해보세요.
    contacts: Contact[] = [];

    constructor() {
        this.fetchData();
    }

    fetchData(): void {
        fetchContacts().then(response => {
            this.contacts = response;
        });
    }

    /* TODO: 아래 함수들의 파라미터 타입과 반환 타입을 지정해보세요 */
    findContactByName(name: string): Contact[] {
        return this.contacts.filter(contact => contact.name === name);
    }

    findContactByAddress(address: string): Contact[] {
        return this.contacts.filter(contact => contact.address === address);
    }

    findContactByPhone(phoneNumber, phoneType: PhoneType) {
        return this.contacts.filter(
            contact => contact.phones[phoneType].num === phoneNumber
        );
    }

    addContact(contact): void {
        this.contacts.push(contact);
    }

    displayListByName(): string[] {
        return this.contacts.map(contact => contact.name);
    }

    displayListByAddress(): string[] {
        return this.contacts.map(contact => contact.address);
    }
    /* ------------------------------------------------ */
}

new AddressBook();
타입 추론(Type Inference)
타입 추론 소개
- 이번 챕터에서는 타입스크립트가 어떻게 타입을 추론하는지에 대해 알아보겠다.
타입 추론의 기본
- 타입스크립트가 타입 추로을 해나가는 과정은 다음과 같다.
let x = 3;
- 위와 같이
x에 대한 타입을 따로 지정하지 않더라도 일단x는number로 간주된다. - 이렇게 변수를 선언하거나 초기화할 때 타입이 추론된다.
- 이외에도 변수, 속성, 인자의 기본값, 함수의 반환 값 등을 설정할 때 타입 추론이 일어난다.
let a; // TS7043: Variable 'a' implicitly has an 'any' type, but a better type may be inferred from usage.
let a = 10; // let a: number
let a = 'abc'; // let a: string
function getB(b) {
  return b;
}
// function getB(b: any): any
function getB(b = 10) {
  return b;
}
// function getB(b?: number): number
function getB(b = 10) {
  let c = 'str';
  return b + c;
}
// function getB(b?: number): string
interface와 generic을 이용한 타입 추론 방식
interface Dropdown<T> {
  value: T;
  title: string;
}

let shoppingItem: Dropdown<string> = {
  value // 마우스 커서 올려놓으면 TS18004: No value exists in scope for the shorthand property 'value'. Either declare one or provide an initializer.
        // shoppintItem.value: string
}
interface Dropdown<T> {
  value: T;
  title: string;
}

let shoppingItem: Dropdown<string> = {
  value: 'abc',
  title: 'hello',
}
복잡한 구조에서의 타입 추론 방식
interface Dropdown<T> {
  value: T;
  title: string;
}

interface DetailedDropdown<K> extends Dropdown<K> {
  description: string;
  tag: K;
}

let detailedItem: DetailedDropdown<string> = {

}
// TS2739: Type '{}' is missing the following properties from type 'DetailedDropdown': description, tag, value, title
interface Dropdown<T> {
  value: T;
  title: string;
}

interface DetailedDropdown<K> extends Dropdown<K> {
  description: string;
  tag: K;
}

let detailedItem: DetailedDropdown<string> = {
  title: 'abc',
  description: 'ab',
  value // TS18004: No value exists in scope for the shorthand property 'value'. Either declare one or provide an initializer.
        // detailedItem.value: string
}
interface Dropdown<T> {
    value: T;
    title: string;
}

interface DetailedDropdown<K> extends Dropdown<K> {
    description: string;
    tag: K;
}

let detailedItem: DetailedDropdown<string> = {
    title: 'abc',
    description: 'ab',
    value: 'a',
    tag: 'b'
}
Best Common Type(가장 적절한 타입) 추론 방식
- 타입은 보통 몇 개의 표현식(코드)을 바탕으로 타입을 추론한다.
- 그리고 그 표현식을 이용하여 가장 근접한 타입을 추론하게 되는데 이 가장 근접한 타입을 Best Common Type이라고 한다.
let arr = [0, 1, null];
- 위 변수
arr의 타입을 추론하기 위해서는 배열의 각 아이템을 살펴봐야 한다. - 배열의 각 아이템의 타입은 크게
number와null로 구분된다. - 이때 Best Common Type 알고리즘으로 다른 타입들과 가장 호환되는 타입을 선정한다.
let arr = [1, 2, 3]; // let arr: number[]
let arr = [1, 2, true]; // let arr: (number | boolean)[]
let arr = [1, 2, true, false, 'abc']; // let arr: (string | number | boolean)[]
- 위와 같이 추론하는 것이 Best Common Type이다.
- 위와 같이 값들을 통해 유니온 타입으로 정의해나간다.
문맥상의 타이핑 (Contextual Typing)
- 타입스크립트에서 타입을 추론하는 또 하나의 방식은 바로 문맥상으로 타입을 결정하는 것이다.
- 이 문맥상의 타이핑(타입 결정)은 코드의 위치(문맥)를 기준으로 일어난다.
문맥상의 타이핑 - 예시 코드 1
window.onmousedown = function (mouseEvent) {
  console.log(mouseEvent.button); // OK
  console.log(mouseEvent.kangaroo); // Error!
}
- 위 코드를 타입스크립트 검사기 관점에서 보면
window.onmousedown에 할당되는 함수의 타입을 추론하기 위해window.onmousedown타입을 검사한다. - 타입 검사가 끝나고나면 함수의 타입이 마우스 이벤트와 연관이 있다고 추론하기 때문에
mouseEvent인자에button속성은 있지만kangaroo속성은 없다고 결론을 내린다.
문맥상의 타이핑 - 예시 코드 2
window.onscroll = function (uiEvent) {
  console.log(uiEvent.button); // Error
}
- 앞의 예제와 마찬가지로 위의 함수는
window.onscroll에 할당되었기 때문에 함수의 인자uiEvent는 UIEvent로 간주된다. - 그래서 위에서 봤던 MouseEvent와는 다르게
button속성이 없다고 추론한다. -
그러므로
uiEvent.button에서 에러가 난다. - 여기서 만약 문맥상 타이핑을 좀 더 이해하고자 한다면 아래와 같이 코드를 바꿔볼 수도 있다.
const handler = function (uiEvent) {
  console.log(uiEvent.button); // OK
}
- 위의 함수 표현식이 앞의 예제와 동일하지만 함수가 할당되는 변수만으로는 타입을 추정하기 어렵기 때문에 아무 에러가 나지 않는다.
위 코드에서 noImplicitAny 옵션을 사용하면 에러가난다.
타입스크립트의 타입 체킹
- 타입 체킹에 있어서 타입스크립트의 지향점은 타입 체크는 값의 형태에 기반하여 이루어져야 한다는 점이다.
- 이걸 Duck Typing 또는 Structural Subtyping 이라고 한다.
- Duck Typing: 객체의 변수 및 메서드의 집합이 객체의 타입을 결정하는 것을 의미. 동적 타이핑의 한 종류
- Structural Subtyping: 객체의 실제 구조나 정의에 따라 타입을 결정하는 것을 의미
Typescript Language Server 소개
node_modules/typescript/bin/tscnode_modules/typescript/bin/tsserver-
bin폴더 안에tsc,tsserver모두 실행 가능한 명령어라고 보면 된다. - 위와 같은 파일에 정의되어있는 코드들이 내부적으로 돌고있기 때문에 타입스크립트가 검사되고 타입 추론을 할 수 있는 것이다.
타입 단언 (Type Assertion)
타입 단언 소개
// 타입 단언 (Type Assertion)
let a; // 변수 a는 type any로 추론된다.
let b = 10; // 변수 b는 type number로 추론된다.

a = 20;
a = 'a';

let c = a; // 왼쪽에서 변수 a, c 모두 type이 any로 추론된다.
// 위에서 최종적으로 a에 string이 담겼음에도 불구하고 type이 any로 된다.
// 타입 단언 (Type Assertion)
let a; // 변수 a는 type any로 추론된다.
let b = 10; // 변수 b는 type number로 추론된다.

a = 20;
a = 'a';

let c = a as string; // 이렇게하면 c의 type은 string으로 추론된다.
                     // 이를 타입 단언이라고 한다.
                     // 지금 이 상황에선 라이브러리가 타입스크립트 추론하는 것보다 개발자가 더 정확하게 타입을 추론할 수 있다는 것이다.
                     // 그렇기 때문에 위와 같이 타입을 선언해준다.
- 타입 단언은 DOM API를 조작할 때 가장 많이 사용된다.
타입 단언 예제
// DOM API 조작
let div = document.querySelector('#app'); // let div: Element
// DOM API 조작
let div = document.querySelector('div'); // let div: HTMLDivElement
- 아래 코드들을 통해 타입 추론
// lib.dom.d.ts
// ...
querySelector<K extends keyof HTMLElementTagNameMap>(selectors: K): HTMLElementTagNameMap[K] | null;
querySelector<K extends keyof SVGElementTagNameMap>(selectors: K): SVGElementTagNameMap[K] | null;
querySelector<E extends Element = Element>(selectors: string): E | null;
// ...
// DOM API 조작
let div = document.querySelector('div'); // div는 HTMLDivElement 타입이라고 추론된다.
div.innerText; // div는 HTMLDivElement 타입이라고 추론, 때문에 innerText 속성이 타입 추론을 통해서 바로 뜨게된다.

// 하지만 실무에선 위와 같이 안함
// 실제로 타입스크립트를 실무에서 사용하게되면 그때는 위와 같이 이상적으로 사용할 수 없다.
// document.querySelector('div'); <- 이 코드를 접근하는 시점에, querySelector 이 메소드가 실행되는 시점에서 div라는 엘리먼트가 있다라는 보장을 할 수가 없기 때문이다.
let div = document.querySelector('div');
// 그렇기 때문에 div가 있는지 확인을 하고 그 다음에 조작을 하는 것이 일반적인 패턴이다.
if (div) {
  div.innerText;
}
let div = document.querySelector('div'); // let div: HTMLDivElement | null
- 좀 더 엄격하게(
strict) 체크하는 위 폴더에서 위와 같은 코드를 작성하면HTMLDivElement또는null이 될 수 있다고 추론한다.
let div = document.querySelector('div');
div.innerText; // TS2531: Object is possibly 'null'. let div: HTMLDivElement | null
- 해당
div오브젝트는null일수도 있기 때문에innerText가 없을지도 몰라! 라는 에러이다.
let div = document.querySelector('div');
if (div) {
  div.innerText;
}
- 즉, 위와 같이
if문을 써서div가 확실히 있는 경우만을 골라주면 에러가 없어진다.
let div = document.querySelector('div') as HTMLDivElement;
div.innerText;
- 그래서 위와 같이
as를 사용해 타입을 단언하기도 한다. - 위 코드가 돌아가는 시점에
div요소는 반드시 있을테니까 이 타입은 무조건HTMLDivElement라고 생각해! 라는 뜻이다.
타입 단언
타입스크립트 추론보다 개발자인 내가 이 변수에 대한 타입을 더 정확하게 잘 알고 있다.
즉, 그렇기 때문에 타입은 내가 지정할테니 타입추론 너는 건드리지 말아라.
이것이 타입 단언이다.
타입 가드
타입 가드를 위한 예제 소개
interface Developer {
  name: string;
  skill: string;
}

interface Person {
  name: string;
  age: number;
}

function introduce(): Developer | Person {
  return { name: 'Tony', age: 33, skill: 'Iron Making' }} // return 값으로 명시적으로 skill 속성을 넘겨주고 있음에도
}

let tony = introduce();

console.log(tony.skill); // TS2339: Property 'skill' does not exist on type 'Developer | Person'. Property 'skill' does not exist on type 'Person'.
 // error: 타입 추론 과정에서 skill은 Developer, Person의 공통 속성이 아니므로 error가 발생한다.
- 위와 같은 에러를 해결하기 위해서 타입 단언을 활용할 수 있다.
interface Developer {
  name: string;
  skill: string;
}

interface Person {
  name: string;
  age: number;
}

function introduce(): Developer | Person {
  return { name: 'Tony', age: 33, skill: 'Iron Making' }}
}

let tony = introduce();

// 타입 단언
if ((tony as Developer).skill) {
  let skill = (tony as Developer).skill;
  console.log(skill);
} else if ((tony as Person).age) {
  let age = (tony as Person).age;
  console.log(age);
}

// 하지만 위와 같이 작성하게되면 가독성도 별로고 복잡해진다.
// 이때 타입 가드를 쓰면된다.
타입 가드 소개와 적용
interface Developer {
  name: string;
  skill: string;
}

interface Person {
  name: string;
  age: number;
}

function introduce(): Developer | Person {
  return { name: 'Tony', age: 33, skill: 'Iron Making' }}
}

let tony = introduce();

// 타입 단언
if ((tony as Developer).skill) {
  let skill = (tony as Developer).skill;
  console.log(skill);
} else if ((tony as Person).age) {
  let age = (tony as Person).age;
  console.log(age);
}

// 타입 가드 정의
function isDeveloper(target: Developer | Person): target is Developer {
  return (target as Developer).skill !== undefined;
}

if (isDeveloper(tony)) {
  // 위와 같이 타입 가드를 정의하면 아래와 같이 .을 입력했을 때, Developer 프로퍼티인 skill, name이 추론된다.
  console.log(tony.skill);
} else {
  // 타입 가드를 통해서 이번엔 아래와 같이 .을 입력했을 때, Person 프로퍼티인 name, age가 추론된다.
  console.log(tony.age);
}
- 위 코드를 보면 타입 가드 방식이 타입 단언보다 훨씬 간편하고 가독성도 좋아지는 것을 볼 수 있다.
타입 호환(Type Compatibility)
타입 호환이란?
- 타입 호환이란 타입스크립트 코드에서 특정 타입이 다른 타입에 잘 맞는지를 의미한다.
- 즉, 타입스크립트가 코드를 해석해나가는 과정에서 두개의 타입이 서로 호환이 되는지를 점검하는 것이 타입 호환이다.
- 예를 들면 아래와 같은 코드를 의미한다.
interface Ironman {
  name: string;
}

class Avengers {
  name: string;
}

let i: Ironman;
i = new Avengers(); // OK, because of structural typing
C#이나JAVA였다면 위 코드에서 에러가 날 것이다.-
왜냐하면
Avengers클래스가 명시적으로Ironman인터페이스를 상속받아 구현되지 않았기 때문이다. - 하지만 위와 같은 코드가 타입스크립트에서 정상적으로 동작하는 이유는 자바스크립트의 작동 방식과 관련이 있다.
- 기본적으로 자바스크립트는 객체 리터럴이나 익명 함수 등을 사용하기 때문에 명시적으로 타입을 지정하는 것보다는 코드의 구조 관점에서 타입을 지정하는 것이 더 잘 어울린다.(
structural typing)
구조적 타이핑(structural typing) 예시
- 구조적 타이핑(structural typing)이란 코드 구조 관점에서 타입이 서로 호환되는지의 여부를 판단하는 것이다.
interface Avengers {
  name: string;
}

let hero: Avengers;
let capt = { name: 'Captain', location: 'Pangyo' }
hero = capt;
- 위 코드에서
capt가hero타입에 호환될 수 있는 이유는capt의 속성 중에name이 있기 때문이다. -
Avengers인터페이스에서name속성을 갖고 있기 때문에capt는Avengers타입에 호환될 수 있다. - 함수를 호출할 때도 마찬가지이다.
interface Avengers {
  name: string;
}

let capt = { name: 'Captain', location: 'Pangyo' }

function assemble(a: Avengers) {
  console.log('어벤져스 모여라', a.name);
}

// 위에서 정의한 capt 변수. 타입은 { name: string; location: string; }
assemble(capt);
capt변수에 이미name속성 뿐만 아니라location속성도 있기 때문에assemble함수의 호출 인자로 넘길 수 있다.
Soundness 란?
- 타입스크립트는 컴파일 시점에 타입을 추론할 수 없는 특정 타입에 대해서 일단 안전하다고 보는 특성이 있다.
- 이걸 "들리지 않는다(it is said to not be sound)"라고 표현한다.
enum 타입 호환 주의 사항
enum타입은number타입과 호환되지만enum타입끼리는 호환되지 않는다.
enum Status {
  Ready,
  Waiting,
}

enum Color {
  Red,
  Blue,
  Green,
}

let status = Status.Ready;
status = Color.Green; // Error
- 타입스크립트에서
enum(열거형)은number와 호환되는 것으로 간주되며 그 반대의 경우도 마찬가지이다. - 그러나 다른
enum(열거형) 유형의enum값은 호환되지 않는 것으로 간주된다. - 예시 코드:
enum Fruit { Orange, Apple };
enum Bird { Chicken, Duck, Goose };

let fruit = Fruit.Orange;
fruit = Bird.Chicken; // error
- 마지막 줄에 오류 메시지가 표시된다.
-
Type ‘Bird.Chicken' is not assignable to type ‘Fruit'.(2322)
- 아 이런 뜻인가????
enum Fruit { Orange, Apple };
enum Bird { Chicken, Duck, Goose };

let fruit = Fruit.Orange;
fruit = 0; // 이건 되는데, // 이건 실제로 됨!
fruit = Bird.Chicken; // 이건 안된다는 것 같다!! // 실제로 안됨!
Class 타입 호환 주의 사항
Class타입은 클래스 타입끼리 비교할 때 스태틱 멤버(static member)와 생성자(constructor)를 제외하고 속성만 비교한다.
class Hulk {
  handSize: number;

  constructor(name: string, numHand: number) {

  }
}

class Captain {
  handSize: number;

  constructor(numHand: number) {

  }
}

let a: Hulk;
let s: Captain;

a = s; // OK
s = a; // OK
제네릭
- 제네릭은 제네릭 타입 간의 호환 여부를 판단할 때 타입 인자
<T>가 속성에 할당 되었는지를 기준으로 한다. - 예시 코드:
interface Empty<T> {

}

let x: Empty<number>;
let y: Empty<string>;

x = y; // OK, because y matches structure of x
- 위
interface는 일단 속성(프로퍼티)이 없기 때문에x와y는 같은 타입으로 간주된다. - 그런데 만약 아래와 같이
interface에 속성이 있어서 제네릭의 타입 인자가 속성에 할당된다면 얘기는 다르다.
interface NotEmpty<T> {
data: T;
}
let x: NotEmpty<number>;
let y: NotEmpty<string>;
x = y; // Error, because x and y are not compatible
interface NotEmpty<T> {
data: T;
}
let x: NotEmpty<number>;
let y: NotEmpty<number>;
x = y; // OK!
interfaceNotEmpty에 넘긴 제네릭 타입<T>이data속성에 할당되었으므로x와y는 서로 다른 타입으로 간주된다.
타입 호환 예제 - 인터페이스, 클래스
interface Developer {
name: string;
skill: string;
}
interface Person {
name: string;
}
let developer: Developer;
let person: Person;
developer = person; // TS2741: Property 'skill' is missing in type 'Person' but required in type 'Developer'.
interface Developer {
name: string;
skill: string;
}
interface Person {
name: string;
}
let developer: Developer;
let person: Person;
Person = developer; // OK
interface Developer {
name: string;
skill: string;
}
class Person {
name: string
}
let developer: Developer;
let person: Person;
developer = new Person(); // Error
// 마찬가지 이유로 에러가 난다.
// 추론 과정에서 developer는 name, skill 속성이 있어야하는데
// Person 클래스에는 name 속성밖에 없다.
- 타입스크립트에선
interface,class서로 다른 유형도 비교가 가능하다. - 그 안의 속성들을 통해 비교를 한다.
- 다른 언어는 그렇지 않다.
- 이를 구조적 타이핑(
structural typing)이라고 한다.
타입 호환 예제 - 함수, 제네릭
let add = function (a: number) {
}
let sum = function (a: number, b: number) {
}
add = sum; // TS2322: Type '(a: number, b: number) => void' is not assgnable to type '(a: number) => void'.
// sum 함수는 2개의 인자를 넘겨야함
// 그런데 add 함수는 하나의 인자만 받도록 되어있다.
// 그래서 에러 발생
let add = function (a: number) {
}
let sum = function (a: number, b: number) {
}
sum = add;
// 에러 안남
// sum은 두개의 파라미터
// add는 하나의 파라미터
// 호환 가능하다고 판단
- 함수는 이전에본
interface,class이런 것들과 구조적 타이핑(structural typing) 방식이 다르다. interface,class이런 것들은 속성을 포함하고 더 많은 것들이 오른쪽, 적은 것들이 왼쪽에 있어야 타입 호환이 됐다.- 함수는 파라미터가 더 많은 것이 오른쪽에 있으면 호환이 안된다.
- 파라미터 개수가 많은 것이 반대로 왼족에 있어야 호환된다.
interface AddFunction {
(a: number, b: number): number;
}
let add: AddFunction;
interface SumFunction {
(a: number, b: number, c: number): number;
}
let sum : SumFunction;
add = function (a: number, b: number) {
return a + b;
}
sum = function (a: number, b: number, c: number) {
return a + b + c;
}
add = sum; // Error O
sum = add; // Error X
interface Empty<T> {
}
let empty1: Empty<string>;
let empty2: Empty<number>;
empty1 = empty2;
empty2 = empty1;
// 위와 같은 경우는 추론 과정에서 error가 발생하지 않는다.
interface NotEmpty<T> {
data: T
}
let notempty1: NotEmpty<string>;
let notempty2: NotEmpty<number>;
notempty1 = notempty2; // error
notempty2 = notempty1; // error
// 위와 같은 경우는 추론 과정에서 error가 발생한다.
타입 모듈화
타입스크립트의 모듈 시스템
- 타입스크립트에서 가리키는 모듈이라는 개념은 ES6+ Modules 개념과 유사하다.
- 모듈은 전역 변수와 구분되는 자체 유효범위를 가지며
export,import와 같은 키워드를 사용하지 않으면 다른 파일에서 접근할 수 없다.
// app.ts
import { Todo } from './types';
let item: Todo = {
title: '할일 1',
checked: false,
}
// types.ts
export interface Todo {
title: string;
checked: boolean;
}
자바스크립트의 모듈 시스템
import와export는 자바스크립트의 코드를 모듈화할 수 있는 기능이다.- 여기서 모듈화란 쉽게 말해서 다른 파일에 있는 자바스크립트의 기능을 특정 파일에서 사용할 수 있는 것을 의미한다.
- 예전엔
AMD(Asynchronous Module Definition)도 있었고 요즘도 많이 사용하는CommonJS도 있다.
모듈화의 필요성
- 기본적으로 자바스크립트의 유효 범위는 전역으로 시작한다.
- 따라서 아래와 같이 HTML 페이지를 로딩하면 원하는 결과가 나오지 않는다.
<body>
<!-- 여기서 말하는 모듈은 각 파일이라고 생각하면 된다. -->
<!-- 하지만 각 파일마다 변수 영역이 나뉘는 것이 아니라서 서로 다른 파일이지만 변수명이 같을 경우 변수값이 덮어 씌워진다던가 기타 예기치못한 오류들이 나올 수 있다. -->
<script src="a.js"></script>
<script src="b.js"></script>
<script>
getTotal(); // 200
</script>
</body>
// a.js
var total = 100;
function getTotal() {
return total;
}
// b.js
val total = 200;
- 다른 프로그래밍 언어 배경을 가지신 분들이라면 파일마다 변수의 유효범위가 다를 것이라고 생각할 것이다.
-
하지만 자바스크립트는 기본적으로 변수의 유효범위가 전역으로 잡히기 때문에 네임스페이스 모듈화 패턴이나
Require.js와 같은 모듈화 라이브러리를 이용하여 모듈화 기능을 구현해왔다. - 이제는 프로그래밍 패턴이나 별도의 모듈화 라이브러리를 사용하지 않고도 자바스크립트 언어 자체에서 모듈화를 지원한다.
import, export 문법 브라우저 지원 범위
- ES6의 기본적인 문법들이 최신 브라우저에서 지원되는데 반해
import,export는 아직 보조 도구가 있어야만 사용할 수 있다. - 가급적 실무 코드에서 사용할 때는 웹팩(webpack)과 같은 모듈 번들러를 이용하여 구현하는 것을 추천드린다.
모듈화 사용 예시
// types.ts
interface PhoneNumberDictionary {
[phone: string]: {
num: number;
}
}
interface Contact {
name: string;
address: string;
phones: PhoneNumberDictionary;
}
enum PhoneType {
Hone = 'home',
Office = 'office',
Studio = 'studio',
}
export { PhoneType, Contact }
// index.ts
import { Contact, PhoneType } from './types';
// api
// TODO: 아래 함수의 변환 타입을 지정해보세요.
function fetchContacts(): Promise<Contact[]> {
// TODO: 아래 변수의 타입을 지정해보세요.
const contacts: Contact[] = [
{
name: 'Tony',
address: 'Malibu',
phones: {
home: {
num: 11122223333,
},
office: {
num: 44455556666,
},
},
},
{
name: 'Banner',
address: 'New York',
phones: {
home: {
num: 77788889999,
},
},
},
{
name: '마동석',
address: '서울시 강남구',
phones: {
home: {
num: 213423452,
},
studio: {
num: 314882045,
},
},
},
];
return new Promise(resolve => {
setTimeout(() => resolve(contacts), 2000);
});
}
// main
class AddressBook {
// TODO: 아래 변수의 타입을 지정해보세요.
contacts: Contact[] = [];
constructor() {
this.fetchData();
}
fetchData(): void {
fetchContacts().then(response => {
this.contacts = response;
});
}
/* TODO: 아래 함수들의 파라미터 타입과 반환 타입을 지정해보세요 */
findContactByName(name: string): Contact[] {
return this.contacts.filter(contact => contact.name === name);
}
findContactByAddress(address: string): Contact[] {
return this.contacts.filter(contact => contact.address === address);
}
// home, office, studio
findContactByPhone(phoneNumber: number, phoneType: PhoneType): Contact[] {
return this.contacts.filter(
contact => contact.phones[phoneType].num === phoneNumber
);
}
addContact(contact: Contact): void {
this.contacts.push(contact);
}
displayListByName(): string[] {
return this.contacts.map(contact => contact.name);
}
displayListByAddress(): string[] {
return this.contacts.map(contact => contact.address);
}
/* ------------------------------------------------ */
}
new AddressBook();
let div = document.querySelector('div') as HTMLDivElement;
div.innerText;