
2 프로젝트 생성 및 환경 구성
source: categories/study/vue-beginner-lv4/vue-beginner-lv4_2.md
2.1 Vue CLI로 프로젝트 생성
vue-cli 설치
npm i -g @vue/cli
# OR
yarn global add @vue/cli
vue 프로젝트 생성
- 뷰 CLI 버전 4.5.x 이상 쓰시는 분들은 아래 옵션으로 프로젝트를 생성해주세요 :) (
Manually select features선택)
vue --version
@vue/cli 4.5.13
vue create vue-til
Manually select features 선택
Vue CLI v4.5.13
Failed to check for updates
? Please pick a preset: (Use arrow keys)
❯ Default ([Vue 2] babel, eslint)
  Default (Vue 3) ([Vue 3] babel, eslint)
  Manually select features
preset
플러그인의 집합이라고 보시면됩니다.
Babel, Linter, Unit Testing 선택
Vue CLI v4.5.13
Failed to check for updates
? Please pick a preset: Manually select features
? Check the features needed for your project: (Press <space> to select, <a> to toggle all, <i> to invert selection)
❯◉ Choose Vue version
 ◉ Babel
 ◯ TypeScript
 ◯ Progressive Web App (PWA) Support
 ◯ Router
 ◯ Vuex
 ◯ CSS Pre-processors
 ◉ Linter / Formatter
 ◉ Unit Testing
 ◯ E2E Testing
vue 2점대 버전 선택
Vue CLI v4.5.13
Failed to check for updates
? Please pick a preset: Manually select features
? Check the features needed for your project: Choose Vue version, Babel, Linter, Unit
? Choose a version of Vue.js that you want to start the project with (Use arrow keys)
❯ 2.x
  3.x
ESLing + Prettier 선택
Vue CLI v4.5.13
Failed to check for updates
? Please pick a preset: Manually select features
? Check the features needed for your project: Choose Vue version, Babel, Linter, Unit
? Choose a version of Vue.js that you want to start the project with 2.x
? Pick a linter / formatter config: (Use arrow keys)
❯ ESLint with error prevention only
  ESLint + Airbnb config
  ESLint + Standard config
  ESLint + Prettier
lint features - Lint on save로 저장
Vue CLI v4.5.13
Failed to check for updates
? Please pick a preset: Manually select features
? Check the features needed for your project: Choose Vue version, Babel, Linter, Unit
? Choose a version of Vue.js that you want to start the project with 2.x
? Pick a linter / formatter config: Prettier
? Pick additional lint features: (Press <space> to select, <a> to toggle all, <i> to invert selection)
❯◉ Lint on save
 ◯ Lint and fix on commit
단위 테스트 - Jest로 작성할거기 때문에 Jest 선택
Vue CLI v4.5.13
Failed to check for updates
? Please pick a preset: Manually select features
? Check the features needed for your project: Choose Vue version, Babel, Linter, Unit
? Choose a version of Vue.js that you want to start the project with 2.x
? Pick a linter / formatter config: Prettier
? Pick additional lint features: Lint on save
? Pick a unit testing solution:
  Mocha + Chai
❯ Jest
설정 파일 - In dedicated config files 선택 (package.json에 하는 것보다 장점이 많음)
Vue CLI v4.5.13
Failed to check for updates
? Please pick a preset: Manually select features
? Check the features needed for your project: Choose Vue version, Babel, Linter, Unit
? Choose a version of Vue.js that you want to start the project with 2.x
? Pick a linter / formatter config: Prettier
? Pick additional lint features: Lint on save
? Pick a unit testing solution: Jest
? Where do you prefer placing config for Babel, ESLint, etc.? (Use arrow keys)
❯ In dedicated config files
  In package.json
지금까지 설정한 프로젝트 preset을 저장할 것인가? n(no) 선택
Vue CLI v4.5.13
Failed to check for updates
? Please pick a preset: Manually select features
? Check the features needed for your project: Choose Vue version, Babel, Linter, Unit
? Choose a version of Vue.js that you want to start the project with 2.x
? Pick a linter / formatter config: Prettier
? Pick additional lint features: Lint on save
? Pick a unit testing solution: Jest
? Where do you prefer placing config for Babel, ESLint, etc.? In dedicated config files
? Save this as a preset for future projects? (y/N) N
2.2 Vue 프로젝트 구조 설명 및 ESLint 에러 확인
node_modules/
프로젝트에 필요한 라이브러리가 설치된 폴더
node_modules/ 안에 내용들은 package.json 내용들로 구성이 되어있습니다.
public
프로젝트 배포에 필요한 파일이 있는 폴더
webpack으로 빌드하고 (여기서는 package.json에 명시되어있는 vue-cli-service로 빌드.. 이것도 webpack)
빌드된 것이 public/index.html에 주입이돼서 화면이 그려지게되는 전형적인 SPA(single page application) 구조라고 보시면됩니다.
tests/unit
유닛 테스팅 관련 폴더
unit 테스트를 Jest로 선택했기 때문에 Jest 문법으로 정의가 되어있습니다.
tests/unit/example.spec.js
import { shallowMount } from "@vue/test-utils";
import HelloWorld from "@/components/HelloWorld.vue";

describe("HelloWorld.vue", () => {
  it("renders props.msg when passed", () => {
    const msg = "new message";
    const wrapper = shallowMount(HelloWorld, {
      propsData: { msg },
    });
    expect(wrapper.text()).toMatch(msg);
  });
});
강의 후반부에 test에 대해서 더 깊게 설명드리고 코드도 같이 작성해볼텐데 그 부분은 이후에 설명드리겠습니다.
.browserslistrc
.eslintrc.js
babel.config.js
jest.config.js
위 4개의 설정 파일이 모두 vue-til 프로젝트를 생성할 때, In dedicated config files를 선택했기 때문에 나온 각 도구들에 대한 설정파일입니다.
위 각각의 설정 파일들을 좀 더 튜닝을 해볼건데,
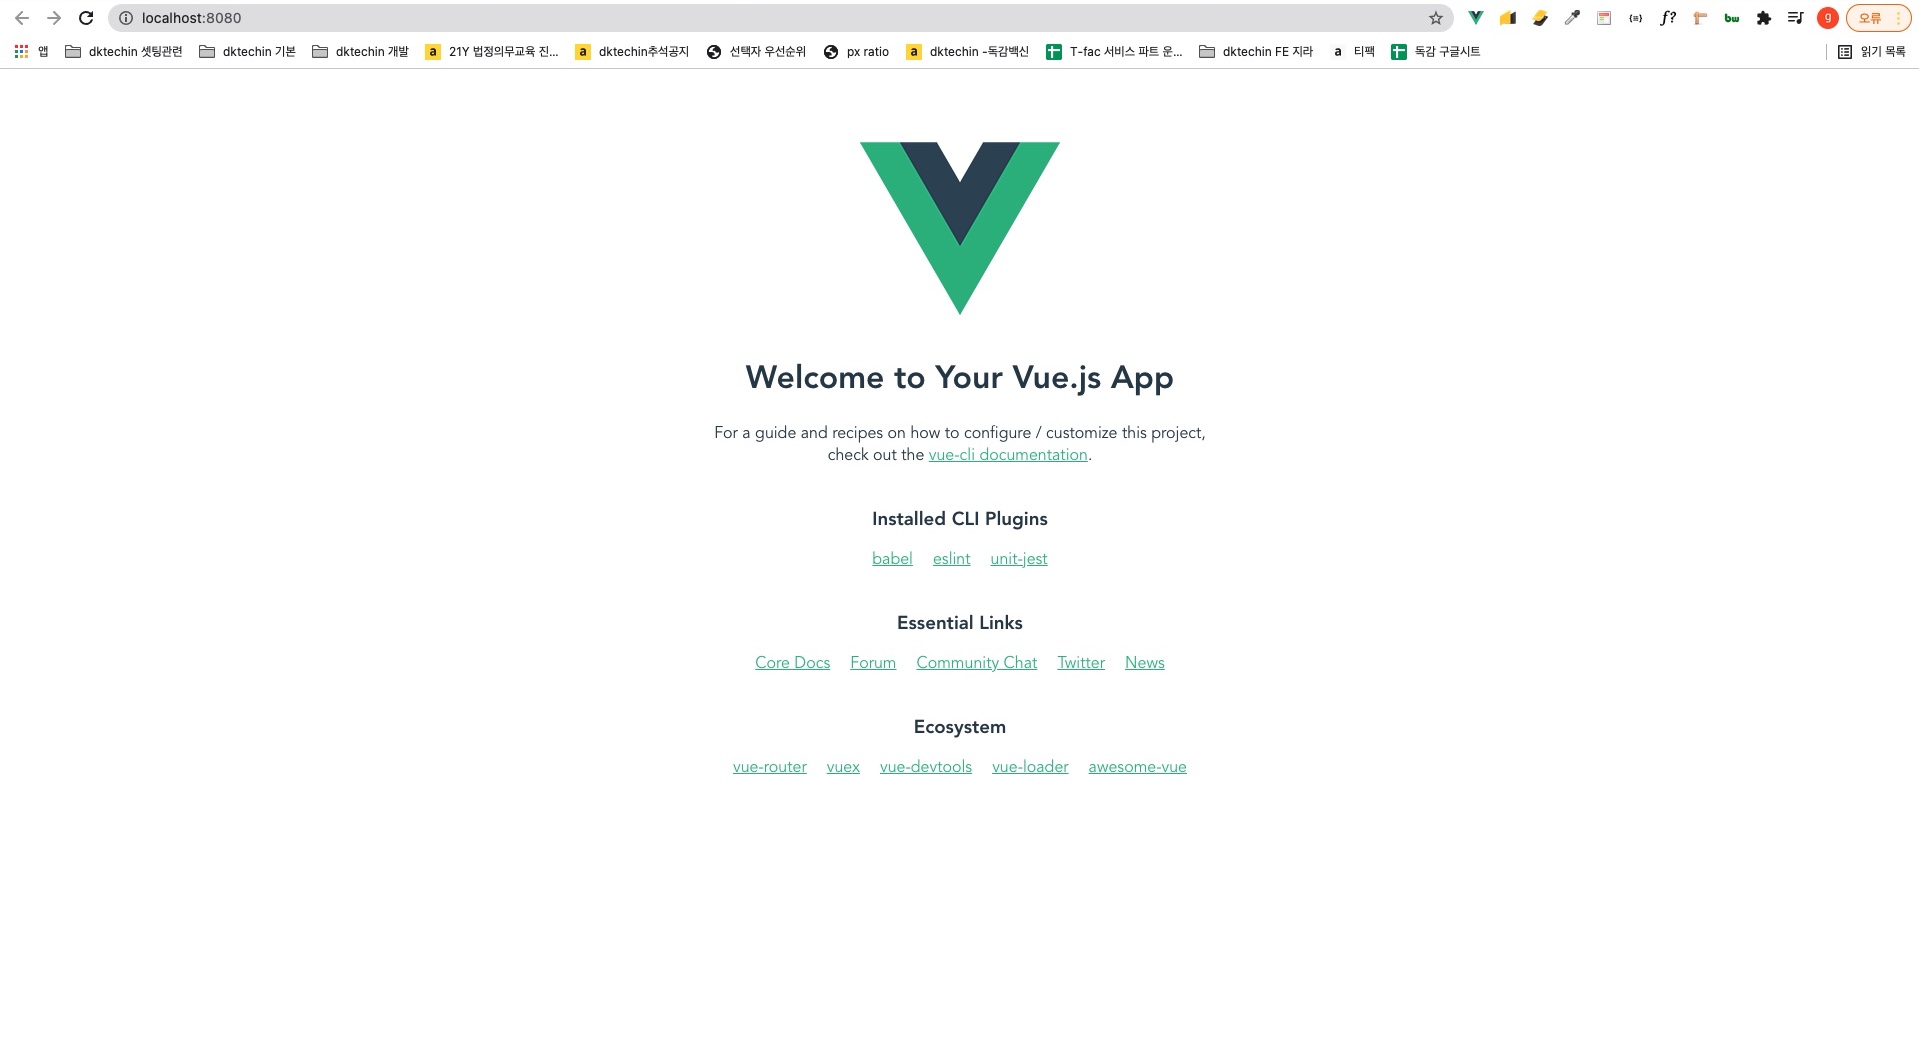
현재 생성한 프로젝트의 모습까지 확인하고
이 다음 시간에 추가로 설정해야되는 부분에 대해 같이 살펴보도록 하겠습니다.
cd vue-til/
yarn serve
eslint 예시
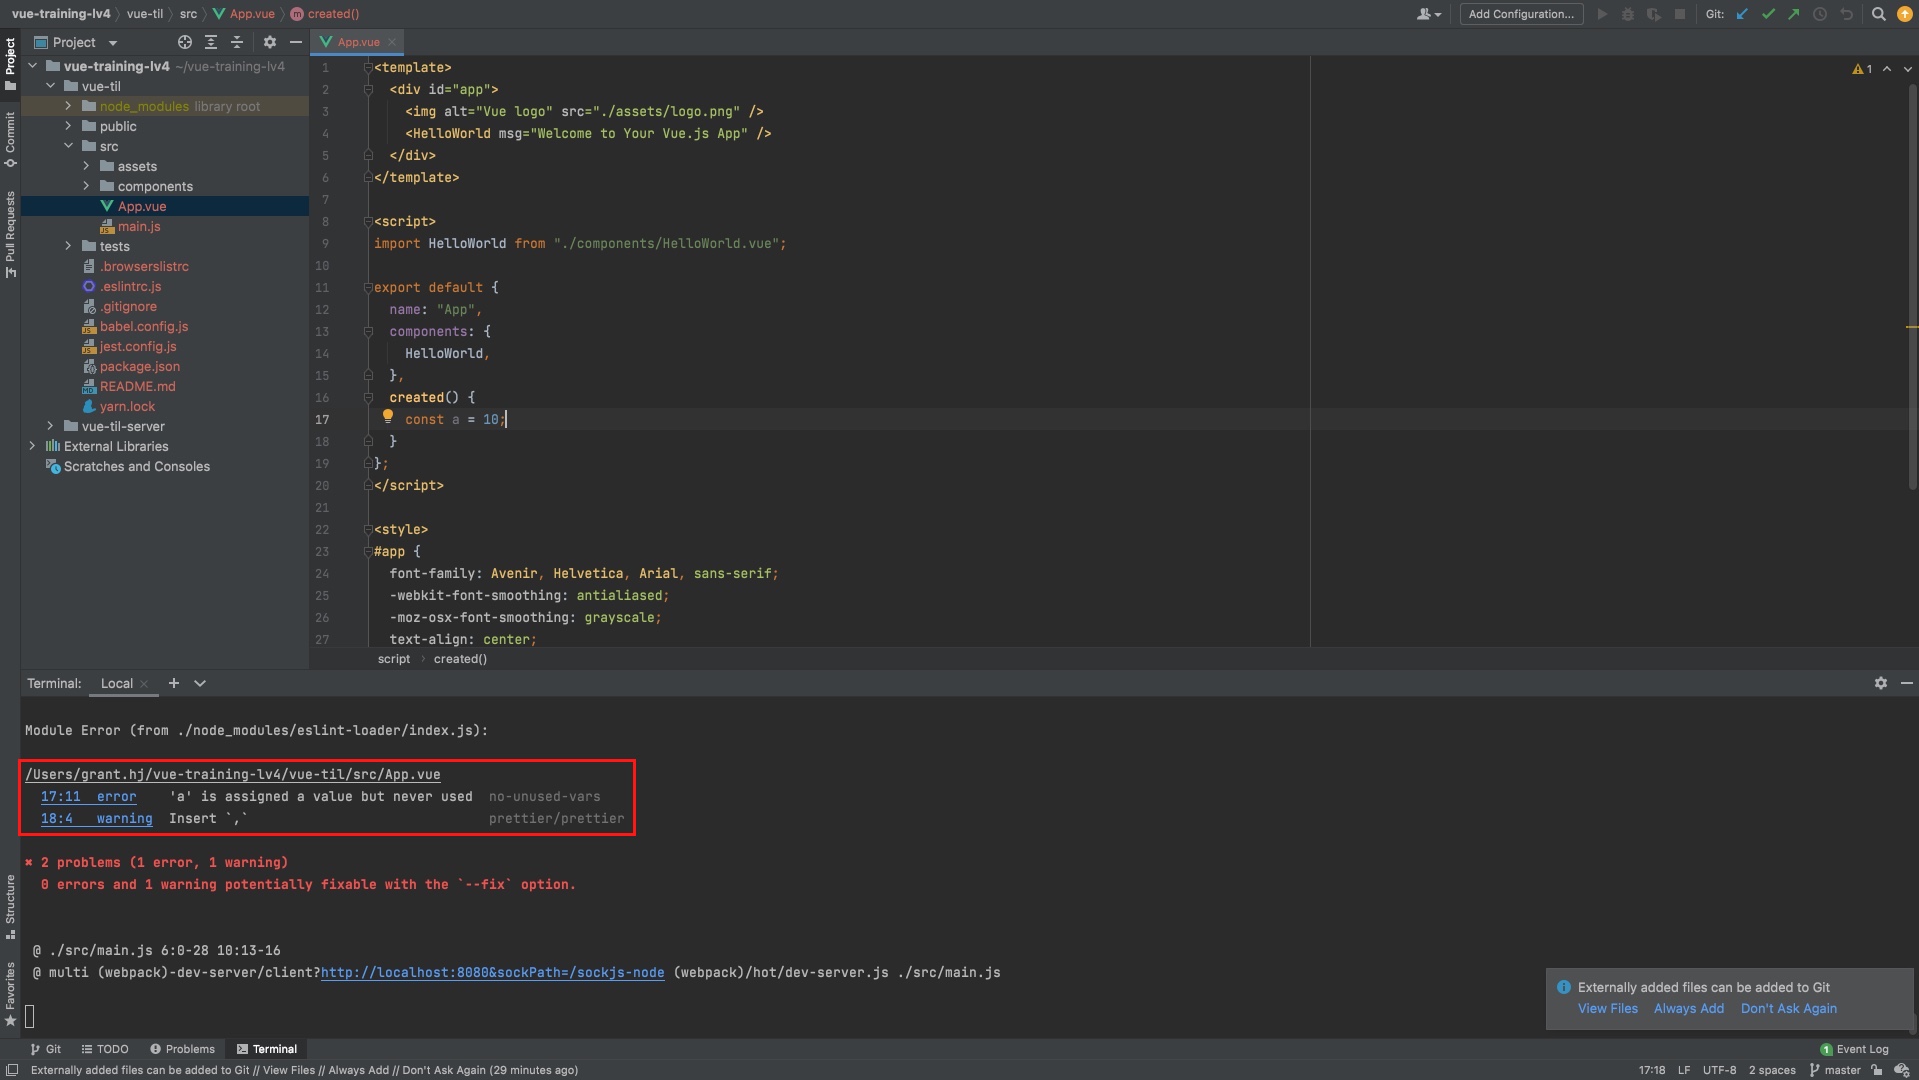
위와 같이 입력하고 저장을 누르는 순간 에러가 두가지가 뜹니다.
a라는 변수가 선언되었지만 한번도 사용된적이 없다 라는 에러- 마지막에
,추가하라는 에러
commit
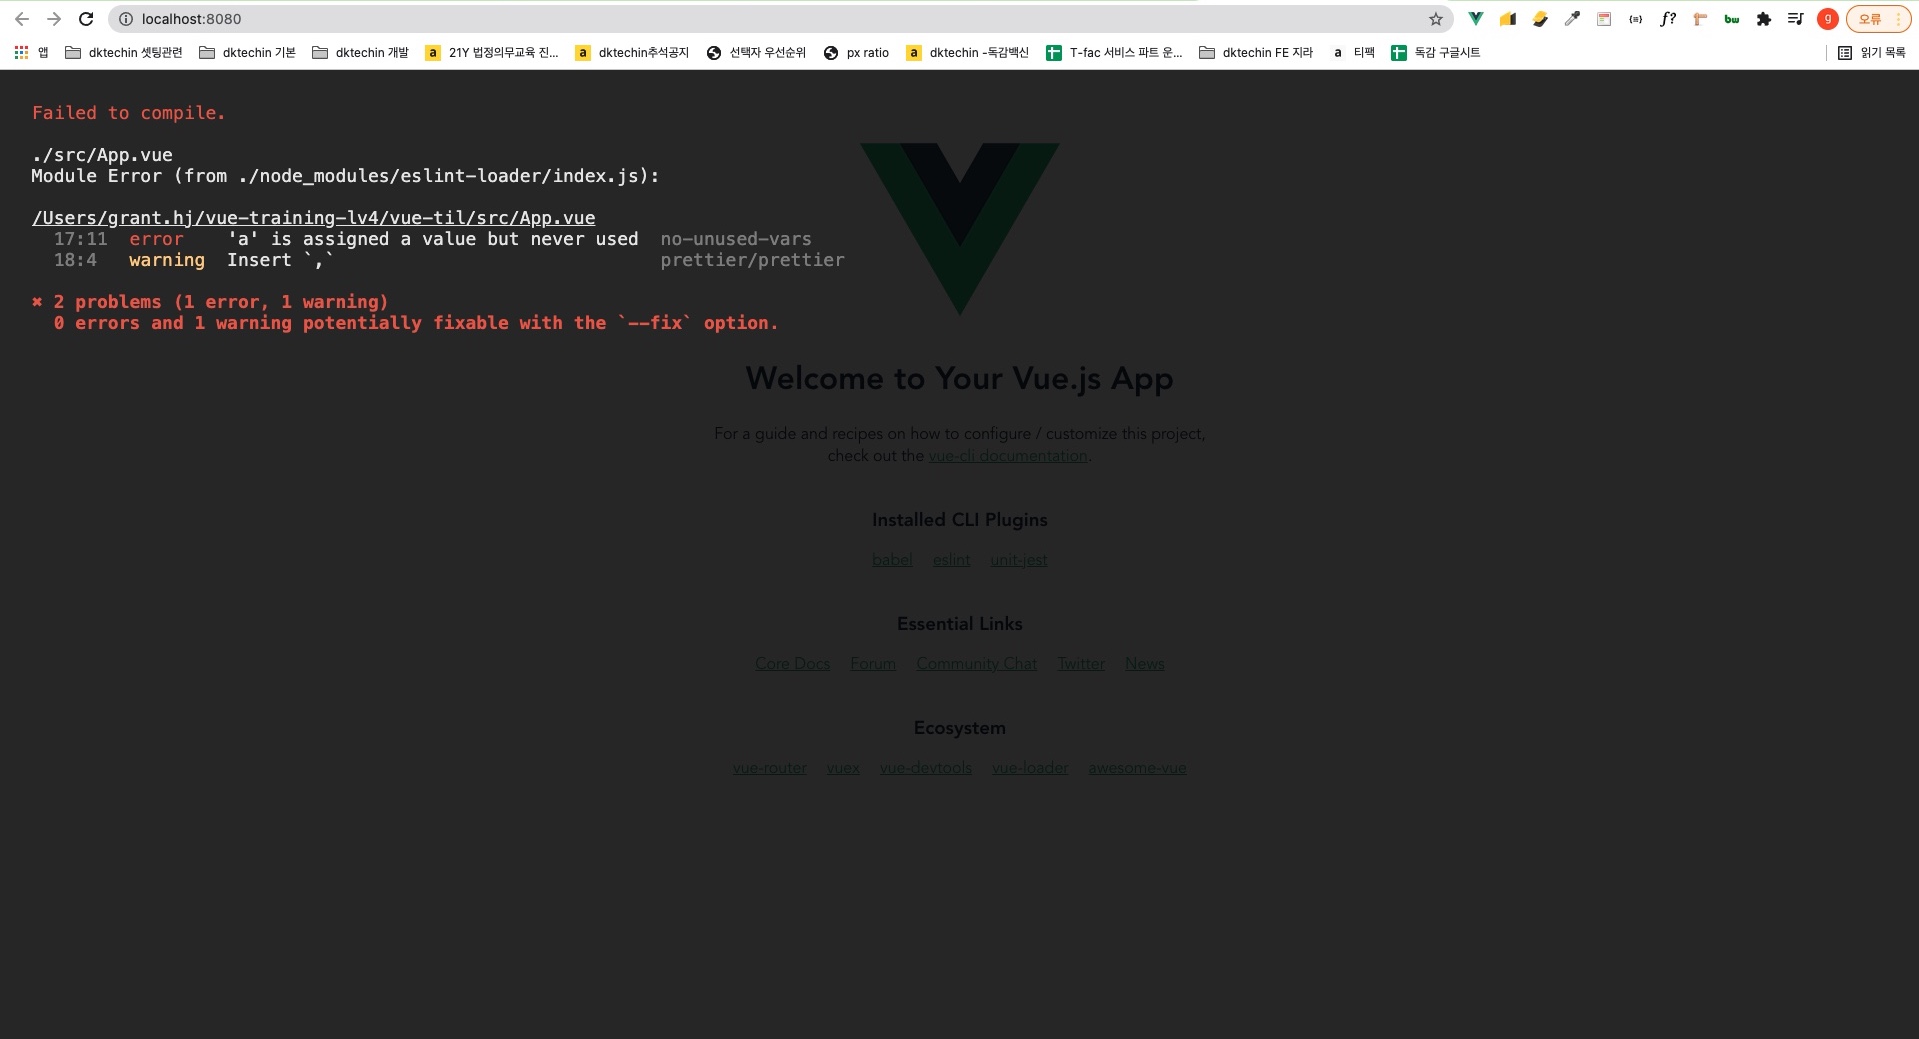
2.3 ESLint 에러가 화면에 표시되지 않게 하는 방법
vue.config.js 파일 생성
에러 발생시 화면을 덮는 오버레이 생성 방지
웹팩의 devServer 옵션을 통해 설정합니다.
module.exports = {
    devServer: {
        overlay: false,
    }
}
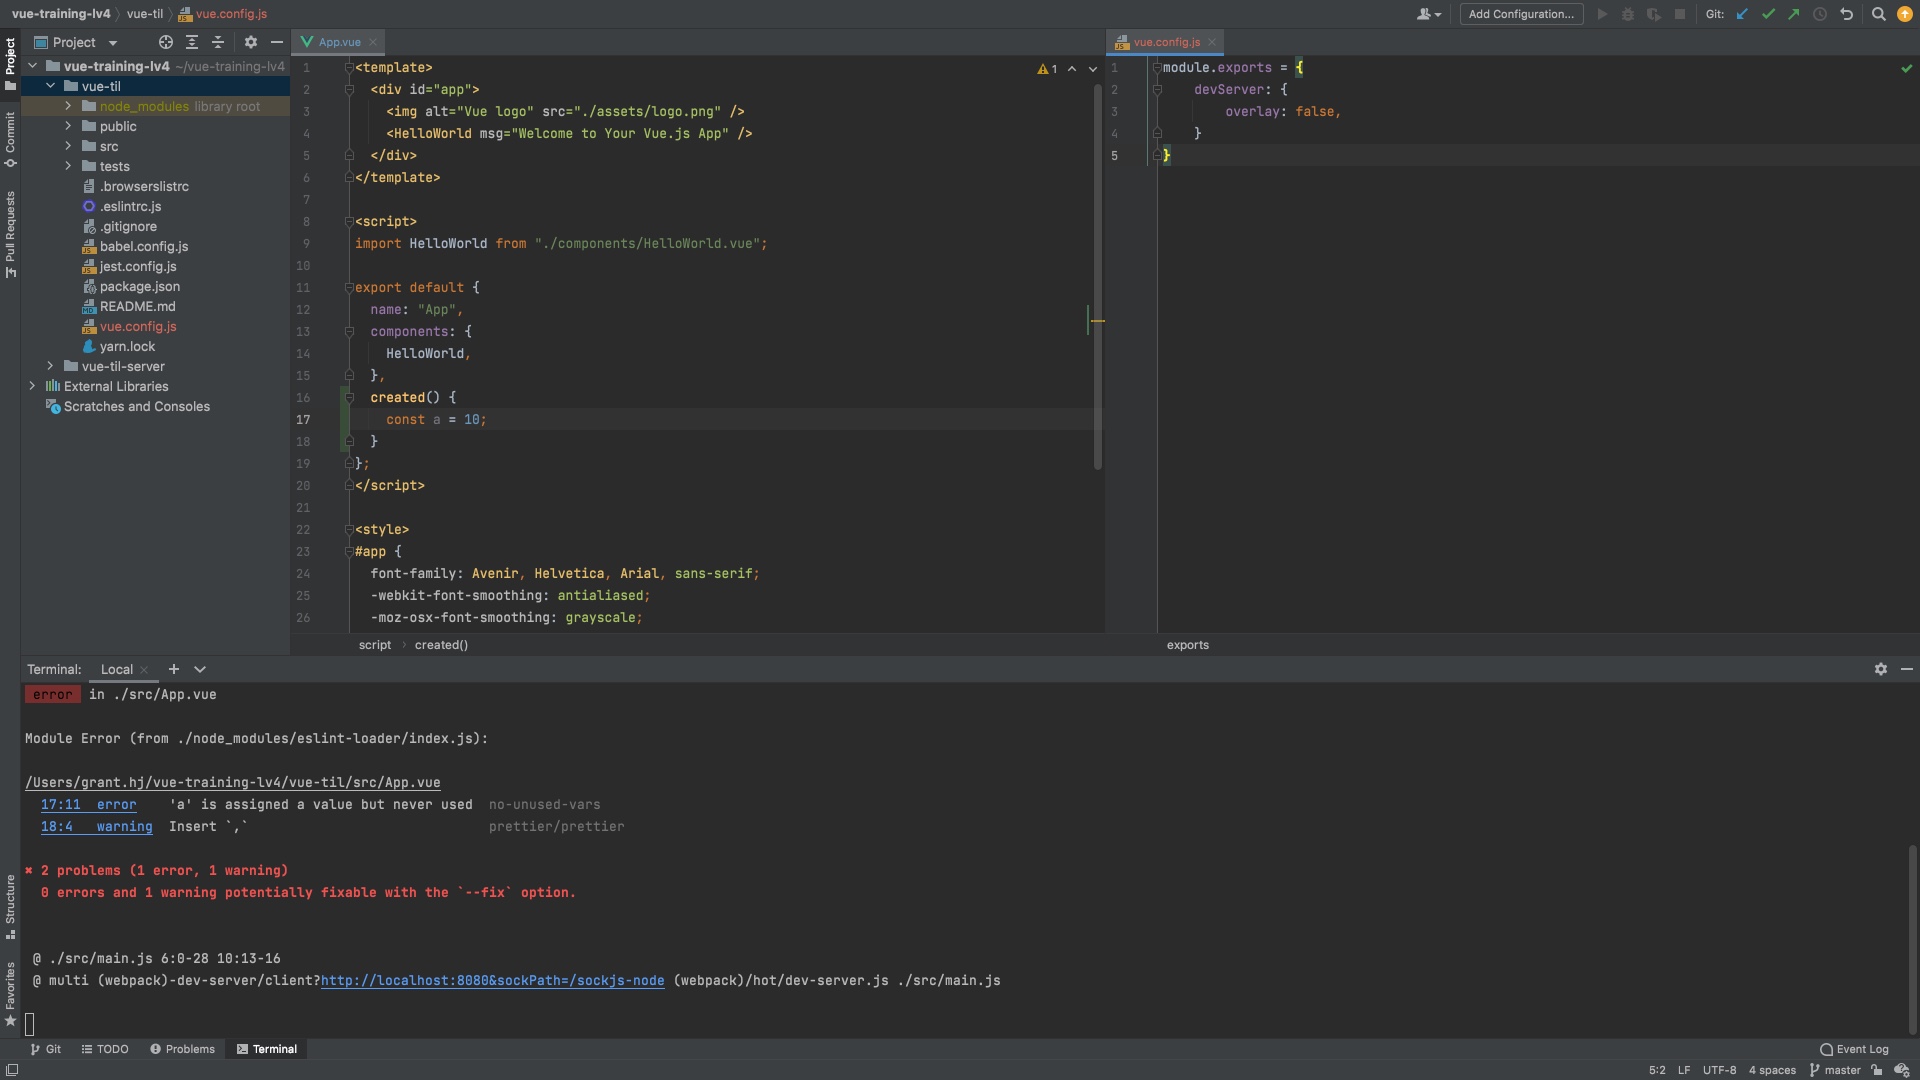
이렇게 에러는 발생하지만,
이전처럼 오버레이로 화면을 덮진 않는다.
2.4 ESLint 설정 파일 안내
ESLintsms JavaScript 코드에서 발견된 문제 패턴을 식별하기위한 정적 코드 분석 도구입니다.
JavaScript에서 에러가 날 수 있는 가능성들을 모두 제거하는 것이 ESLint라고 보시면됩니다.
.eslintrc.js rules
module.exports = {
  root: true,
  env: {
    node: true,
  },
  extends: ["plugin:vue/essential", "eslint:recommended", "@vue/prettier"],
  parserOptions: {
    parser: "babel-eslint",
  },
  rules: {
    "no-console": process.env.NODE_ENV === "production" ? "warn" : "off",
    "no-debugger": process.env.NODE_ENV === "production" ? "warn" : "off",
  },
  overrides: [
    {
      files: [
        "**/__tests__/*.{j,t}s?(x)",
        "**/tests/unit/**/*.spec.{j,t}s?(x)",
      ],
      env: {
        jest: true,
      },
    },
  ],
};
console입력 금지 룰:console코드가 개발시에 들어가는 것은 상관이 없다.
하지만production으로 빌드될 땐 들어가면 안된다!
위 코드를 보시면 이런식으로 설정되어있다.
vue-cli로 생성한 프로젝트의 장점
vue 파일들의 내용이 바뀌었을 때 webpack의 hot module replacement 같은 것을 이용해서 쉽게 새로고침이됩니다.
이러한 설정들이 이미 다 설정이 되어있습니다.
하지만 설정 파일이 수정되었을 땐 서버를 종료했다 다시 실행시켜주십시오.
화면에 빨간색 줄이 안보이시는 분들은 3.7 ESLint 플러그인 설치 및 설정 변경을 참고하세요.
다음 시간엔 위 rules 부분에다가 여러 사람이 코드를 같이 작업할 때 좀 더 통일성있고 이쁘게 작성할 수 있또록
prettier도 같이 설정해보도록 하겠습니다.
2.5 Prettier 소개 및 ESLint와 같이 사용해야 하는 이유
2.5.1 .eslintrc.js
.eslintrc.js에서 프리티어 설정을 해야되는 이유.prettierrc에서 프리티어 설정을 하게되면
 // .prettierrc
 {
    "printWidth": 80
 }
위에서 정의한 규칙대로 코드가 정리가된다.
처음에 VUE CLI로 프로젝트를 생성할 때,ESLint와Prettier를 같이 선택했었다.
이는package.json을 보시면 확인하실 수 있다.// package.json { "name": "vue-til", "version": "0.1.0", "private": true, "scripts": { "serve": "vue-cli-service serve", "build": "vue-cli-service build", "test:unit": "vue-cli-service test:unit", "lint": "vue-cli-service lint" }, "dependencies": { "core-js": "^3.6.5", "vue": "^2.6.11" }, "devDependencies": { "@vue/cli-plugin-babel": "~4.5.0", "@vue/cli-plugin-eslint": "~4.5.0", "@vue/cli-plugin-unit-jest": "~4.5.0", "@vue/cli-service": "~4.5.0", "@vue/eslint-config-prettier": "^6.0.0", "@vue/test-utils": "^1.0.3", "babel-eslint": "^10.1.0", "eslint": "^6.7.2", "eslint-plugin-prettier": "^3.3.1", "eslint-plugin-vue": "^6.2.2", "prettier": "^2.2.1", "vue-template-compiler": "^2.6.11" } }위에서 보시면 이미
devDependencies목록 중에eslint와prettier관련해서 들어가있는 것을 볼 수 있다.
여튼 그래서.prettierrc설정파일로prettier관련 설정을 정의할 수 있지만,
이 설정이.eslintrc.js로 들어가야되는 이유는// .eslintrc.js module.exports = { root: true, env: { node: true, }, extends: ["plugin:vue/essential", "eslint:recommended", "@vue/prettier"], parserOptions: { parser: "babel-eslint", }, rules: { "no-console": process.env.NODE_ENV === "production" ? "warn" : "off", "no-debugger": process.env.NODE_ENV === "production" ? "warn" : "off", }, overrides: [ { files: [ "**/__tests__/*.{j,t}s?(x)", "**/tests/unit/**/*.spec.{j,t}s?(x)", ], env: { jest: true, }, }, ], };.eslintrc.js의rules부분과 충돌나기 때문에.eslintrc.js가 우선시되어야한다.
따라서.prettierrc설정파일에 프리티어 설정이 따로 있는 것이 아니라.eslintrc.js안에 프리티어 설정을 넣어줘야한다.
그렇게하면 프리티어로 코드 정리도 해주면서eslint로 에러까지 잡아주게된다.
두 가지 라이브러리를 함께 사용할 수 있게 되는 것이다.
2.6 ESLint에 Prettier 규칙 적용
-
위 블로그 글에서
eslint,prettier에 대해 자세하게 설명함
2.6.1 .eslintrc.js
module.exports = {
  root: true,
  env: {
    node: true,
  },
  extends: ["plugin:vue/essential", "eslint:recommended", "@vue/prettier"],
  parserOptions: {
    parser: "babel-eslint",
  },
  rules: {
    "no-console": process.env.NODE_ENV === "production" ? "warn" : "off",
    "no-debugger": process.env.NODE_ENV === "production" ? "warn" : "off",
    "prettier/prettier": [
      'error', // off, warn, error <- 프리티어 규칙에 어긋나는 것들을 전부 error라고 보겠음
      // 이 객체에 정의하는 프리티어 규칙에 어긋나면 터미널에서 error로 잡는다.
      // 아래 규칙들은 개인 선호에 따라 prettier 문법 적용
      // https://prettier.io/docs/en/options.html
      {
        singleQuote: true,
        semi: true,
        useTabs: true,
        tabWidth: 2,
        trailingComma: 'all',
        printWidth: 80,
        bracketSpacing: true,
        arrowParens: 'avoid',
      },
    ],
  },
  overrides: [
    {
      files: [
        "**/__tests__/*.{j,t}s?(x)",
        "**/tests/unit/**/*.spec.{j,t}s?(x)",
      ],
      env: {
        jest: true,
      },
    },
  ],
};
2.6.2 error

- 위와 같이 에러가 떴을 때 자동으로 수정되게끔 할 수 있음
- 안되면 다음 강의 참고 (에디터상에서의 eslint 플러그인과 prettier 플러그인에 대해 살펴보겠음)
- 그리고 파일에서 빨간줄 안뜨는데 그것도 다음 강의 참고
Diff
2.7 ESLint 플러그인 설치 및 설정 변경
- 난 webstorm이라 미리해봄
- 위와 같이 설정해주면 파일 상에서 에러로 빨강줄로 잡히고 저장했을 때 자동 수정도된다.
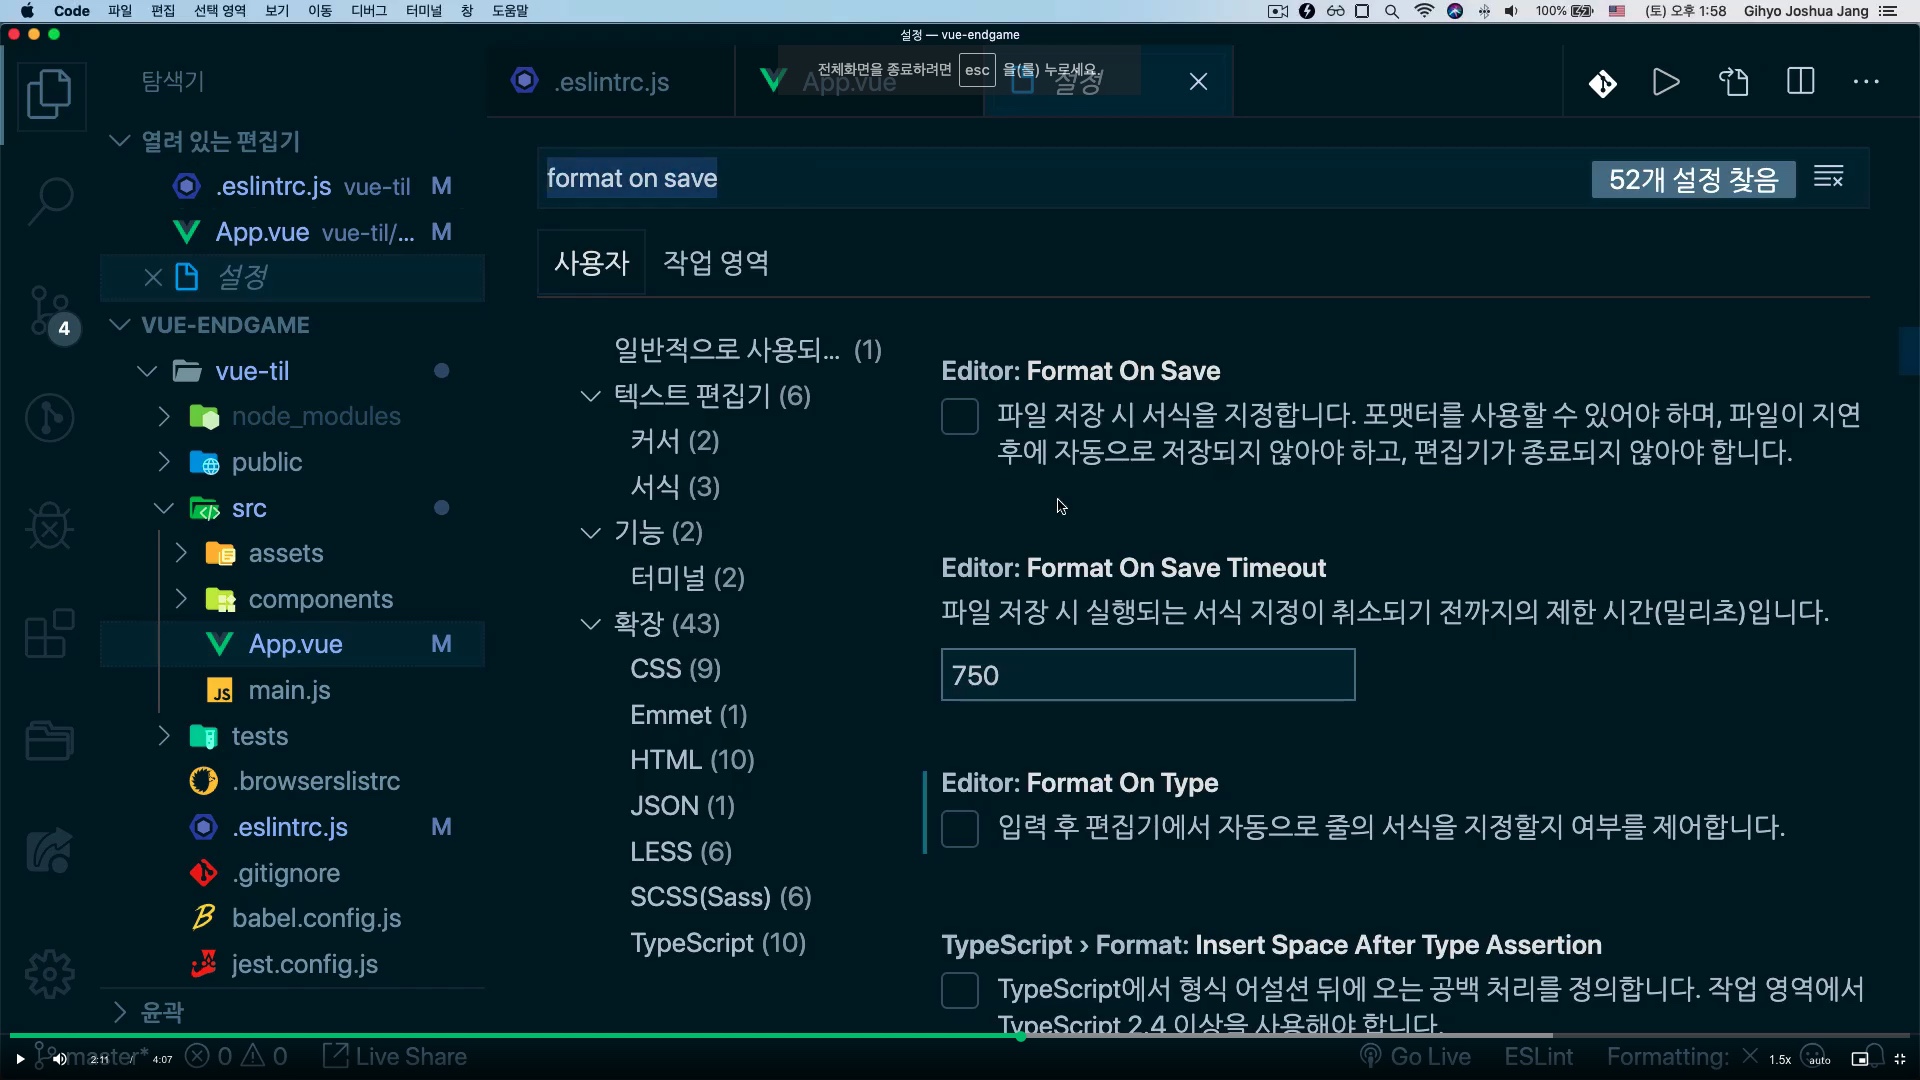
- 깃헙 브랜치에 올라간 코드 확인하기 - vscode 에디터 설정파일 (settings.json)
- Open Settings(settings.json)에 아래 내용 추가
{
  "editor.codeActionsOnSave": {
    "source.fixAll.eslint": true
  },
  "eslint.workingDirectories": [
    {"mode": "auto"}
  ],
}
2.8 Prettier 플러그인 확인 및 설정할 때 주의사항
- vscode.. webstorm도 그런거같음
- 에디터 prettier 플러그인은 ‘사용안함'으로 설정해야되나봄
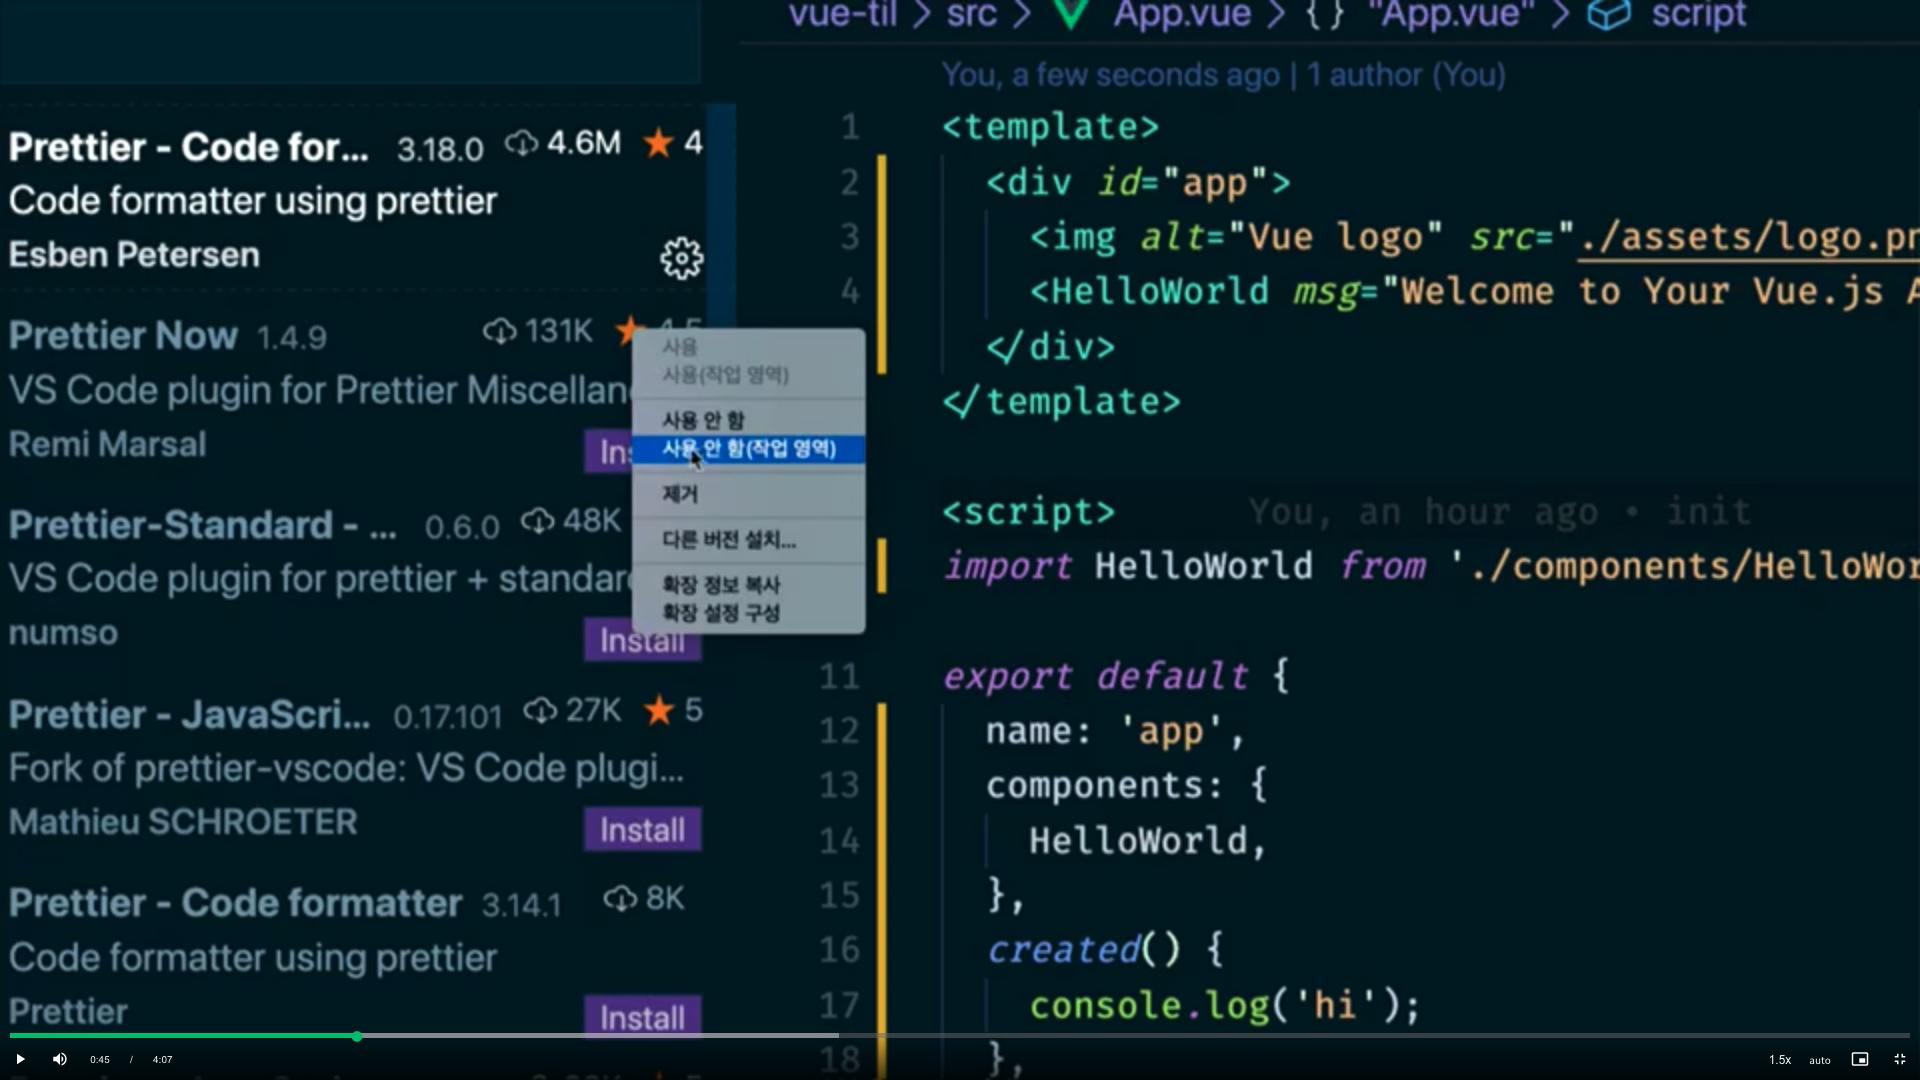
- 이렇게 prettier는 사용 안함이라고 해줘야되나봄
- pretter도 어차피 .eslintrc.js 파일 안에 설정해서 그런가봄
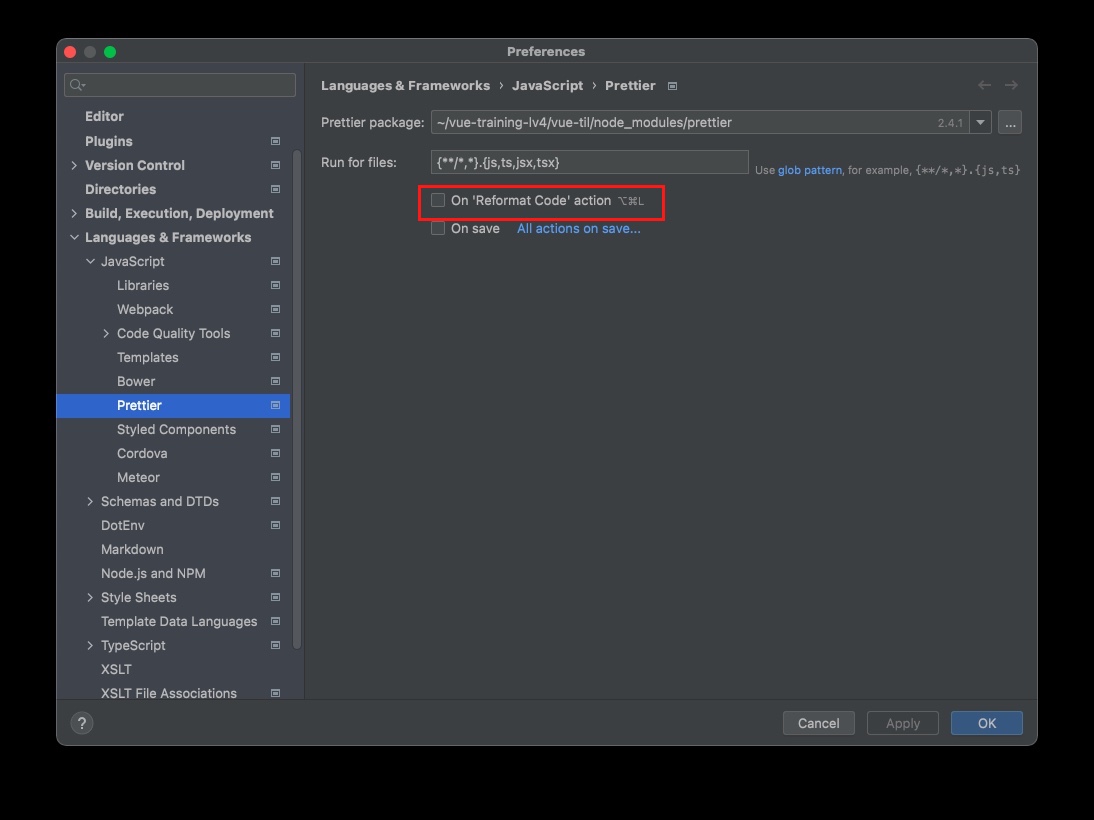
format on save도 꺼줘야됨- 그래야 .eslintrc.js 설정과 충돌이 안남

2.9 프로젝트 레벨로 ESLint 규칙을 관리해야 하는 이유와 ESLint 규칙 설명
- 프로젝트마다 작업하는 개발자가 여러명
- 개발 에디터가 사람마다 다르고 설정도 다를거임
- 그렇게되면 코드 스타일이 중구난방
- 그런 코드 스타일을 일치시킬 수 있음
// .eslintrc.js
module.exports = {
  root: true,
  env: {
    node: true,
  },
  extends: [
    "plugin:vue/essential",
    "eslint:recommended",
    "@vue/prettier" // @는 organization을 의미함. vue organization에서 Prettier를 제공한다고 보면됨, 즉 vue를 개발하는 팀에서 제공한다는 뜻
                    // 이 안에 어떤 것이 있는지 살펴보는 것도 좋음
  ],
  parserOptions: {
    parser: "babel-eslint",
  },
  rules: {
    "no-console": process.env.NODE_ENV === "production" ? "warn" : "off",
    "no-debugger": process.env.NODE_ENV === "production" ? "warn" : "off",
    "prettier/prettier": [
      'error', // off, warn, error <- 프리티어 규칙에 어긋나는 것들을 전부 error라고 보겠음
      // 이 객체에 정의하는 프리티어 규칙에 어긋나면 터미널에서 error로 잡는다.
      // 아래 규칙들은 개인 선호에 따라 prettier 문법 적용
      // https://prettier.io/docs/en/options.html
      {
        singleQuote: true,
        semi: true,
        useTabs: true,
        tabWidth: 2,
        trailingComma: 'all',
        printWidth: 80,
        bracketSpacing: true,
        arrowParens: 'avoid',
      },
    ],
  },
  overrides: [
    {
      files: [
        "**/__tests__/*.{j,t}s?(x)",
        "**/tests/unit/**/*.spec.{j,t}s?(x)",
      ],
      env: {
        jest: true,
      },
    },
  ],
};
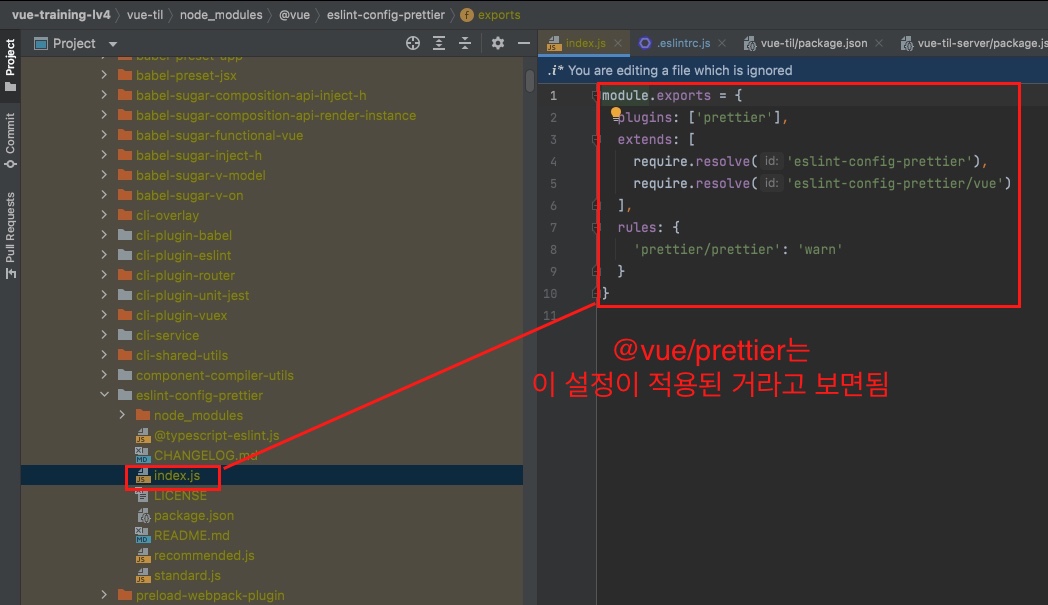
- 즉 위의
extends프로퍼티 키에 적용된 내용들은 위와 같이 따로 설정되어있는 설정들을 불러와 적용하는거라고 보면됨 - 그래서 따로 설정들을 해줄필요없이 위와 같이 이미 설정되어있는 파일들을
extends로 불러오면되는거
- 즉 위의
- 다음시간엔 파일의 상대경로, 절대경로에 대해 말해보겠음
@로 절대경로 설정하는 방법도 알려드리겠음
Diff
2.10 파일의 절대 경로를 설정해야 하는 이유
- 파일이 많아지고 폴더 뎁스가 복잡해지면 상대경로로 파일을
import하는게 번거로워짐- 때문에
@절대경로 설정을 통해 복잡한 경로를 단순화시키는 것이 좋음 - 다음 시간에 이 절대경로 설정 방법을 알아보도록 하겠음
- 때문에
Diff
2.11 파일을 절대 경로로 찾기 설정
- jsconfig.json 파일링크(Vue TIL 저장소)
- jsconfig.json 파일을 활용해 설정하는 것은 VSCode 에디터에서 적용하는 방식
- 다른 에디터에선 적용 안됨
2.11.1 2021-11-22 제안 예정
1. eslint 기능 강화
- eslint 규칙 추가 및 prettier 추가
- stylelint 규칙 추가
- 웹스톰 자동 수정기능 설정
- git hook 기능으로 커밋 전 eslint 규칙에 따라 자동 fix 및 error 있으면 커밋 안되게 방어
- 수정 후 커밋
2. 기대효과
- 코드 스타일 일치
- 불필요한 코드 제거
- 다양한 코드 힌트를 통해 코드 개선 가능
- 타입비교 연산자 힌트 제공
- if 문을 삼항 연산자로 바꾸는 힌트 제공
- async/await 구문 추가해야되는지 아닌지 힌트 제공
- return 전에 불필요한 변수있는지 없는지 파악 및 한줄로 줄이는 힌트 제공
- 인라인 태그 안에 블록태그 사용 못함 <- 이에 대한 힌트 제공
- 해당 태그 속성이 아닌데 존재한다면 제거요청하는 힌트 제공
- 변수명 정하는 컨벤션 같은것은 아니겠지만 코드 컨벤션을 읽어보지 않아도 지킬 수 있는 것들이 많아짐 (불필요한 리소스 제거)
3. 위 효과를 통해 최종적으로 기대할 수 있는 효과
- 작업시 효율 (불필요한 리소스 제거, 불필요한 diff 제거 등)
- 메모리 효율 (불필요한 코드 및 불필요한 문법을 줄임으로써 최적화)
- 예시1) if 문보다 삼항연산자가 메모리 사용이 적음
- 불필요한 async/await 문을 사용안함으로써 메모리 자원 덜 사용
4. 코드 스플리팅
- 다이나믹 임포트
5. husky 설정하기
- https://typicode.github.io/husky/#/
- https://typicode.github.io/husky/#/?id=create-a-hook
- npx husky add .husky/pre-commit "npm test"
- git add .husky/pre-commit
6. 웹스톰 설정하기
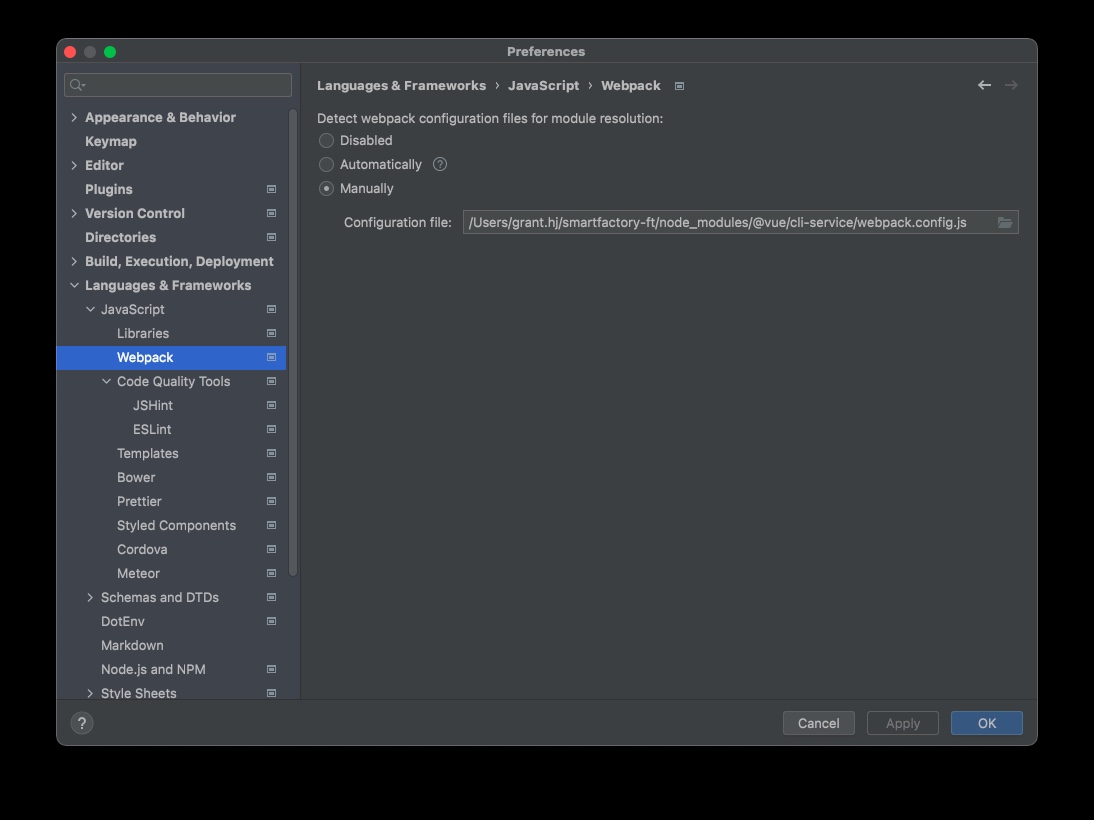
6.1 Vue alias 웹스톰 인식하기
- Preferences > languages & frameworks > javascript > webpack > Manually > 경로설정 <- 이 경로는 프로젝트폴더/node_modules/@vue/cli-service/webpack.config.js
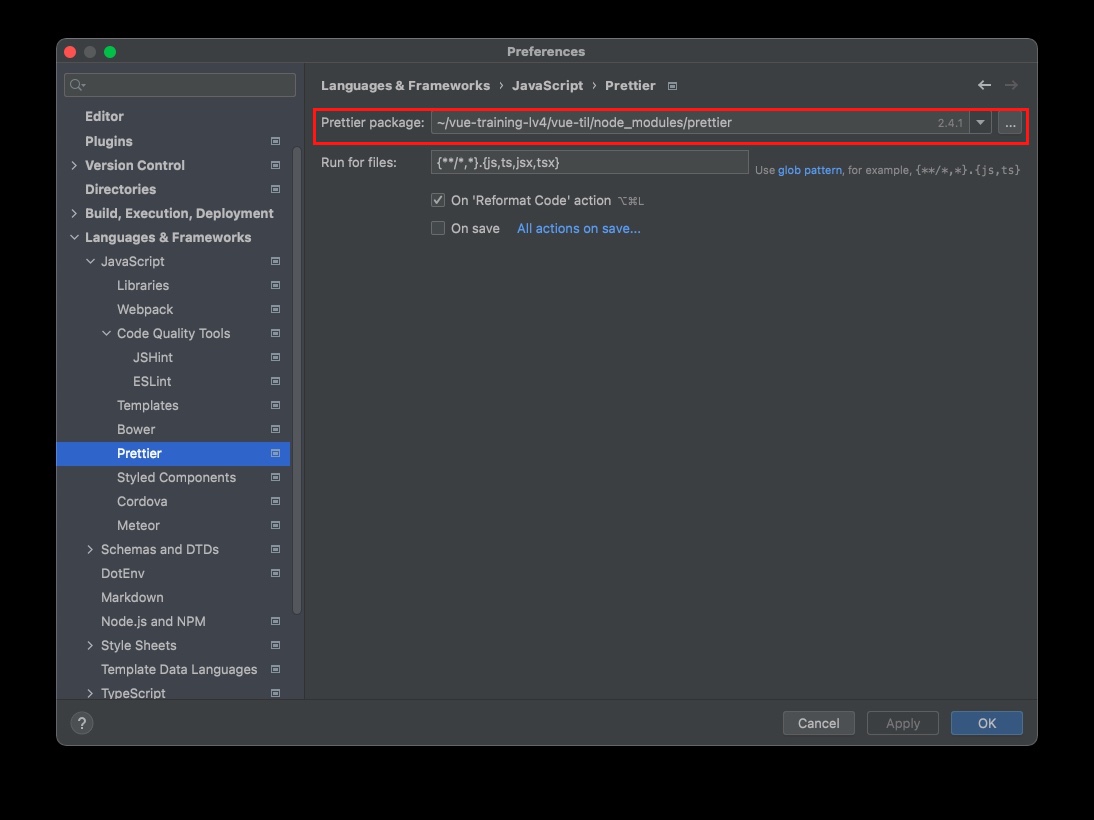
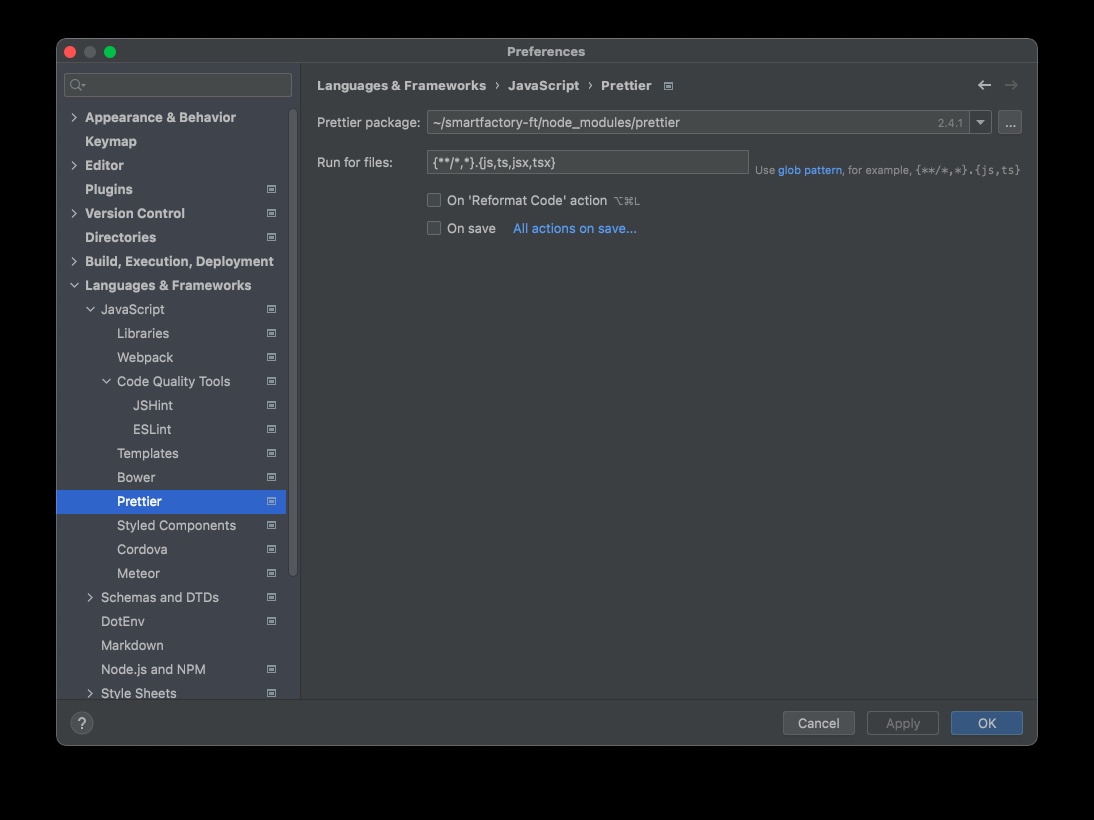
6.2 Prettier 웹스톰 인식하기
- Preferences > languages & frameworks > javascript > prettier > 프로젝트폴더/node_modules/prettier
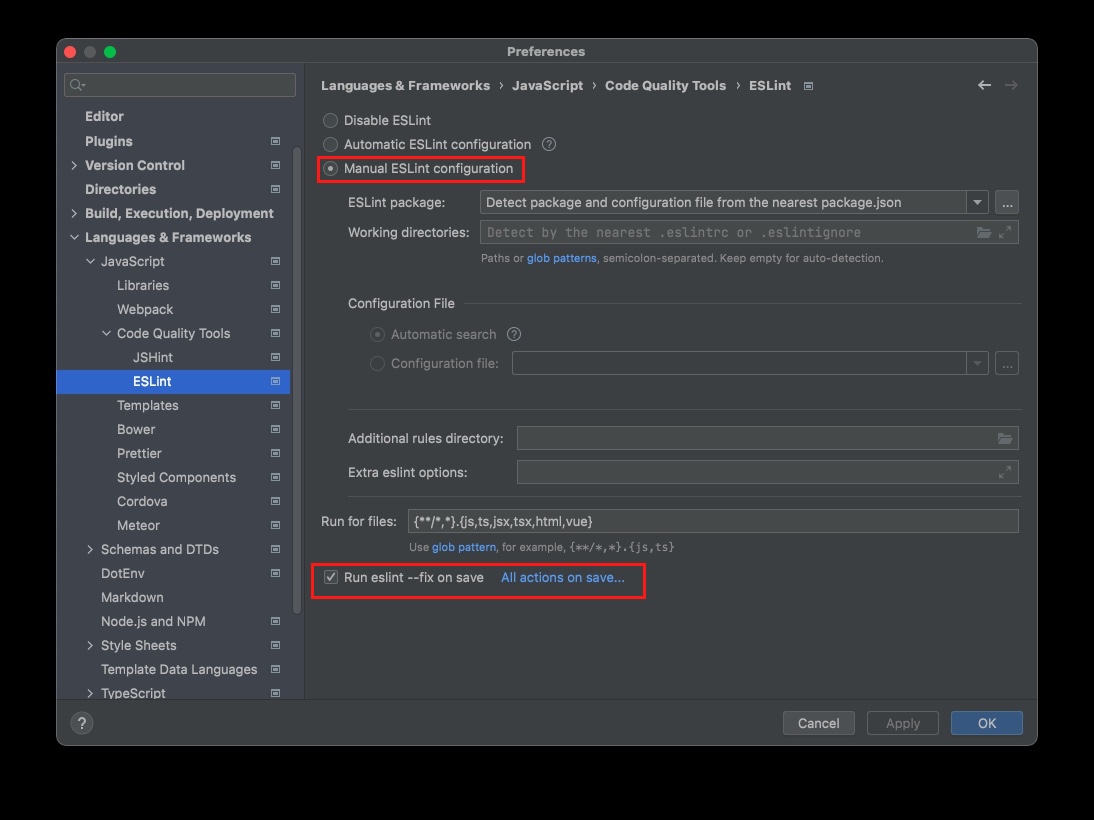
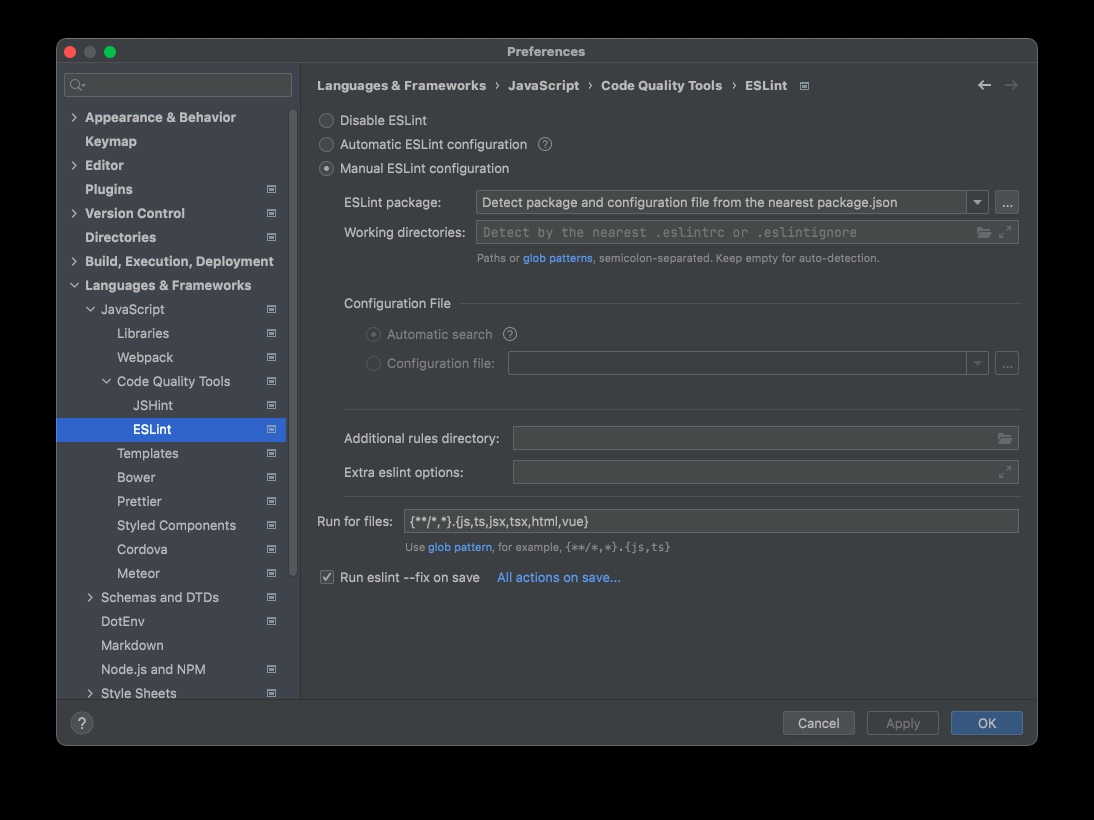
6.3 eslint 웹스톰 인식하기
- Preferences > languages & frameworks > javascript > code quality tools > eslint > manual eslint configuration, run aslant —fix on save
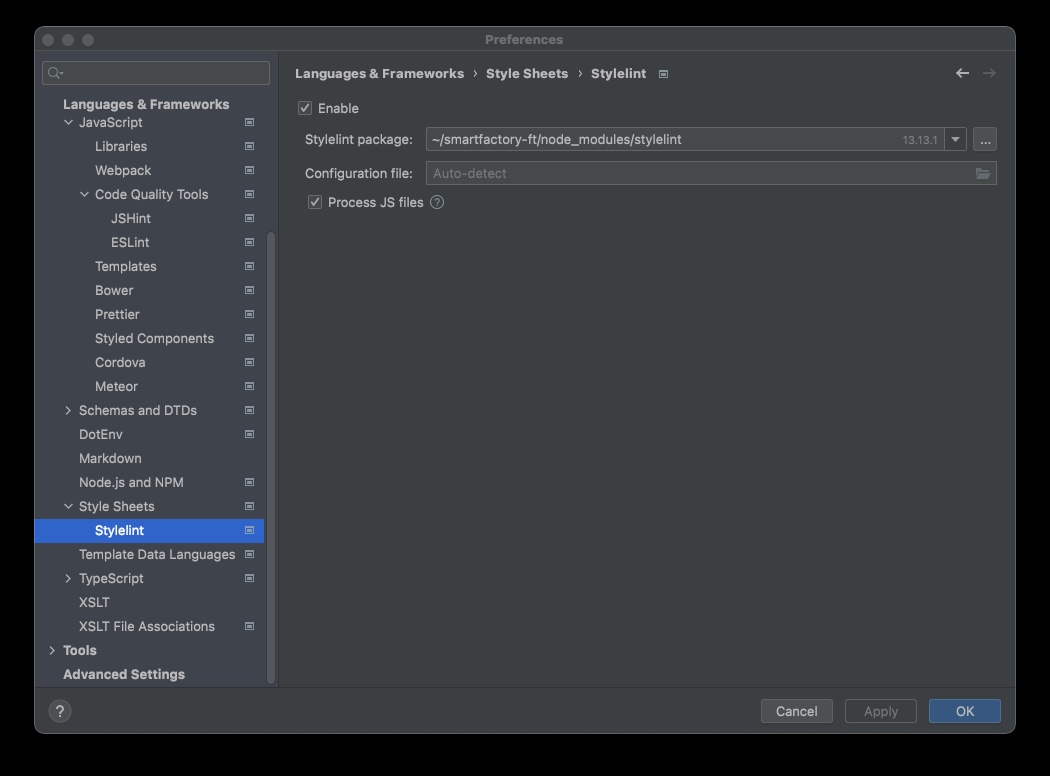
6.4 stylelint 웹스톰 인식하기
- Preferences > languages & frameworks > style sheets > style lint
2.12 애플리케이션 코딩 컨벤션 및 뷰 스타일 가이드 소개
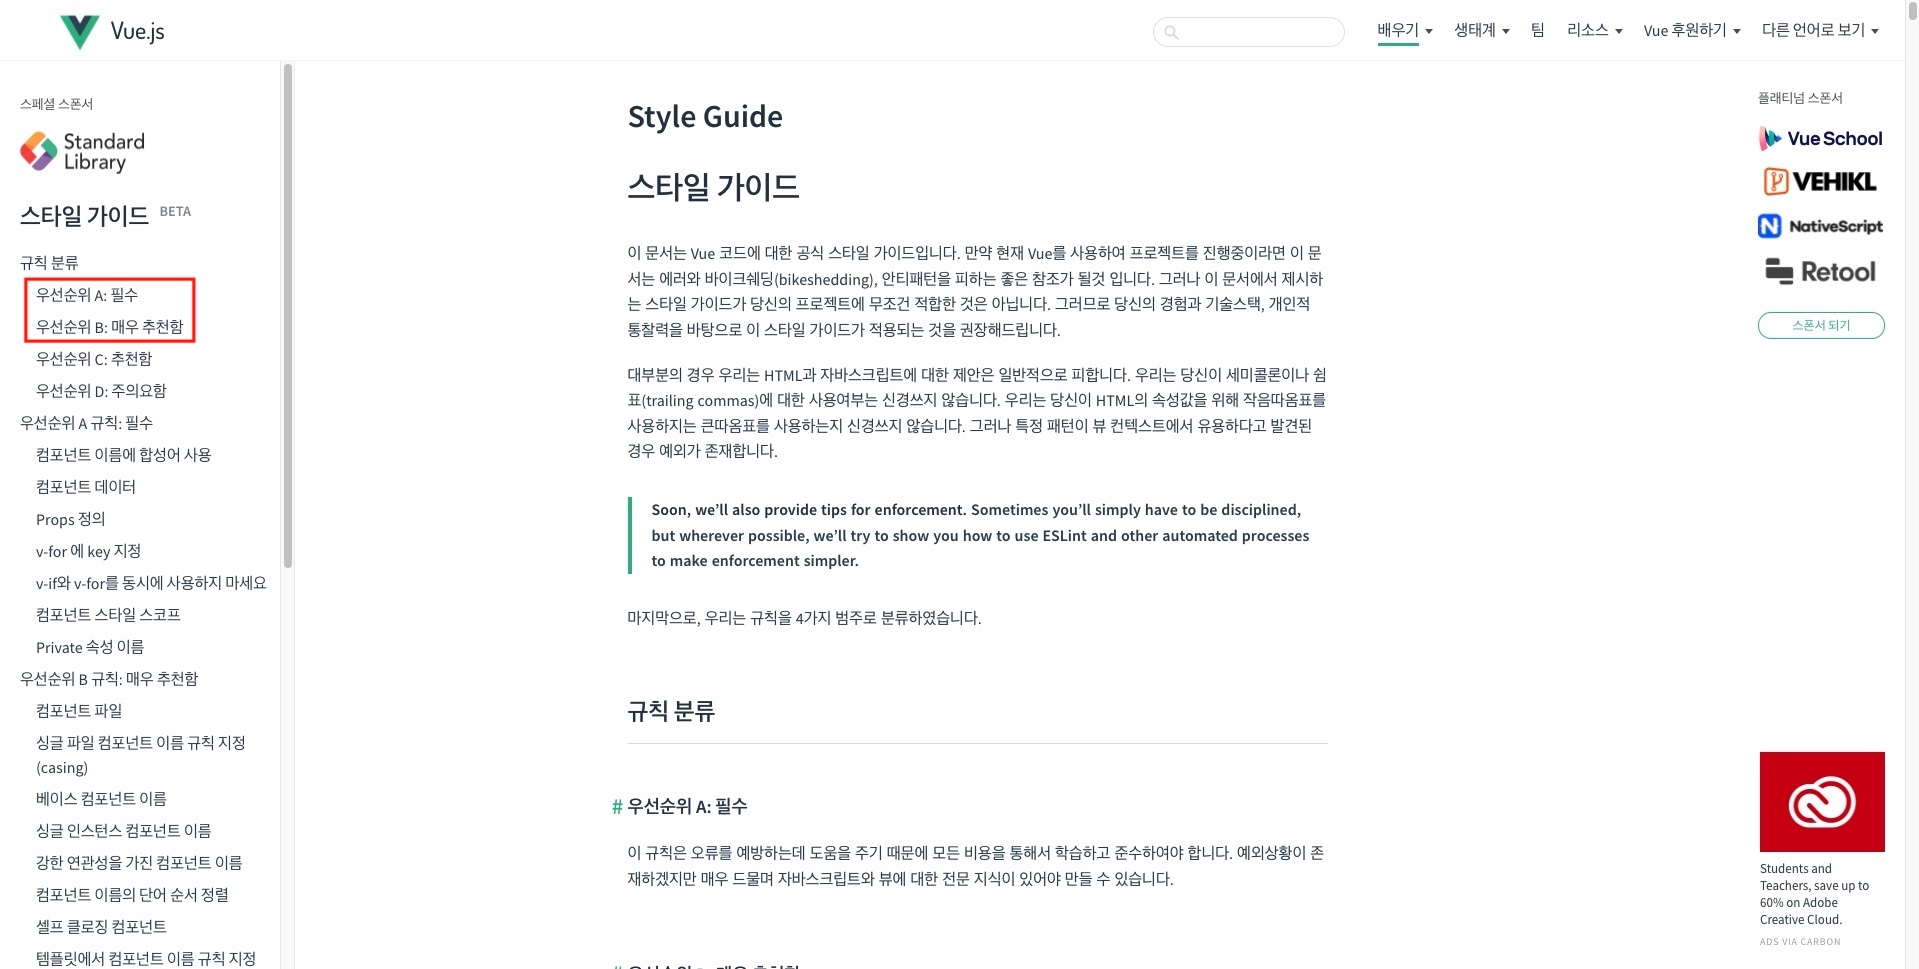
- 앞으로 만들 어플리케이션 코드는 웬만하면 뷰 스타일 가이드의 우선순위 A, B 안에 속하는걸로 작성할거임
- A는 필수, B는 강력 추천
- 이 내용을 한번 살펴보길바람