
8 라우터 실전
source: categories/study/vue-beginner-lv3/vue-beginner-lv3_8.md
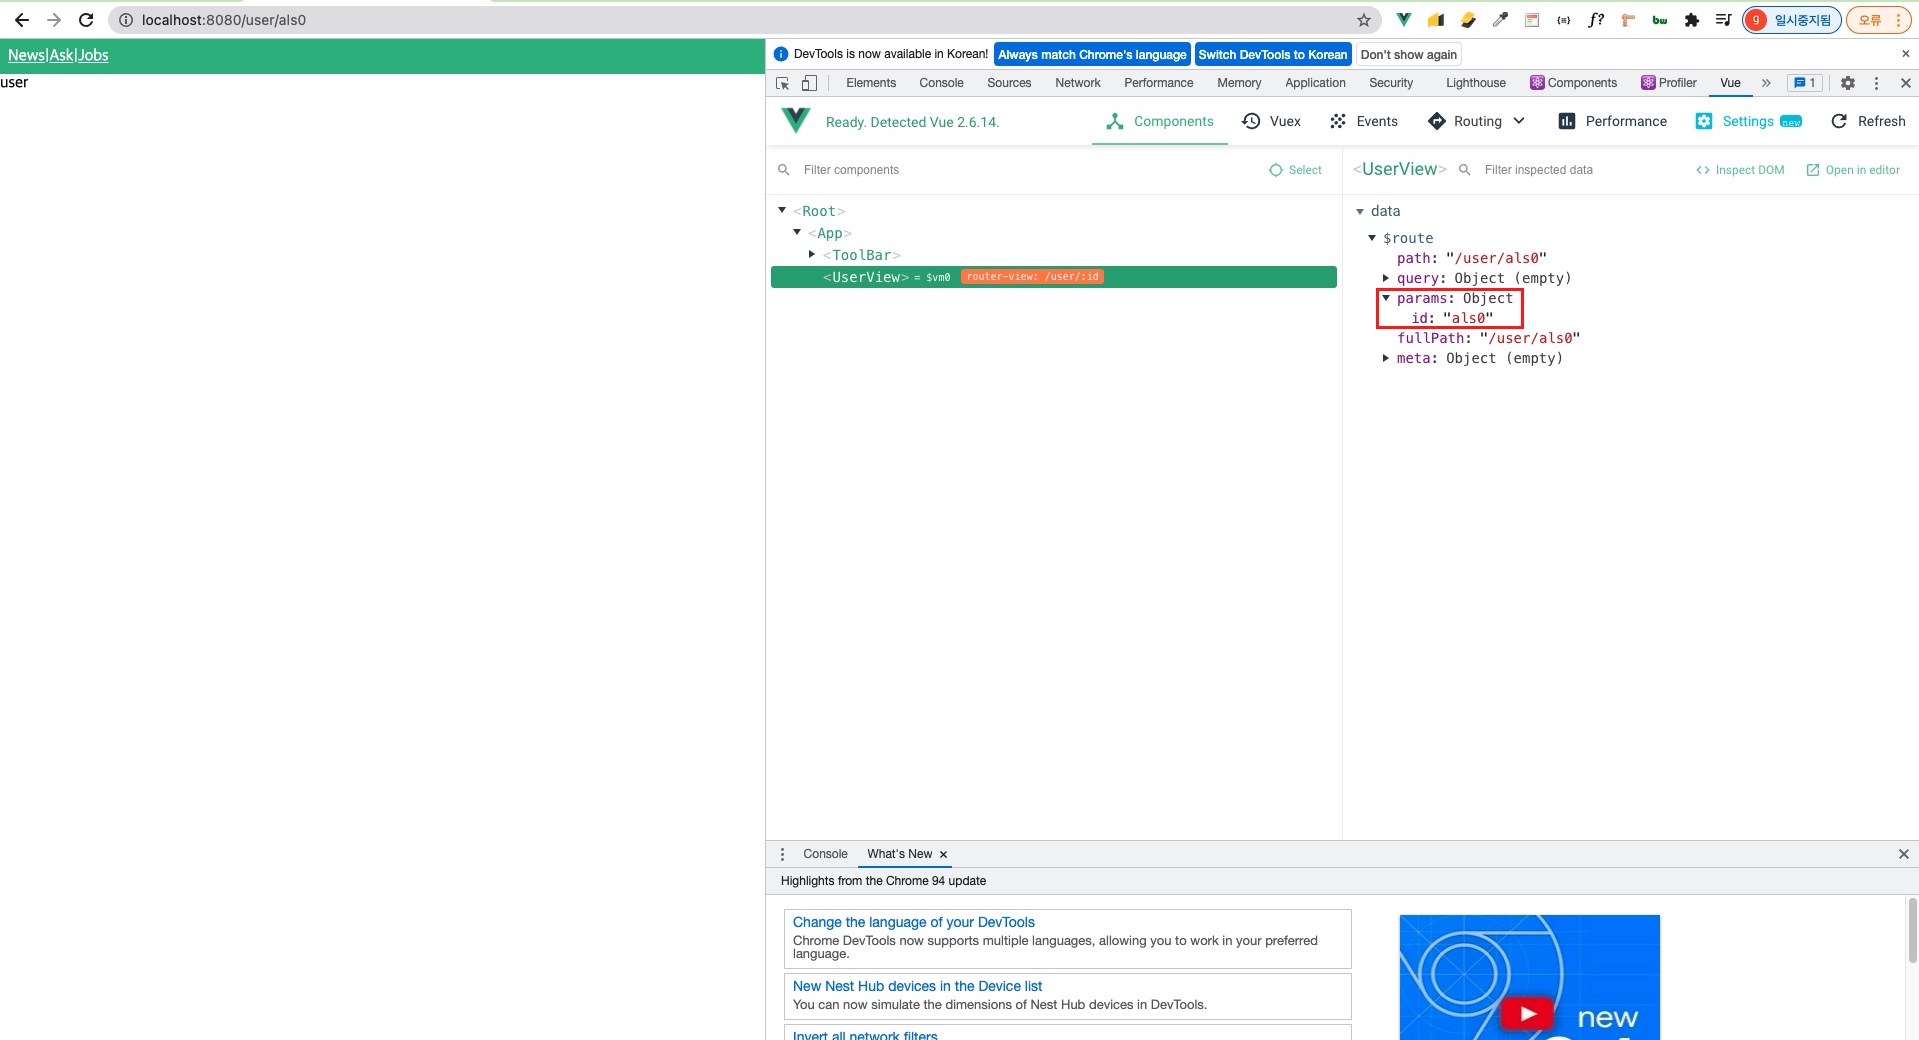
8.1 동적 라우트 매칭 원리 및 적용 (/user/:id)
라우트 설정
src/routes/modules/users.js
import UserView from "../../views/UserView";

const usersRouter = [
    {
        path: '/user/:id',
        component: UserView,
    },
]

export default usersRouter
src/views/NewsView.vue
<template>
<div>
  <p v-for="(item, index) in fetchedNews" v-bind:key="index">
    <a v-bind:href="item.url">{{item.title}}</a>
    <small>
      {{item.time_ago}} by
      <router-link :to="`/user/${item.user}`">{{item.user}}</router-link>
    </small>
  </p>
</div>
</template>

<script>
import {mapGetters, mapActions} from "vuex";

export default {
  name: "NewsView",
  computed: {
    ...mapGetters(['fetchedNews']),
  },
  methods: {
    ...mapActions(['FETCH_NEWS']),
  },
  created() {
    this.FETCH_NEWS();
  }
}
</script>

<style scoped>

</style>
src/views/UserView.vue
<template>
<div>
  user
</div>
</template>

<script>
export default {
  name: "UserView"
}
</script>

<style scoped>

</style>
8.2 라우터 params을 이용한 User 상세 페이지 구현
내가 미리 푼 답
src/api/index.js
// package.json에 명시된 라이브러리는 이렇게 "axios"라고만 적어도 알아서 node_modules 폴더 안에 있는 axios 라이브러리를 가져온다.
// axios는 Promise 기반: axios가 new Promise()로 되어있기 때문에 그 뒤에 then, catch를 체이닝할 수 있는 것
import axios from "axios";

// 1. HTTP Request & Response와 관련된 기본 설정
const config = {
    baseUrl: 'https://api.hnpwa.com/v0/',
}

// 2. API 함수들을 정리
const fetchNewsList = () => {
    return axios.get(`${config.baseUrl}news/1.json`);
}
const fetchJobsList = () => {
    return axios.get(`${config.baseUrl}jobs/1.json`);
}
const fetchAskList = () => {
    return axios.get(`${config.baseUrl}ask/1.json`);
}
const fetchUserInfo = (username) => {
    return axios.get(`${config.baseUrl}user/${username}.json`);
}

export {
    fetchNewsList,
    fetchJobsList,
    fetchAskList,
    fetchUserInfo,
}
src/store/modules/FetchUser.js
import {fetchUserInfo} from "../../api";

const state = {
    user: {},
}

const getters = {
    fetchedUser(state) {
        return state.user;
    }
}

const mutations = {
    SET_USER(state, user) {
        state.user = user;
    }
}

const actions = {
    FETCH_USER({commit}, {username}) {
        fetchUserInfo(username)
            .then(({data}) => commit('SET_USER', data))
            .catch(error => console.log(error))
    }
}

export default {
    state,
    getters,
    mutations,
    actions,
}
src/store/index.js
import Vue from "vue";
import Vuex from 'vuex';
import FetchNews from "./modules/FetchNews";
import FetchJobs from "./modules/FetchJobs";
import FetchAsk from "./modules/FetchAsk";
import FetchUser from "./modules/FetchUser";

Vue.use(Vuex);

const store = new Vuex.Store({
    modules: {
        FetchNews,
        FetchJobs,
        FetchAsk,
        FetchUser,
    },
})

export default store
src/routes/modules/users.js
import UserView from "../../views/UserView";

const usersRouter = [
    {
        path: '/user/:id',
        component: UserView,
    },
]

export default usersRouter
src/views/UserView.vue
<template>
<div>
  {{ fetchedUser }}
</div>
</template>

<script>
import {mapGetters, mapActions} from "vuex";

export default {
  name: "UserView",
  computed: {
    ...mapGetters(['fetchedUser']),
  },
  methods: {
    ...mapActions(['FETCH_USER']),
  },
  created() {
    const username = this.$route.params.id;
    // 아래와 같이 인자로 넘길 수가 있는데 이 인자는 payload라고해서 꼭 하나만 넘길 수 있습니다.
    // 즉, 여러개 넘길 때엔 반드시 객체로 넘겨야합니다. 아래는 하나지만 객체화해서 넘겼습니다.
    this.FETCH_USER({username});
  }
}
</script>

<style scoped>

</style>
내가 푼 답과 거의 유사함.
현재 이전 데이터가 보였다가 내가 현재 클릭한 데이터로 바뀌는 현상이 있는데, 이는 차차 살펴보도록 하겠습니다.
데이터 호출시점, 렌더링 시점 등 이런 문제들을 많이 겪으실겁니다.
그래서 이번에 그러한 문제들을 보여드리고자 이런식으로 했습니다.
이는 이번 강의 후반부에 해결해보도록 하겠습니다.
8.3 [실습] 질문 상세 페이지 구현 실습 안내
실습 순서
- ItemView 생성
-
라우터 ItemView로 갈 수 있는 라우터 정보를 등록
{ path: '', component: '', } - 해당 페이지 컴포넌트로 이동했을 때 받아온 params(id)를 이용해서 페이지에 데이터를 표시
내가푼답
src/api/index.js
// package.json에 명시된 라이브러리는 이렇게 "axios"라고만 적어도 알아서 node_modules 폴더 안에 있는 axios 라이브러리를 가져온다.
// axios는 Promise 기반: axios가 new Promise()로 되어있기 때문에 그 뒤에 then, catch를 체이닝할 수 있는 것
import axios from "axios";

// 1. HTTP Request & Response와 관련된 기본 설정
const config = {
    baseUrl: 'https://api.hnpwa.com/v0/',
}

// 2. API 함수들을 정리
const fetchNewsList = () => {
    return axios.get(`${config.baseUrl}news/1.json`);
}
const fetchJobsList = () => {
    return axios.get(`${config.baseUrl}jobs/1.json`);
}
const fetchAskList = () => {
    return axios.get(`${config.baseUrl}ask/1.json`);
}
const fetchUserInfo = (username) => {
    return axios.get(`${config.baseUrl}user/${username}.json`);
}
const fetchItemInfo = (askId) => {
    return axios.get(`${config.baseUrl}item/${askId}.json`)
}

export {
    fetchNewsList,
    fetchJobsList,
    fetchAskList,
    fetchUserInfo,
    fetchItemInfo,
}
src/store/modules/FetchItem.js
import {fetchItemInfo} from "../../api";

const state = {
    item: {},
}

const getters = {
    fetchedItem(state) {
        return state.item;
    }
}

const mutations = {
    SET_ITEM(state, item) {
        state.item = item;
    }
}

const actions = {
    FETCH_ITEM({commit}, {askId}) {
        fetchItemInfo(askId)
            .then(({data}) => commit('SET_ITEM', data))
            .catch(error => console.log(error))
    }
}

export default {
    state,
    getters,
    mutations,
    actions,
}
src/store/index.js
import Vue from "vue";
import Vuex from 'vuex';
import FetchNews from "./modules/FetchNews";
import FetchJobs from "./modules/FetchJobs";
import FetchAsk from "./modules/FetchAsk";
import FetchUser from "./modules/FetchUser";
import FetchItem from "./modules/FetchItem";

Vue.use(Vuex);

const store = new Vuex.Store({
    modules: {
        FetchNews,
        FetchJobs,
        FetchAsk,
        FetchUser,
        FetchItem,
    },
})

export default store
src/views/ItemView.vue
<template>
<div>
  <p>{{ fetchedItem.comments_count }}</p>
  <p>{{ fetchedItem.content }}</p>
</div>
</template>

<script>
import {mapGetters, mapActions} from "vuex";

export default {
  name: "ItemView",
  computed: {
    ...mapGetters(['fetchedItem']),
  },
  methods: {
    ...mapActions(['FETCH_ITEM']),
  },
  created() {
    const askId = this.$route.query.id;
    this.FETCH_ITEM({askId});
  }
}
</script>

<style scoped>

</style>
8.4 [실습] 질문 상세 페이지 실습 풀이 및 오류 디버깅
src/views/AskView.vue
<template>
<div>
  <p v-for="(item, index) in fetchedAsk" v-bind:key="index">
    <router-link :to="`/item/${item.id}`">
      {{item.title}}
    </router-link>
    <small>{{item.time_ago}} by {{item.user}}</small>
  </p>
</div>
</template>

<script>
import {mapGetters, mapActions} from 'vuex';

export default {
  name: "AskView",
  computed: {
    ...mapGetters(['fetchedAsk']),
  },
  methods: {
    ...mapActions(['FETCH_ASK']),
  },
  created() {
    this.FETCH_ASK();
  }
}
</script>

<style scoped>

</style>
src/routes/modules/item.js
import ItemView from "../../views/ItemView";

const itemRouter = [
    {
        path: '/item/:id',
        component: ItemView,
    },
]

export default itemRouter
src/views/ItemView.vue
<template>
<div>
  <p>{{ fetchedItem.comments_count }}</p>
  <p>{{ fetchedItem.content }}</p>
   <p>{{ fetchedItem.content }}</p>
</div>
</template>

<script>
import {mapGetters, mapActions} from "vuex";

export default {
  name: "ItemView",
  computed: {
    ...mapGetters(['fetchedItem']),
  },
  methods: {
    ...mapActions(['FETCH_ITEM']),
  },
  created() {
    const askId = this.$route.params.id;
    this.FETCH_ITEM({askId});
  }
}
</script>

<style scoped>

</style>
Note
- vue에서 라우터 링크는
router-link태그를 사용하자. /item/:id는 값이/item/123092이렇게 넘어올 때.
현재는/item/?id=12301238이런식으로 url이 넘어가므로/item/:id와 맞지않다.
즉,router-link태그의:to속성으로/item/:id형태로 넘어가도록 수정한다.
그런데 꼭 위와 같이 수정안해도 this.$route.query.id 이걸로 찾아도 되지않나?
흐음 위와 같이 수정하여 적용하는 이유는?
뭘까?
그냥 코드 통일성 때문에?/item/?id=123098이런 방식인 query를 사용하면 라우트 안에서 어떤식으로 정의했는지 안보이니깐? 그래서 그런건가? 흠..
https://github.com/tastejs/hacker-news-pwas/blob/master/docs/api.md
아 위 API에도 /item/:id 형식으로 정의되어있긴하네
8.5 질문 상세 페이지 스타일링 및 v-html 디렉티브 사용법 소개
fontawesome
public/index.html
<!DOCTYPE html>
<html lang="">
  <head>
    <meta charset="utf-8">
    <meta http-equiv="X-UA-Compatible" content="IE=edge">
    <meta name="viewport" content="width=device-width,initial-scale=1.0">
    <link rel="icon" href="<%= BASE_URL %>favicon.ico">
    <link rel="stylesheet" href="https://pro.fontawesome.com/releases/v5.10.0/css/all.css" integrity="sha384-AYmEC3Yw5cVb3ZcuHtOA93w35dYTsvhLPVnYs9eStHfGJvOvKxVfELGroGkvsg+p"/>
    <title><%= htmlWebpackPlugin.options.title %></title>
  </head>
  <body>
    <noscript>
      <strong>We're sorry but <%= htmlWebpackPlugin.options.title %> doesn't work properly without JavaScript enabled. Please enable it to continue.</strong>
    </noscript>
    <div id="app"></div>
    <!-- built files will be auto injected -->
  </body>
</html>
Note
이제 좀 바뀌었다. 폰트어썸이..
위와 같이해선 안돼고 뭐 이메일 등록해서 나오는 script 경로가 있는데, 그거 넣어줘야된다.
아래처럼..
귀찮게 바뀜..
<!DOCTYPE html>
<html lang="">
  <head>
    <meta charset="utf-8">
    <meta http-equiv="X-UA-Compatible" content="IE=edge">
    <meta name="viewport" content="width=device-width,initial-scale=1.0">
    <link rel="icon" href="<%= BASE_URL %>favicon.ico">
    <title><%= htmlWebpackPlugin.options.title %></title>
  </head>
  <body>
    <noscript>
      <strong>We're sorry but <%= htmlWebpackPlugin.options.title %> doesn't work properly without JavaScript enabled. Please enable it to continue.</strong>
    </noscript>
    <div id="app"></div>
    <!-- built files will be auto injected -->
    <script src="https://kit.fontawesome.com/2aace48082.js" crossorigin="anonymous"></script>
  </body>
</html>
v-html 디렉티브
html 태그를 화면에 적용해서 뿌려야할 때는 v-html이란 디렉티브를 사용하시면됩니다.
<template>
<div>
  <section>
    <!-- 질문 상세 정보 -->
    <div class="user-container">
      <div><i class="fas fa-user"></i></div>
      <div class="user-description">
        <!-- 아래처럼 맨 앞에 /를 붙여서 넘기지 않으면 url 뒤에 계속 이어붙어서 표시되게된다. -->
        <!-- 아래처럼 맨 앞에 /를 붙여서 /user 이런식으로 넘겨야 그런현상이 없다. -->
        <router-link :to="`/user/${fetchedItem.user}`">
          {{ fetchedItem.user }}
        </router-link>
        <div class="time">
          {{fetchedItem.time_ago}}
        </div>
      </div>
    </div>
    <h2>{{fetchedItem.title}}</h2>
  </section>
  <section>
    <!-- 질문 댓글 -->
    <div v-html="fetchedItem.content"></div>
  </section>
</div>
</template>

<script>
import {mapGetters, mapActions} from "vuex";

export default {
  name: "ItemView",
  computed: {
    ...mapGetters(['fetchedItem']),
  },
  methods: {
    ...mapActions(['FETCH_ITEM']),
  },
  created() {
    const askId = this.$route.params.id;
    this.FETCH_ITEM({askId});
  }
}
</script>

<style scoped>
.user-container {
  display: flex;
  align-items: center;
  padding: 0.5rem;
}
.fa-user {
  font-size: 2.5rem;
}
.user-description {
  padding-left: 8px;
}
.time {
  font-size: 0.7rem;
}
</style>
8.6 라우터 트랜지션
뷰 내부에서 제공하는 페이지 이동할때의 전환 효과
router-view 태그를 transition 태그로 감싸서 적용합니다.
src/App.vue
<template>
  <div id="app">
    <tool-bar></tool-bar>
    <transition name="page">
      <router-view></router-view>
    </transition>
  </div>
</template>

<script>
import ToolBar from "./components/ToolBar";

export default {
  name: 'App',
  components: {
    ToolBar,
  },
}
</script>

<style>
body {
  padding: 0;
  margin: 0;
}

/* Router Transition */
.page-enter-active, .page-leave-active {
  transition: opacity .5s;
}
.page-enter, .page-leave-to /* .page-leave-active below version 2.1.8 */ {
  opacity: 0;
}
</style>