
10 리팩토링 2 - 사용자 프로필 컴포넌트 공통화
source: categories/study/vue-beginner-lv3/vue-beginner-lv3_9-01.md
10.1 사용자 프로필 컴포넌트 소개 및 등록
UserProfile.vue컴포넌트 생성- 어떻게 하면
user정보를UserProfile에서 가져올 수 있게할지 이는 다음 시간에..
10.2 사용자 컴포넌트 데이터 흐름 처리 1
어차피 user 정보나 이런 것들이 store에 담기니까 UserProfile 컴포넌트에서 store에 바로 접근해서 값을 가져오도록 정리했네 이번 시간엔..
흐음.. 이것도 좋은 정리 방법인지는 모르겠다.
일단 더 보자.
src/views/UserView.vue
<template>
<div>
  <user-profile></user-profile>
<!--  <p>name: {{ fetchedUser.id }}</p>-->
<!--  <p>karma: {{ fetchedUser.karma }}</p>-->
<!--  <p>created: {{ fetchedUser.created }}</p>-->
</div>
</template>

<script>
// import {mapGetters, mapActions} from "vuex";
import {mapActions} from "vuex";
import UserProfile from "../components/UserProfile";

export default {
  name: "UserView",
  // computed: {
  //   ...mapGetters(['fetchedUser']),
  // },
  methods: {
    ...mapActions(['FETCH_USER']),
  },
  created() {
    const username = this.$route.params.id;
    // 아래와 같이 인자로 넘길 수가 있는데 이 인자는 payload라고해서 꼭 하나만 넘길 수 있습니다.
    // 즉, 여러개 넘길 때엔 반드시 객체로 넘겨야합니다. 아래는 하나지만 객체화해서 넘겼습니다.
    this.FETCH_USER({username});
  },
  components: {
    UserProfile,
  }
}
</script>

<style scoped>

</style>
src/components/UserProfile.vue
<template>
  <div class="user-container">
    <div><i class="fas fa-user"></i></div>
    <div class="user-description">
      <!-- 아래처럼 맨 앞에 /를 붙여서 넘기지 않으면 url 뒤에 계속 이어붙어서 표시되게된다. -->
      <!-- 아래처럼 맨 앞에 /를 붙여서 /user 이런식으로 넘겨야 그런현상이 없다. -->
<!--      <router-link :to="`/user/${fetchedUser.user}`">-->
<!--        {{ fetchedUser.id }}-->
<!--      </router-link>-->
      <div>{{ fetchedUser.id }}</div>
      <div class="time">
        {{fetchedUser.created}}
      </div>
    </div>
  </div>
</template>

<script>
import {mapGetters} from "vuex";

export default {
  name: "UserProfile",
  computed: {
    ...mapGetters(['fetchedUser']),
  },
}
</script>

<style scoped>
.user-container {
  display: flex;
  align-items: center;
  padding: 0.5rem;
}
.fa-user {
  font-size: 2.5rem;
}
.user-description {
  padding-left: 8px;
}
.time {
  font-size: 0.7rem;
}
</style>
10.3 사용자 컴포넌트 데이터 흐름 처리 2
이번 시간엔 위에서 UserProfile에선 직접 store의 state를 내려받고, UserView에선 store의 state값을 조작하는 식으로 했던 것을,UserView에서 store의 state 값을 조작하고 UserProfile에 내려주기까지하도록 수정해보도록 하겠다.
(맞아, 이게 더 나은거같음)
src/components/UserProfile.vue
<template>
  <div class="user-container">
    <div><i class="fas fa-user"></i></div>
    <div class="user-description">
      <div>{{ info.id }}</div>
      <div class="time">
        {{info.created}}
      </div>
    </div>
  </div>
</template>

<script>
export default {
  name: "UserProfile",
  // 아래와 같이 props의 타입 정의 가능
  props: {
    info: Object,
  },
}
</script>

<style scoped>
.user-container {
  display: flex;
  align-items: center;
  padding: 0.5rem;
}
.fa-user {
  font-size: 2.5rem;
}
.user-description {
  padding-left: 8px;
}
.time {
  font-size: 0.7rem;
}
</style>
src/views/UserView.vue
<template>
<div>
  <user-profile :info="fetchedUser"></user-profile>
</div>
</template>

<script>
import {mapGetters, mapActions} from "vuex";
import UserProfile from "../components/UserProfile";

export default {
  name: "UserView",
  computed: {
    ...mapGetters(['fetchedUser']),
  },
  methods: {
    ...mapActions(['FETCH_USER']),
  },
  created() {
    const username = this.$route.params.id;
    this.FETCH_USER({username});
  },
  components: {
    UserProfile,
  }
}
</script>

<style scoped>

</style>
UserView 컴포넌트를 최대한… 어떤 컴포넌트 등록이라고하면 컴포넌트 속으로 비즈니스 로직을 내리는 것이 좀 더 드라이한 컴포넌트 설계라 할 수 있기 때문에
이 내용들을 다음 시간에 최종적으로 정의를 해보도록하겠습니다.
이번 시간에 했던 것들과 전 시간에 했던 것들을 비교하면서 어떤 부분들이 어떤 상황에서 빛이나는지 좀 더 살펴보도록 하겠습니다.
10.4 2가지 데이터 처리 흐름 비교
- UserView에서 store의 state 값 조작 / UserProfile에서 store의 state값 직접 가져오기
- UserView에서 store의 state 값 조작 + UserProfile로 store의 state값 내려주기
위 두가지 방법으로 컴포넌트 정리를 해봤었습니다.
위 두가지 경우의 데이터 흐름 처리를 각각 보도록 하겠습니다.
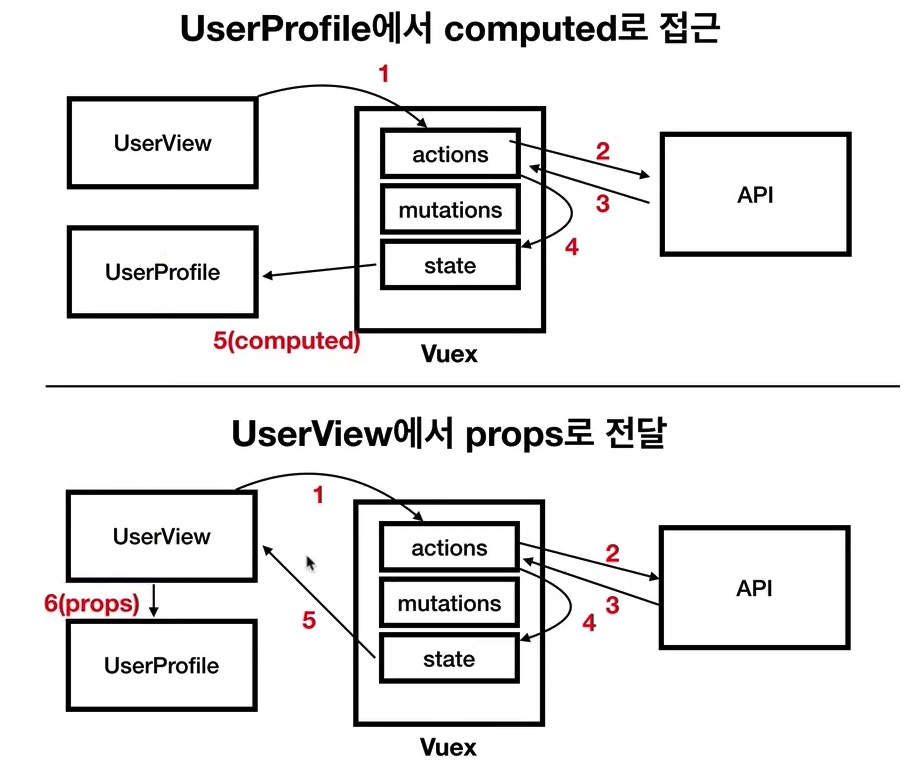
Vuex에 좀 더 가까운(?) 데이터 흐름은 1번 UserProfile에서 computed로 접근이 더 가깝다.
2번 방뻡은 반면, component 간 어떤 데이터 흐름이 있는지, 어떤 데이터를 주고받는지 명시적으로 한다는 장점이 있다.
1번 케이스, 2번 케이스 모두 누가 옳고 그르다의 방법이 아니기 때문에
각각의 상황에 맞춰서 이런 데이터 흐름을 인지하시고 사용하시면 좋을 거 같습니다.
10.5 slot을 이용한 사용자 프로필 컴포넌트 구현
이번 시간의 컴포넌트 공통화의 다른점이ListItem 컴포넌트 공통화와 조금 다른점이,
컴포넌트 내부적으로 template 태그나 v-if 디렉티브를 이용해서 구분하지않고,
상위 컴포넌트에서 컴포넌트를 등록할 때, 내용을 채워주는 slot을 이용해서 ItemView와 UserView를 정의해봤습니다.
slot 활용하여 컴포넌트 정리하기
src/components/UserProfile.vue
<template>
  <div class="user-container">
    <div><i class="fas fa-user"></i></div>
    <div class="user-description">
      <!-- 아래처럼 맨 앞에 /를 붙여서 넘기지 않으면 url 뒤에 계속 이어붙어서 표시되게된다. -->
      <!-- 아래처럼 맨 앞에 /를 붙여서 /user 이런식으로 넘겨야 그런현상이 없다. -->
<!--      <router-link :to="`/user/${fetchedUser.user}`">-->
<!--        {{ fetchedUser.id }}-->
<!--      </router-link>-->
      <slot name="username">
        <!-- 상위 컴포넌트에서 정의할 영역 -->
      </slot>
<!--      <div>username: {{ info.id }}</div>-->
      <div class="time">
<!--        time: {{info.created}}-->
        <slot name="time">
          <!-- 상위 컴포넌트에서 정의할 영역 -->
        </slot>
      </div>
      <slot name="karma"></slot>
    </div>
  </div>
</template>

<script>
export default {
  name: "UserProfile",
  // 아래와 같이 props의 타입 정의 가능
  // props: {
  //   info: Object,
  // },
}
</script>

<style scoped>
.user-container {
  display: flex;
  align-items: center;
  padding: 0.5rem;
}
.fa-user {
  font-size: 2.5rem;
}
.user-description {
  padding-left: 8px;
}
.time {
  font-size: 0.7rem;
}
</style>
src/views/UserView.vue
<template>
<div>
  <user-profile>
    <div slot="username">{{fetchedUser.id}}</div>
    <template slot="time">{{fetchedUser.created}}</template>
    <div slot="karma">{{fetchedUser.karma}}</div>
  </user-profile>
<!--  <p>name: {{ fetchedUser.id }}</p>-->
<!--  <p>karma: {{ fetchedUser.karma }}</p>-->
<!--  <p>created: {{ fetchedUser.created }}</p>-->
</div>
</template>

<script>
import {mapGetters, mapActions} from "vuex";
import UserProfile from "../components/UserProfile";

export default {
  name: "UserView",
  components: {
    UserProfile,
  },
  computed: {
    ...mapGetters(['fetchedUser']),
  },
  methods: {
    ...mapActions(['FETCH_USER']),
  },
  created() {
    const username = this.$route.params.id;
    // 아래와 같이 인자로 넘길 수가 있는데 이 인자는 payload라고해서 꼭 하나만 넘길 수 있습니다.
    // 즉, 여러개 넘길 때엔 반드시 객체로 넘겨야합니다. 아래는 하나지만 객체화해서 넘겼습니다.
    this.FETCH_USER({username});
  },
}
</script>

<style scoped>

</style>
src/views/ItemView.vue
<template>
<div>
  <section>
    <user-profile>
      <div slot="username">
        {{fetchedItem.user}}
      </div>
      <template slot="time">
        {{fetchedItem.time_ago}}
      </template>
    </user-profile>
    <!-- 사용자 상세 정보 -->
<!--    <div class="user-container">-->
<!--      <div><i class="fas fa-user"></i></div>-->
<!--      <div class="user-description">-->
<!--        <!– 아래처럼 맨 앞에 /를 붙여서 넘기지 않으면 url 뒤에 계속 이어붙어서 표시되게된다. –>-->
<!--        <!– 아래처럼 맨 앞에 /를 붙여서 /user 이런식으로 넘겨야 그런현상이 없다. –>-->
<!--        <router-link :to="`/user/${fetchedItem.user}`">-->
<!--          {{ fetchedItem.user }}-->
<!--        </router-link>-->
<!--        <div class="time">-->
<!--          {{fetchedItem.time_ago}}-->
<!--        </div>-->
<!--      </div>-->
<!--    </div>-->
  </section>
  <section>
    <h2>{{fetchedItem.title}}</h2>
  </section>
  <section>
    <!-- 질문 댓글 -->
    <div v-html="fetchedItem.content"></div>
  </section>
</div>
</template>

<script>
import UserProfile from "../components/UserProfile";
import {mapGetters, mapActions} from "vuex";

export default {
  name: "ItemView",
  components: {
    UserProfile,
  },
  computed: {
    ...mapGetters(['fetchedItem']),
  },
  methods: {
    ...mapActions(['FETCH_ITEM']),
  },
  created() {
    const askId = this.$route.params.id;
    this.FETCH_ITEM({askId});
  }
}
</script>

<style scoped>
.user-container {
  display: flex;
  align-items: center;
  padding: 0.5rem;
}
.fa-user {
  font-size: 2.5rem;
}
.user-description {
  padding-left: 8px;
}
.time {
  font-size: 0.7rem;
}
</style>
10.6 사용자 프로필 컴포넌트 스타일링 및 코드 정리
불필요한 코드 제거 및 추가 스타일링
src/components/UserProfile.vue
<template>
  <div class="user-container">
    <div><i class="fas fa-user"></i></div>
    <div class="user-description">
      <slot name="username"></slot>
      <div class="time">
        <slot name="time"></slot>
        <slot name="karma"></slot>
      </div>
    </div>
  </div>
</template>

<script>c
export default {
  name: "UserProfile",
}
</script>

<style scoped>
.user-container {
  display: flex;
  align-items: center;
  padding: 0.5rem;
}
.fa-user {
  font-size: 2.5rem;
}
.user-description {
  padding-left: 8px;
}
.time {
  font-size: 0.7rem;
}
</style>
src/views/UserView.vue
<template>
<div>
  <user-profile>
    <div slot="username">{{fetchedUser.id}}</div>
    <span slot="time">{{`Joined ${fetchedUser.created}`}},</span>
    <span slot="karma">{{fetchedUser.karma}}</span>
  </user-profile>
</div>
</template>

<script>
import {mapGetters, mapActions} from "vuex";
import UserProfile from "../components/UserProfile";

export default {
  name: "UserView",
  components: {
    UserProfile,
  },
  computed: {
    ...mapGetters(['fetchedUser']),
  },
  methods: {
    ...mapActions(['FETCH_USER']),
  },
  created() {
    const username = this.$route.params.id;
    this.FETCH_USER({username});
  },
}
</script>

<style scoped>

</style>
src/views/ItemView.vue
<template>
<div>
  <section>
    <user-profile>
      <router-link slot="username" :to="`/user/${fetchedItem.user}`">{{fetchedItem.user}}</router-link>
      <template slot="time">{{fetchedItem.time_ago}}</template>
    </user-profile>
  </section>
  <section>
    <h2>{{fetchedItem.title}}</h2>
  </section>
  <section>
    <div v-html="fetchedItem.content"></div>
  </section>
</div>
</template>

<script>
import UserProfile from "../components/UserProfile";
import {mapGetters, mapActions} from "vuex";

export default {
  name: "ItemView",
  components: {
    UserProfile,
  },
  computed: {
    ...mapGetters(['fetchedItem']),
  },
  methods: {
    ...mapActions(['FETCH_ITEM']),
  },
  created() {
    const askId = this.$route.params.id;
    this.FETCH_ITEM({askId});
  }
}
</script>

<style scoped>
.user-container {
  display: flex;
  align-items: center;
  padding: 0.5rem;
}
.fa-user {
  font-size: 2.5rem;
}
.user-description {
  padding-left: 8px;
}
.time {
  font-size: 0.7rem;
}
</style>