
12 Vuex - 주요 기술 요소
source: categories/study/vue-beginner-lv2/vue-beginner-lv2_9-03.md
12.1 Vuex 설치 및 등록
Vuex 설치하기
- Vuex는 싱글 파일 컴포넌트 체계에서 NPM 방식으로 라이브러리를 설치하는게 좋다.
npm i vuex
# or
yarn add vuex
ES6와 함께 사용해야 더 많은 기능과 이점을 제공받을 수 있음
Vuex를 보통 store라고 말합니다.
store 같은 경우는 개발자들이 관행적으로 저장하는 폴더가 있습니다.
store 폴더 및 store.js 파일 생성
root_folder/
|-- public/
|-- src/
|   |-- assets/
|   |-- components/
|   `-- store/
|       `-- store.js
위와 같이 store 폴더와 store.js 파일을 생성하는 것이 일반적인 Vuex의 구조라고 생각하시면됩니다.
src/store/store.js
import Vue from "vue";
import Vuex from "vuex";

// vue 플러그인을 사용하는 코드
// use는 vue의 플러그인을 등록하는 기능을한다.
// use를 쓰는 이유는 일반적으로 vue를 사용할 때, 전역으로.. 그러니가 vue를 사용하는 모든 영역에 특정 기능을 추가하고 싶을 때,
// 글로벌 펑셔널리티를 추가하고싶을 때, 사용합니다.
Vue.use(Vuex);

export const store = new Vuex.Store({

});

// 간단한 설치와함께 Vuex 등록까지 마친상태
src/main.js
import Vue from 'vue'
import App from './App.vue'
import {store} from "@/store/store";

Vue.config.productionTip = false

new Vue({
  render: h => h(App),
  store,
}).$mount('#app')
12.2 state와 getters 소개
Vuex 기술 요소
- state: 여러 컴포넌트에 공유되는 데이터
data - getters: 연산된 state 값을 접근하는 속성
computed - mutations: state 값을 변경하는 이벤트 로직, 메서드
methods - actions: 비동기 처리 로직을 선언하는 메서드
async methods
state란?
- 여러 컴포넌트 간에 공유할 데이터 - 상태
// Vue
data: {
    message: 'Hello Vue.js!'
}
// Vuex
// data에서 명칭이 state로 되었다는 점과
// 여러 컴포넌트 간에 공유가된다라는 부분만 다릅니다.
state: {
    message: 'Hello Vue.js!'
}
<!-- Vue -->
<p>{{ message }}</p>
<!-- Vuex -->
<!-- Vue.use(Vuex); 코드로 Vuex를 글로벌 펑셔널리티로 추가를해줬기 때문에, this.$store 이런식으로 접근이 가능합니다. -->
<p>{{ this.$store.state.message }}</p>
getters란?
- state 값을 접근하는 속성이자
computed()처럼 미리 연산된 값을 접근하는 속성
// store.js
state: {
    num: 10
},
// getters는 위 state를 쉽게 접근하는 속성
getters: {
    getNumber(state) {
        return state.num;
    },
    doubleNumber(state) {
        return state.num * 2;
    }
}
<!-- 지금 봤을 땐 별 차이가 안납니다. -->
<!-- 아까 this.$store.state.message랑 뭐가다르지? 싶은데, 이 뒤에 나오는 Helper 함수를 쓰게되면 this.getNumber로 바로 축약이됩니다. -->
<!-- getters가 주는 이점, computed가 일반적으로 주는 이점을 같이 활용할 수 있기 때문에 getters를 많이 활용합니다. -->
<p>{{ this.$store.getters.getNumber }}</p>
<p>{{ this.$store.getters.doubleNumber }}</p>
this.$state.state.~~ 이런식으로 접근하기 너무 번거롭다.
나중에 후반부에 배우는 map getters를 이용하면 쉽게 접근할 수 있는데,
그런 것들이 getters가 있는 목적이라고 보시면 됩니다.
state 값을 접근하는 속성이자 computed() 처럼 미리 연산된 값을 접근하는 속성이 바로 getters.
computed와 거의 같은 역할을 한다고 보시면 됩니다.
12.3 [리팩토링] state 속성 적용
적용 예시
store/store.js
import Vue from "vue";
import Vuex from "vuex";

// vue 플러그인을 사용하는 코드
// use는 vue의 플러그인을 등록하는 기능을한다.
// use를 쓰는 이유는 일반적으로 vue를 사용할 때, 전역으로.. 그러니가 vue를 사용하는 모든 영역에 특정 기능을 추가하고 싶을 때,
// 글로벌 펑셔널리티를 추가하고싶을 때, 사용합니다.
Vue.use(Vuex);

export const store = new Vuex.Store({
    state: {
        headerText: 'Todo it!'
    }
});

// 간단한 설치와함께 Vuex 등록까지 마친상태
TodoHeader.vue
<template>
  <header>
  <!--<h1>TODO it!</h1>-->
    <h1>{{this.$store.state.headerText}}</h1>
  </header>
</template>

<script>
export default {
  name: "TodoHeader"
}
</script>

<style scoped>
h1 {
  color: #2f3b52;
  font-weight: 900;
  margin: 2.5rem 0 1.5rem;
}
</style>
결과
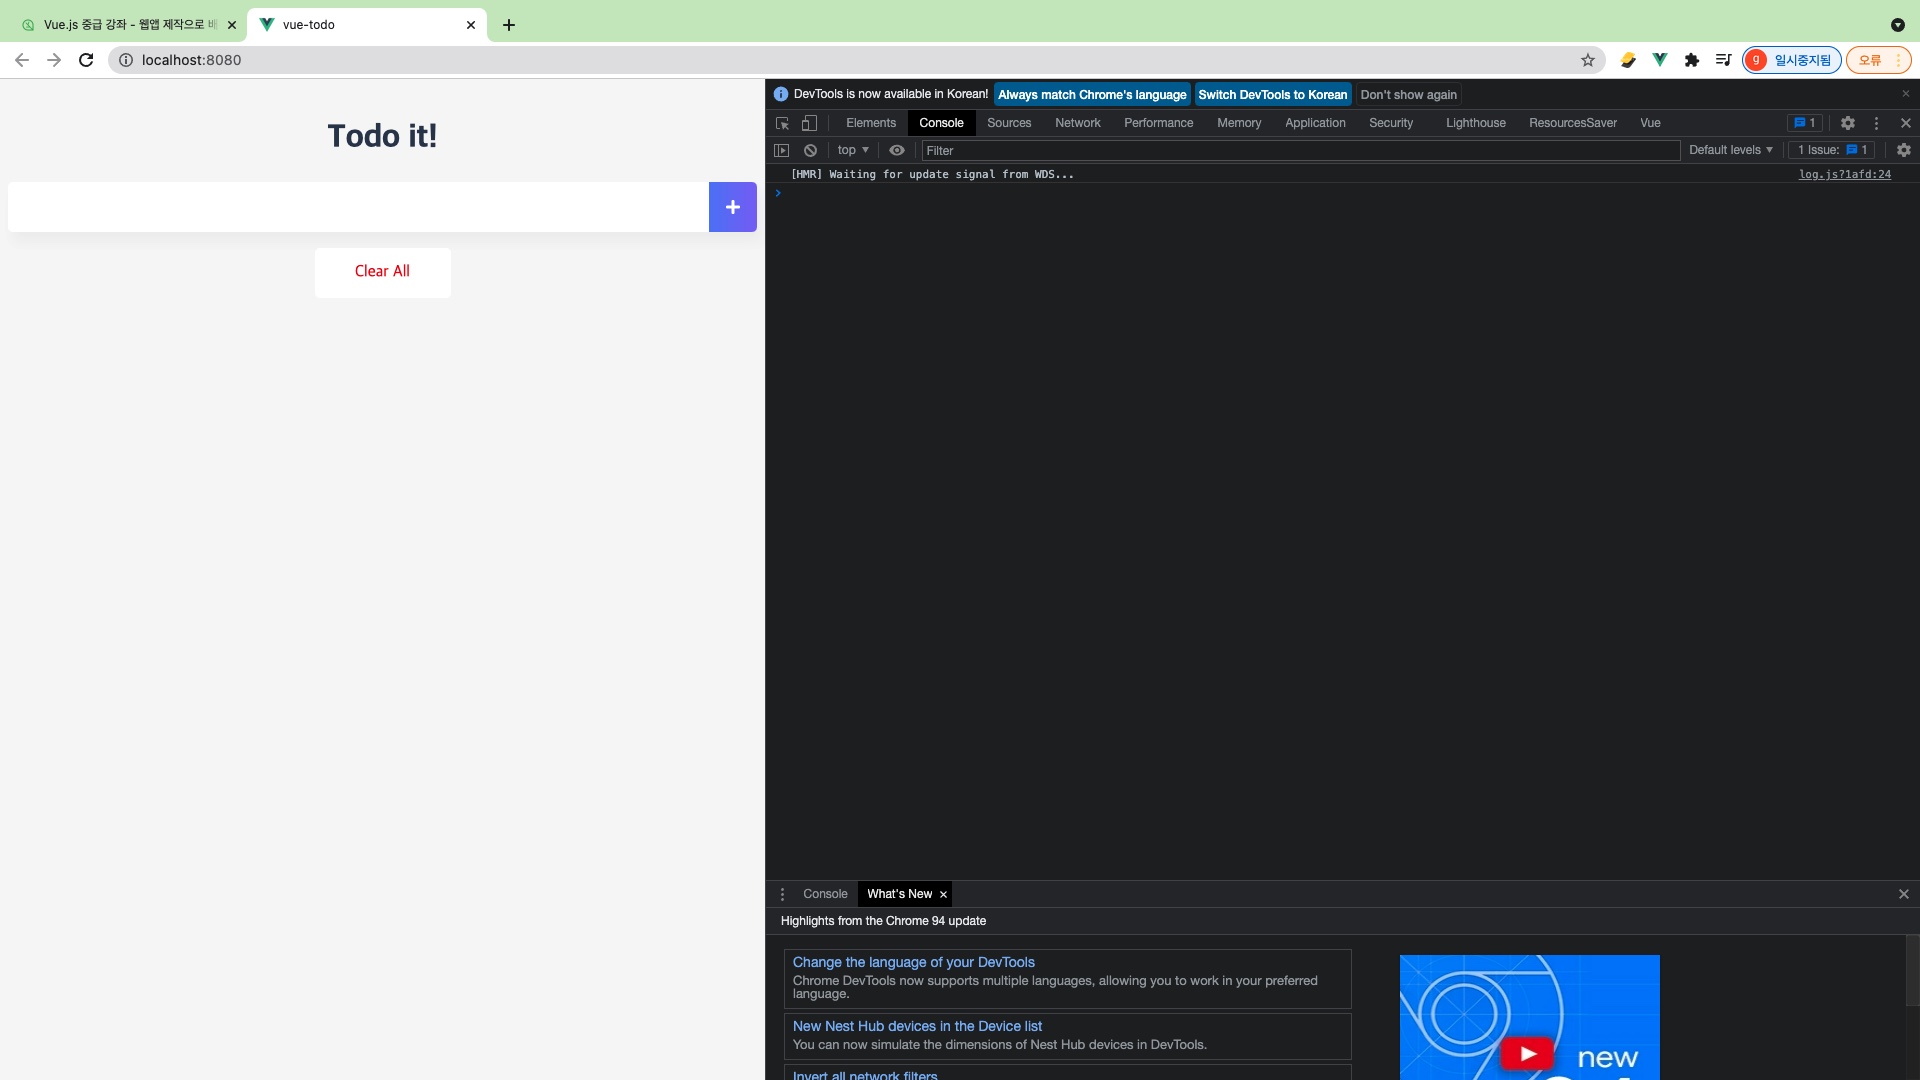
어? 이전과 크게 다른게 뭐가있지? 라고 생각하실 수도 있지만, Vuex를 썼을 때의 강력한점을 보여드리도록 하겠습니다.
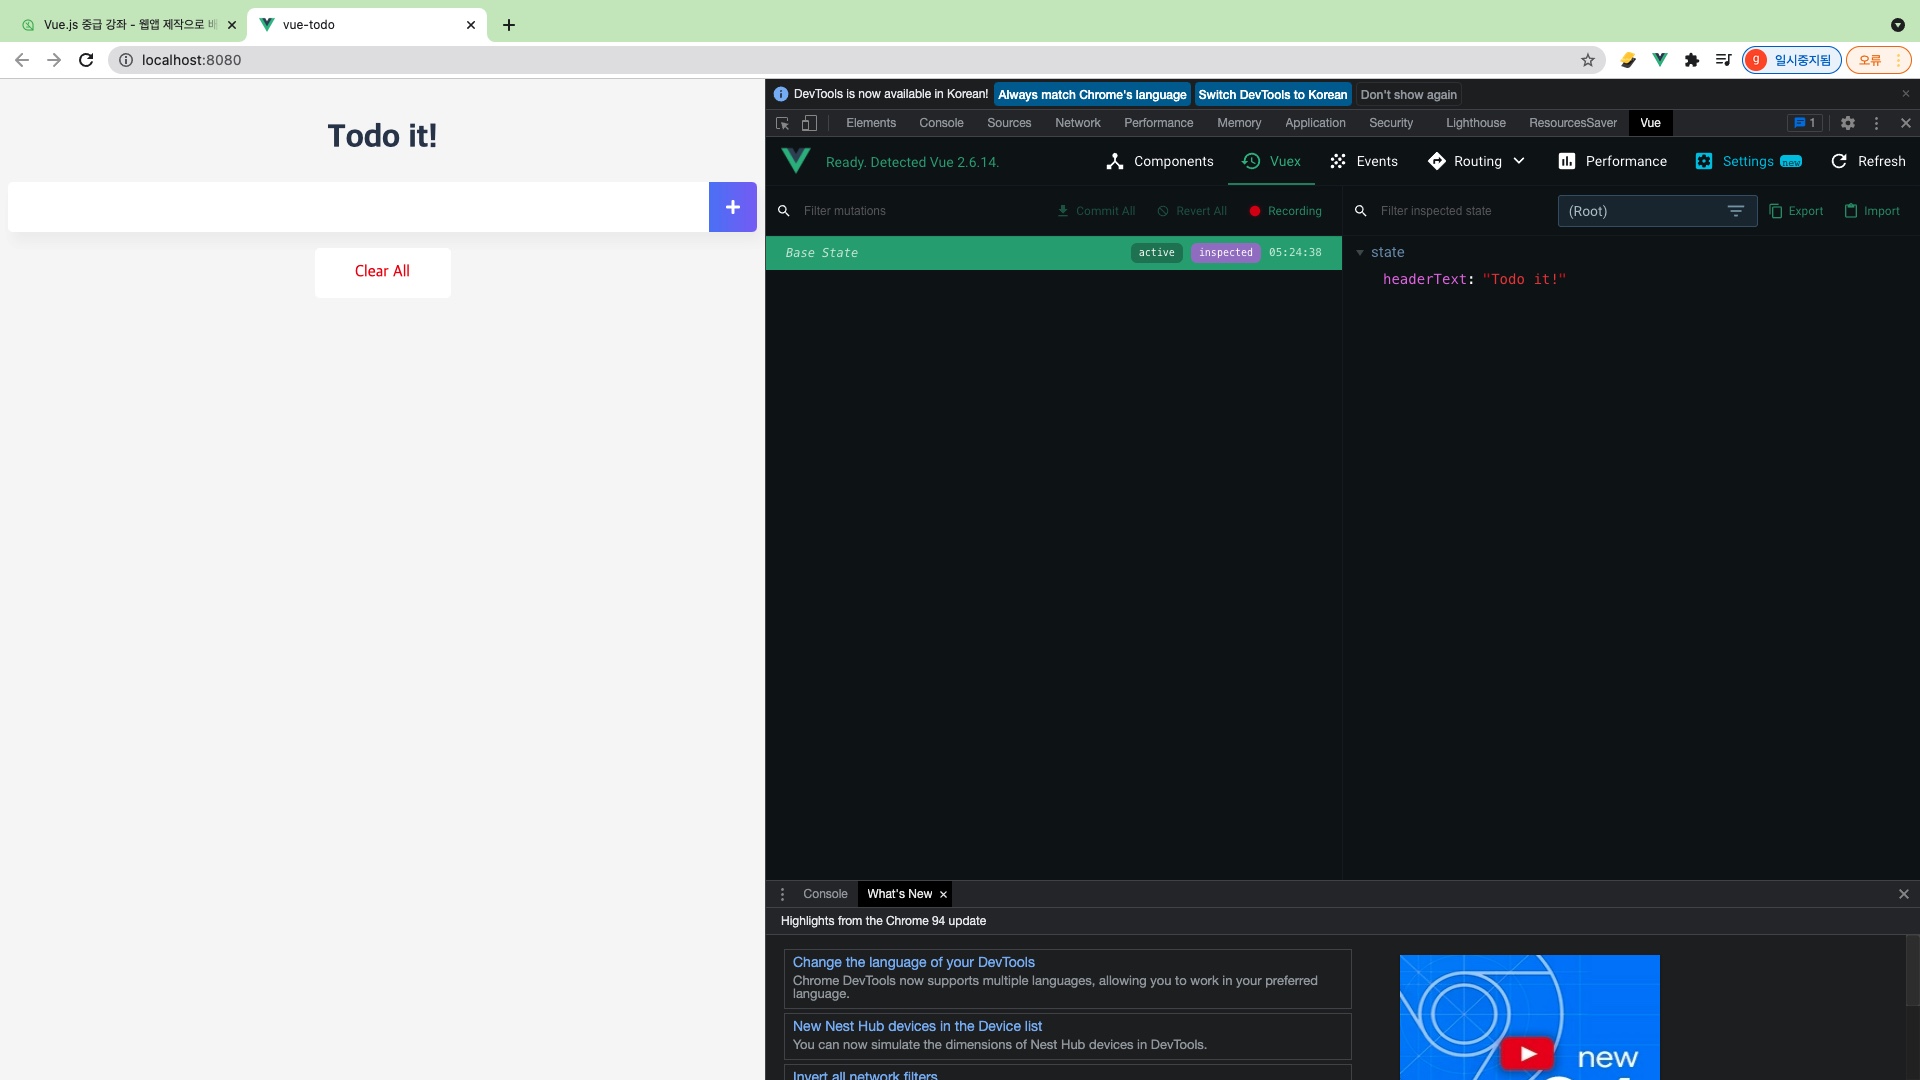
vue 개발자창에 Vuex 탭을보면 Base State에 state에 headerText가 들어있습니다.
이런식으로 앞으로 getters, mutation 등을 다 할텐데,
그런거를 이렇게 vue 개발자도구, 특히 Vuex 부분에서 확인할 수 있습니다.
이전 코드 리팩토링 실습.
TodoList, TodoInput, TodoFooter 이 3개의 컴포넌트에서 공유되는 데이터의 성질이 같았다.
그래서 todoItems를 상위 컴포넌트인 App 컴포넌트로 뺀 것이다.
이제는 이러한 데이터들을 store로 뺄거다.
아래처럼.
import Vue from "vue";
import Vuex from "vuex";

// vue 플러그인을 사용하는 코드
// use는 vue의 플러그인을 등록하는 기능을한다.
// use를 쓰는 이유는 일반적으로 vue를 사용할 때, 전역으로.. 그러니가 vue를 사용하는 모든 영역에 특정 기능을 추가하고 싶을 때,
// 글로벌 펑셔널리티를 추가하고싶을 때, 사용합니다.
Vue.use(Vuex);

export const store = new Vuex.Store({
    state: {
        todoItems: [],
    }
});

// 간단한 설치와함께 Vuex 등록까지 마친상태
실제 리팩토링 과정
src/store/store.js
App.vue의 created 라이프 사이클 훅을 storage.fetch로 옮기기
import Vue from "vue";
import Vuex from "vuex";

// vue 플러그인을 사용하는 코드
// use는 vue의 플러그인을 등록하는 기능을한다.
// use를 쓰는 이유는 일반적으로 vue를 사용할 때, 전역으로.. 그러니가 vue를 사용하는 모든 영역에 특정 기능을 추가하고 싶을 때,
// 글로벌 펑셔널리티를 추가하고싶을 때, 사용합니다.
Vue.use(Vuex);

const storage = {
    fetch() {
        const arr = [];
        if (localStorage.length > 0) {
            for (let i=0; i < localStorage.length; i++) {
                if (localStorage.key(i) !== 'loglevel:webpack-dev-server') {
                    arr.push(JSON.parse(localStorage.getItem(localStorage.key(i))));
                }
            }
        }
        return arr;
    }
}

export const store = new Vuex.Store({
    state: {
        todoItems: storage.fetch()
    }
});

// 간단한 설치와함께 Vuex 등록까지 마친상태
src/App.vue
created 라이프 사이클 훅 삭제
<template>
  <div id="app">
    <TodoHeader></TodoHeader>
    <TodoInput v-on:addTodoItem="addOneItem"></TodoInput>
    <TodoList v-bind:propsdata="todoItems" v-on:removeItem="removeOneItem" v-on:toggleItem="toggleOneItem"></TodoList>
    <TodoFooter v-on:clearAll="clearAllItems"></TodoFooter>
  </div>
</template>

<script>
import TodoFooter from "@/components/TodoFooter";
import TodoHeader from "@/components/TodoHeader";
import TodoInput from "@/components/TodoInput";
import TodoList from "@/components/TodoList";

export default {
  data() {
    return {
      todoItems: [],
    }
  },
  methods: {
    addOneItem(todoItem) {
      const obj = {completed: false, item: todoItem};
      localStorage.setItem(todoItem, JSON.stringify(obj));
      this.todoItems.push(obj);
    },
    removeOneItem(todoItem, index) {
      localStorage.removeItem(todoItem.item);
      this.todoItems.splice(index, 1);
    },
    toggleOneItem(todoItem, index) {
      this.todoItems[index].completed = !this.todoItems[index].completed;
      // todoItem.completed = !todoItem.completed; // deep copy를 해서 값을 변형시킨게 아니라 참조값을 변형시킨것이므로 todoItems 값에 변형이 가해진다.
                                                // 때문에 todoItems 값을 따로 업데이트 안해도된다. 그렇기 때문에 바로바로 화면 렌더링이 일어난다.
      localStorage.removeItem(todoItem.item); // 해당 키로 삭제
      localStorage.setItem(todoItem.item, JSON.stringify(todoItem)); // 키와 값 다시 재등록
    },
    clearAllItems() {
      localStorage.clear();
      this.todoItems = [];
    }
  },
  components: {
    // 컴포넌트 태그명 : 컴포넌트 내용
    TodoHeader,
    TodoInput,
    TodoList,
    TodoFooter
  }
}
</script>

<style>
body {
  text-align: center;
  background-color: #f6f6f6;
}
input {
  border-style: groove;
  width: 200px;
}
button {
  border-style: groove;
}
.shadow {
  box-shadow: 5px 10px 10px rgba(0, 0, 0, 0.03);
}
</style>
src/components/TodoList.vue
<template>
  <div>
    <transition-group name="list" tag="ul">
      <li v-for="(todoItem, index) in this.$store.state.todoItems" v-bind:key="todoItem.item" class="shadow">
        <i class="checkBtn fas fa-check" v-bind:class="{checkBtnCompleted: todoItem.completed}" v-on:click="toggleComplete(todoItem, index)"></i>
        <span v-bind:class="{textCompleted: todoItem.completed}">{{todoItem.item}}</span>
        <span class="removeBtn" v-on:click="removeTodo(todoItem, index)">
            <i class="fas fa-trash-alt"></i>
          </span>
      </li>
    </transition-group>
  </div>
</template>

<script>
export default {
  name: "TodoList",
  props: ['propsdata'],
  methods: {
    removeTodo(todoItem, index) {
      this.$emit('removeItem', todoItem, index);
    },
    toggleComplete(todoItem, index) {
      this.$emit('toggleItem', todoItem, index);
    }
  },
}
</script>

<style scoped>
ul {
  list-style-type: none;
  padding-left: 0;
  margin-top: 0;
  text-align: left;
}
li {
  display: flex;
  min-height: 50px;
  height: 50px;
  line-height: 50px;
  margin: 0.5rem 0;
  padding: 0 0.9rem;
  background-color: #ffffff;
  border-radius: 5px;
}
.checkBtn {
  line-height: 45px;
  color: #62acde;
  margin-right: 5px;
}
.checkBtnCompleted {
  color: #b3adad;
}
.textCompleted {
  text-decoration: line-through;
  color: #b3adad;
}
.removeBtn {
  margin-left: auto;
  color: #de4343;
}
/* 리스트아이템 트랜지션 효과 */
.list-item {
  display: inline-block;
  margin-right: 10px;
}
.list-enter-active, .list-leave-active {
  transition: all 1s;
}
.list-enter, .list-leave-to /* .list-leave-active below version 2.1.8 */ {
  opacity: 0;
  transform: translateY(30px);
}
</style>
원래는 App.vue에서 props로 내린 todoItems를 TodoList가 받아서 사용했었다.
그런데 위에 수정은 TodoList에서 v-for로 리스트 뿌릴 때, 더 이상 App.vue에서 내려주는 todoItems를 사용하지 않도록 수정한 것이다.
12.4 mutations와 commit() 형식 소개
mutations란?
- state의 값을 변경할 수 있는 유일한 방법이자 메서드
- 뮤테이션은
commit()으로 동작시킨다.
// store.js
state: {num: 10},
mutations: {
    printNumbers(state) {
        return state.num
    },
    sumNumbers(state, anotherNum) {
        return state.num + anotherNum
    }
}
<!-- App.vue -->
this.$store.commit('printNumbers');
this.$store.commit('sumNumbers', 20);
mutations의 commit() 형식
- state를 변경하기 위해 mutations를 동작시킬 때 인자(payload)를 전달할 수 있음
// store.js
state: {storeNum: 10},
mutations: {
    modifyState(state, payload) {
        console.log(payload.str);
        return state.storeNum += payload.num;
    }
}
<!-- App.vue -->
this.$store.commit('modifyState', {
  str: 'passed from payload',
  num: 20
})
12.5 [리팩토링&퀴즈] mutations 적용 및 퀴즈 안내
잘 적용되는지 테스트
src/store/store.js
import Vue from "vue";
import Vuex from "vuex";

// vue 플러그인을 사용하는 코드
// use는 vue의 플러그인을 등록하는 기능을한다.
// use를 쓰는 이유는 일반적으로 vue를 사용할 때, 전역으로.. 그러니가 vue를 사용하는 모든 영역에 특정 기능을 추가하고 싶을 때,
// 글로벌 펑셔널리티를 추가하고싶을 때, 사용합니다.
Vue.use(Vuex);

const storage = {
    fetch() {
        const arr = [];
        if (localStorage.length > 0) {
            for (let i=0; i < localStorage.length; i++) {
                if (localStorage.key(i) !== 'loglevel:webpack-dev-server') {
                    arr.push(JSON.parse(localStorage.getItem(localStorage.key(i))));
                }
            }
        }
        return arr;
    }
}

export const store = new Vuex.Store({
    state: {
        todoItems: storage.fetch()
    },
    mutations: {
        addOneItem() {
            console.log('received')
            // const obj = {completed: false, item: todoItem};
            // localStorage.setItem(todoItem, JSON.stringify(obj));
            // this.todoItems.push(obj);
        },
    }
});

// 간단한 설치와함께 Vuex 등록까지 마친상태
src/App.vue
<template>
  <div id="app">
    <TodoHeader></TodoHeader>
    <TodoInput v-on:addTodoItem="addOneItem"></TodoInput>
    <TodoList v-bind:propsdata="todoItems" v-on:removeItem="removeOneItem" v-on:toggleItem="toggleOneItem"></TodoList>
    <TodoFooter v-on:clearAll="clearAllItems"></TodoFooter>
  </div>
</template>

<script>
import TodoFooter from "@/components/TodoFooter";
import TodoHeader from "@/components/TodoHeader";
import TodoInput from "@/components/TodoInput";
import TodoList from "@/components/TodoList";

export default {
  data() {
    return {
      todoItems: [],
    }
  },
  methods: { // methods는 store의 mutations와 같다.
    // addOneItem(todoItem) {
    //   const obj = {completed: false, item: todoItem};
    //   localStorage.setItem(todoItem, JSON.stringify(obj));
    //   this.todoItems.push(obj);
    // },
    removeOneItem(todoItem, index) {
      localStorage.removeItem(todoItem.item);
      this.todoItems.splice(index, 1);
    },
    toggleOneItem(todoItem, index) {
      this.todoItems[index].completed = !this.todoItems[index].completed;
      // todoItem.completed = !todoItem.completed; // deep copy를 해서 값을 변형시킨게 아니라 참조값을 변형시킨것이므로 todoItems 값에 변형이 가해진다.
                                                // 때문에 todoItems 값을 따로 업데이트 안해도된다. 그렇기 때문에 바로바로 화면 렌더링이 일어난다.
      localStorage.removeItem(todoItem.item); // 해당 키로 삭제
      localStorage.setItem(todoItem.item, JSON.stringify(todoItem)); // 키와 값 다시 재등록
    },
    clearAllItems() {
      localStorage.clear();
      this.todoItems = [];
    }
  },
  components: {
    // 컴포넌트 태그명 : 컴포넌트 내용
    TodoHeader,
    TodoInput,
    TodoList,
    TodoFooter
  }
}
</script>

<style>
body {
  text-align: center;
  background-color: #f6f6f6;
}
input {
  border-style: groove;
  width: 200px;
}
button {
  border-style: groove;
}
.shadow {
  box-shadow: 5px 10px 10px rgba(0, 0, 0, 0.03);
}
</style>
src/components/TodoInput.vue
<template>
  <div class="inputBox shadow">
    <!-- v-model은 2 way binding, v-bind는 1 way binding인 개념인듯? -->
    <input type="text" v-model="newTodoItem" v-on:keyup.enter="addTodo">
    <span class="addContainer" v-on:click="addTodo">
      <i class="fas fa-plus addBtn"></i>
    </span>
    <Modal v-bind:propsdata="showModal">
      <h3 slot="header">
        경고!
        <!-- @는 v-on의 간소화된 문법입니다. short hand -->
        <i class="fas fa-times closeModalBtn" @click="showModal=false"></i>
      </h3>
      <div slot="body">
        무언가를 입력하세요.
      </div>
    </Modal>
  </div>
</template>

<script>
import Modal from "@/components/common/Modal";

export default {
  name: "TodoInput",
  data() {
    return {
      newTodoItem: "",
      showModal: false,
    }
  },
  methods: {
    addTodo() {
      if (this.newTodoItem !== '') {
        // this.$emit('addTodoItem', this.newTodoItem);
        this.$store.commit('addOneItem');
        this.clearInput();
      } else {
        this.showModal = !this.showModal;
      }
    },
    clearInput() {
      this.newTodoItem = '';
    },
  },
  components: {
    Modal,
  }
}
</script>

<style scoped>
.input:focus {
  outline: none;
}
.inputBox {
  background-color: #fff;
  height: 50px;
  line-height: 50px;
  border-radius: 5px;
}
.inputBox input {
  border-style: none;
  font-size: 0.9rem;
}
.addContainer {
  float: right;
  display: block;
  background: linear-gradient(to right, #6478fb, #8763fb);
  width: 3rem;
  border-radius: 0 5px 5px 0;
}
.addBtn {
  color: #ffffff;
  vertical-align: middle;
}
.closeModalBtn {
  color: #42b983;
}
</style>
src/components/TodoList.vue
<template>
  <div>
    <transition-group name="list" tag="ul">
      <li v-for="(todoItem, index) in this.$store.state.todoItems" v-bind:key="todoItem.item" class="shadow">
        <i class="checkBtn fas fa-check" v-bind:class="{checkBtnCompleted: todoItem.completed}" v-on:click="toggleComplete(todoItem, index)"></i>
        <span v-bind:class="{textCompleted: todoItem.completed}">{{todoItem.item}}</span>
        <span class="removeBtn" v-on:click="removeTodo(todoItem, index)">
            <i class="fas fa-trash-alt"></i>
          </span>
      </li>
    </transition-group>
  </div>
</template>

<script>
export default {
  name: "TodoList",
  methods: {
    removeTodo(todoItem, index) {
      this.$emit('removeItem', todoItem, index);
    },
    toggleComplete(todoItem, index) {
      this.$emit('toggleItem', todoItem, index);
    }
  },
}
</script>

<style scoped>
ul {
  list-style-type: none;
  padding-left: 0;
  margin-top: 0;
  text-align: left;
}
li {
  display: flex;
  min-height: 50px;
  height: 50px;
  line-height: 50px;
  margin: 0.5rem 0;
  padding: 0 0.9rem;
  background-color: #ffffff;
  border-radius: 5px;
}
.checkBtn {
  line-height: 45px;
  color: #62acde;
  margin-right: 5px;
}
.checkBtnCompleted {
  color: #b3adad;
}
.textCompleted {
  text-decoration: line-through;
  color: #b3adad;
}
.removeBtn {
  margin-left: auto;
  color: #de4343;
}
/* 리스트아이템 트랜지션 효과 */
.list-item {
  display: inline-block;
  margin-right: 10px;
}
.list-enter-active, .list-leave-active {
  transition: all 1s;
}
.list-enter, .list-leave-to /* .list-leave-active below version 2.1.8 */ {
  opacity: 0;
  transform: translateY(30px);
}
</style>

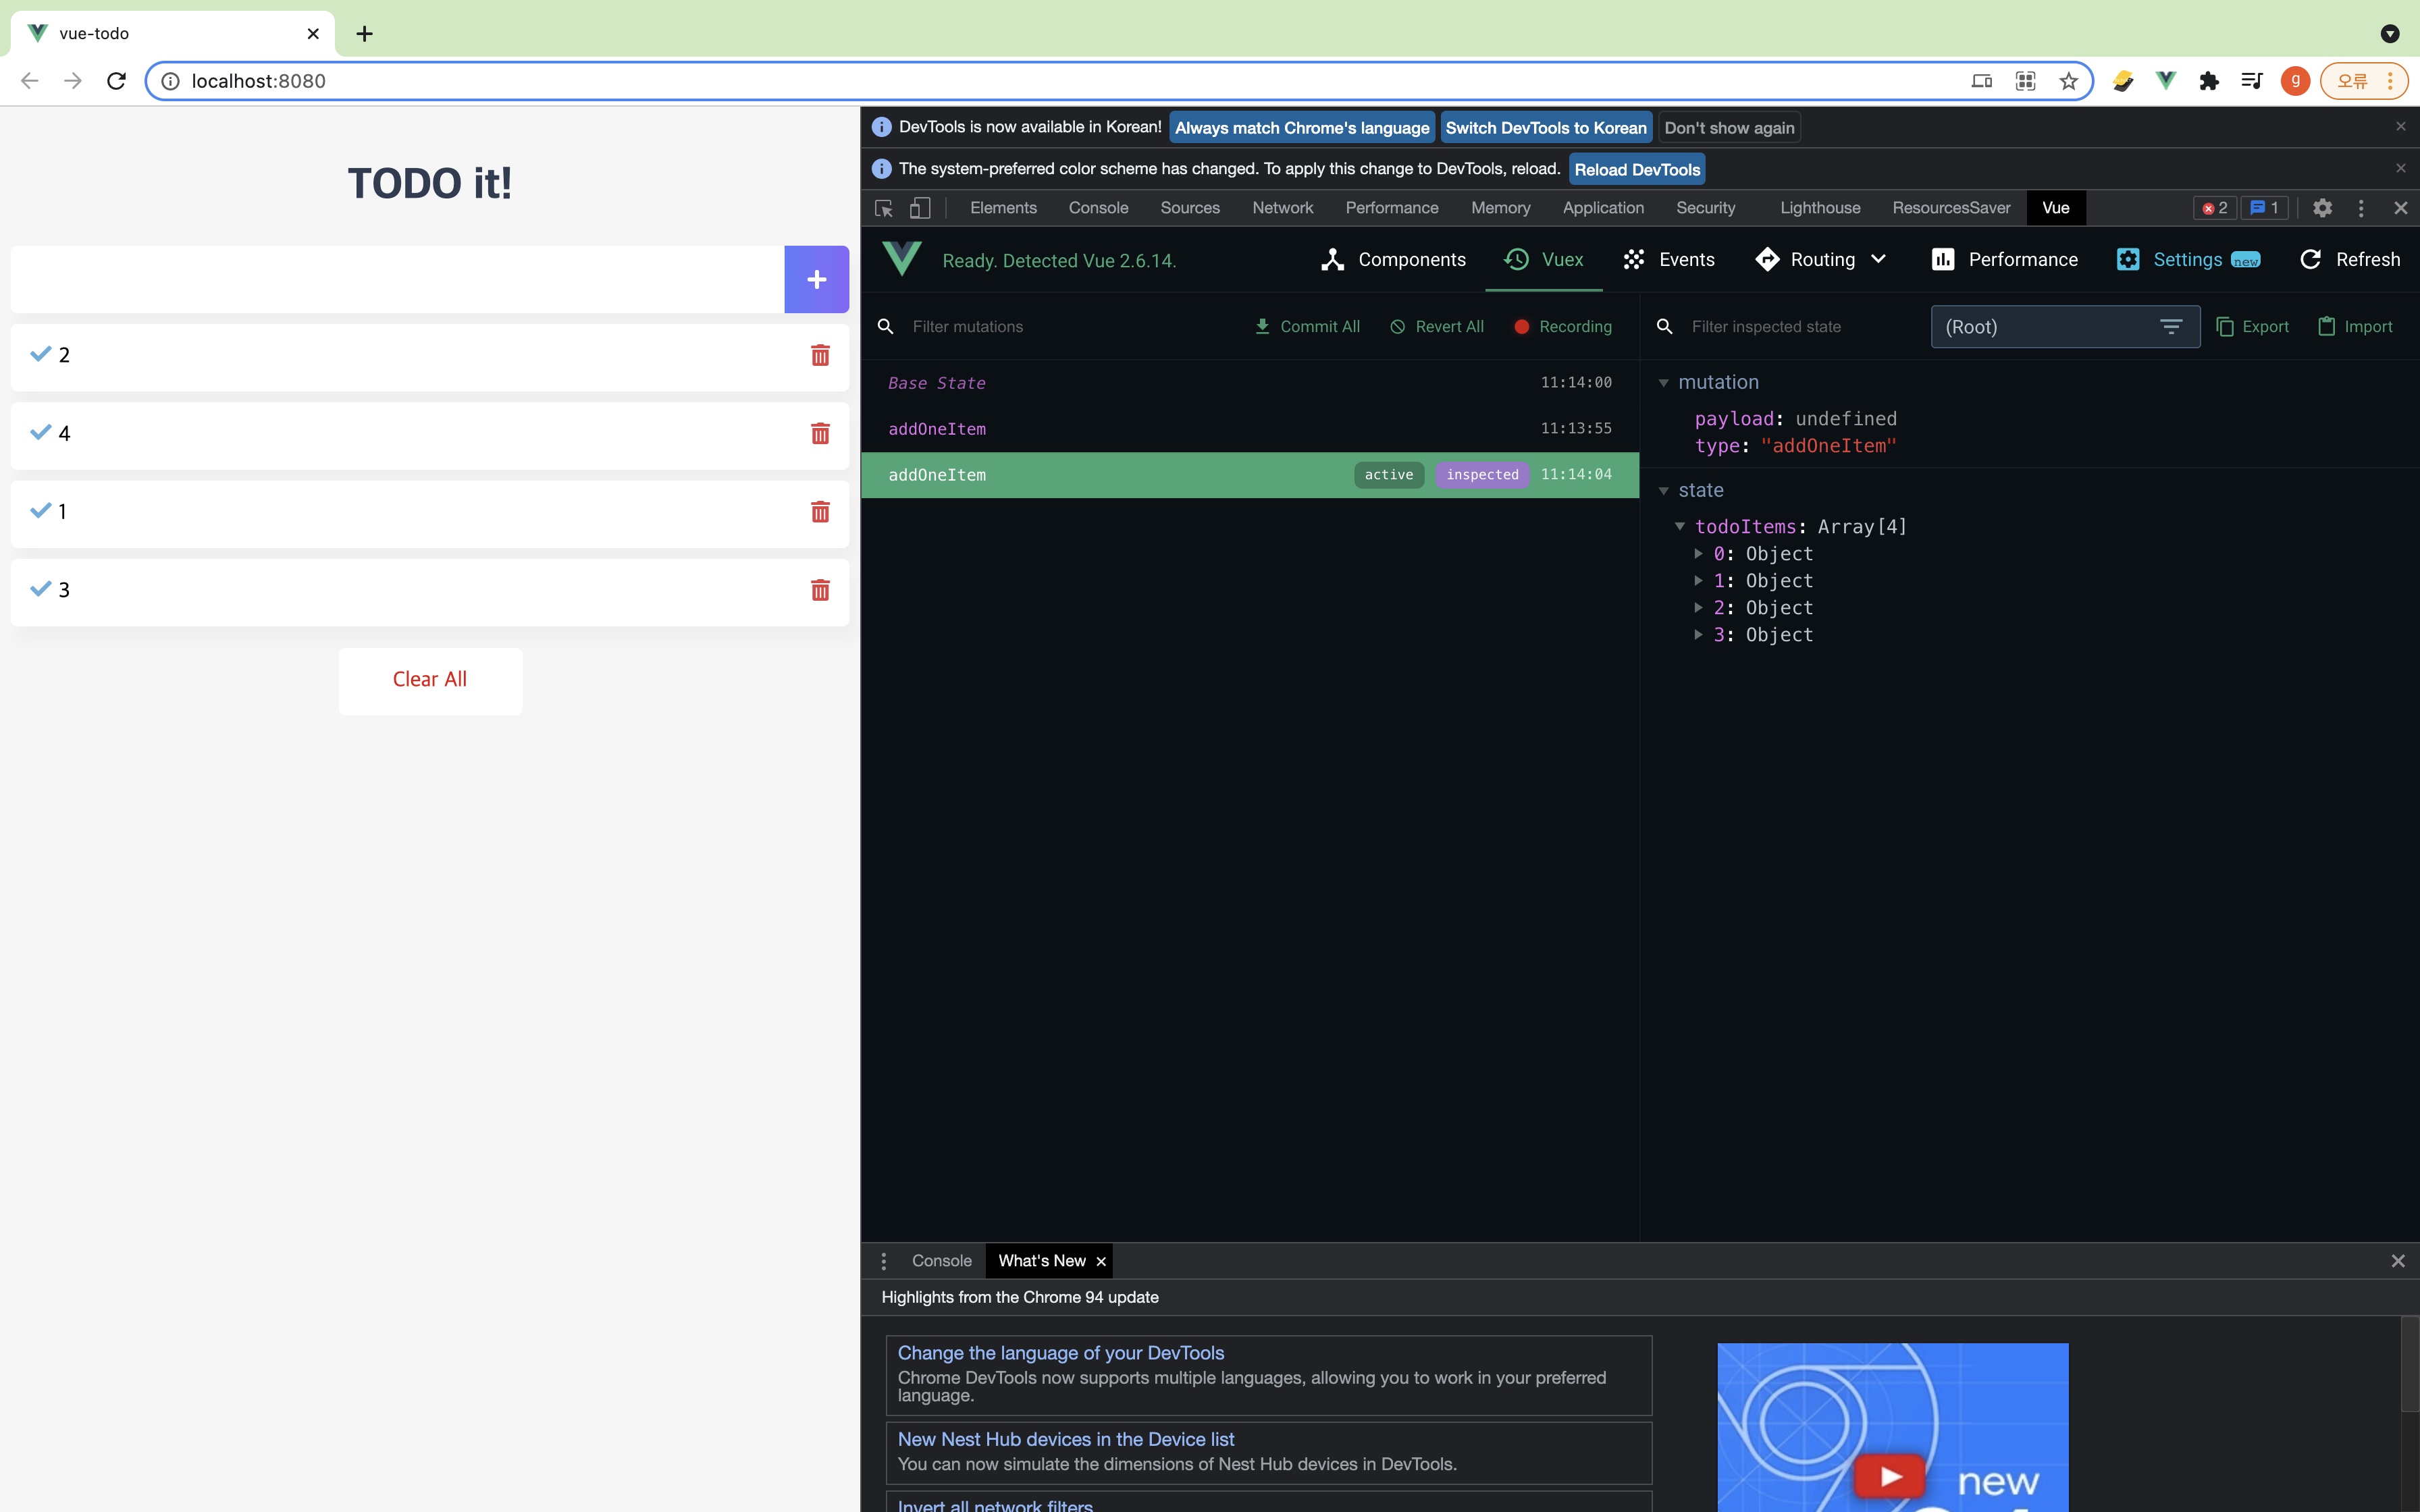
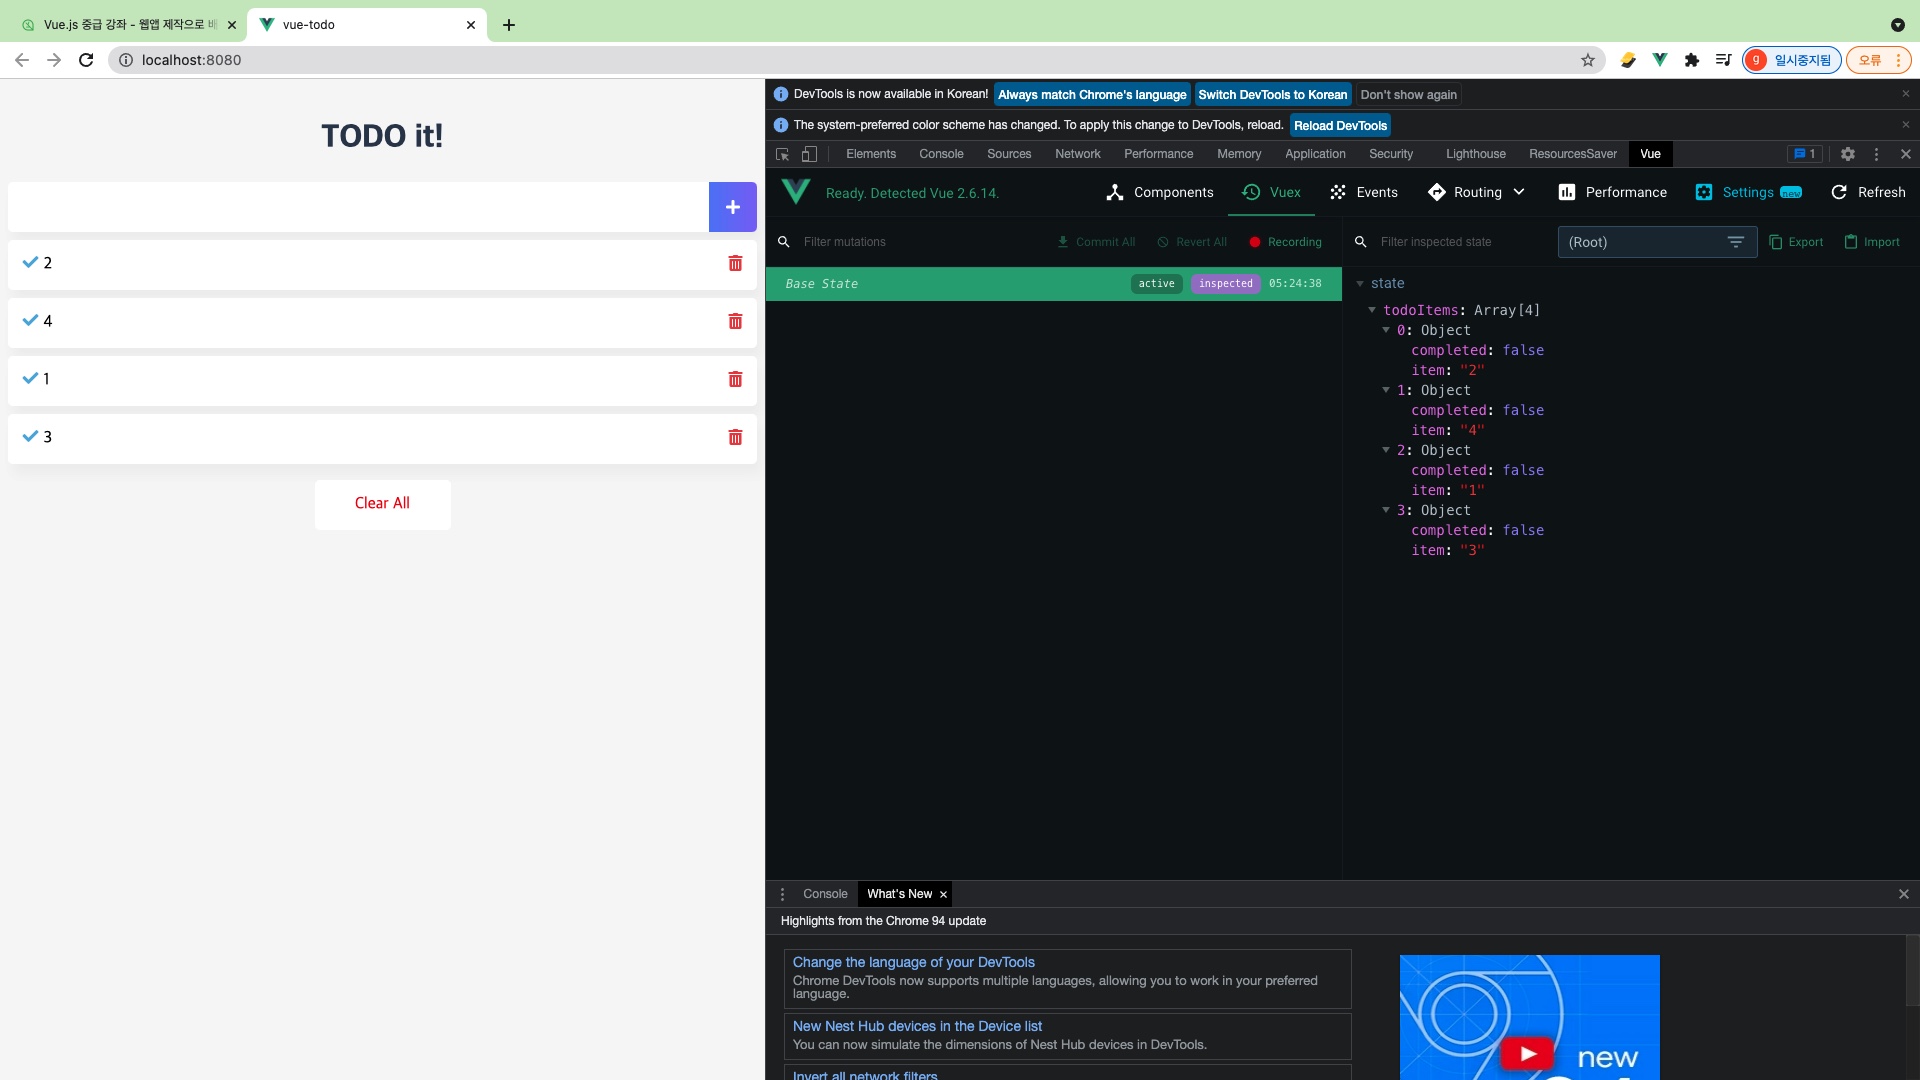
위에 보시면 방금 input창에 입력하여 add 버튼을 클릭하였을 때, addOneItem 함수가 실행된 것을 볼 수 있고,
mutation이라고 되어있는 부분이 보이실겁니다.
그 안에 type이 있고 type 값으로 해당 함수의 이름이 적혀있습니다.
src/store/store.js
import Vue from "vue";
import Vuex from "vuex";

// vue 플러그인을 사용하는 코드
// use는 vue의 플러그인을 등록하는 기능을한다.
// use를 쓰는 이유는 일반적으로 vue를 사용할 때, 전역으로.. 그러니가 vue를 사용하는 모든 영역에 특정 기능을 추가하고 싶을 때,
// 글로벌 펑셔널리티를 추가하고싶을 때, 사용합니다.
Vue.use(Vuex);

const storage = {
    fetch() {
        const arr = [];
        if (localStorage.length > 0) {
            for (let i=0; i < localStorage.length; i++) {
                if (localStorage.key(i) !== 'loglevel:webpack-dev-server') {
                    arr.push(JSON.parse(localStorage.getItem(localStorage.key(i))));
                }
            }
        }
        return arr;
    }
}

export const store = new Vuex.Store({
    state: {
        todoItems: storage.fetch()
    },
    mutations: {
        addOneItem(state, todoItem) {
            const obj = {completed: false, item: todoItem};
            localStorage.setItem(todoItem, JSON.stringify(obj));
            state.todoItems.push(obj);
        },
    }
});

// 간단한 설치와함께 Vuex 등록까지 마친상태
src/components/TodoInput.vue
<template>
  <div class="inputBox shadow">
    <!-- v-model은 2 way binding, v-bind는 1 way binding인 개념인듯? -->
    <input type="text" v-model="newTodoItem" v-on:keyup.enter="addTodo">
    <span class="addContainer" v-on:click="addTodo">
      <i class="fas fa-plus addBtn"></i>
    </span>
    <Modal v-bind:propsdata="showModal">
      <h3 slot="header">
        경고!
        <!-- @는 v-on의 간소화된 문법입니다. short hand -->
        <i class="fas fa-times closeModalBtn" @click="showModal=false"></i>
      </h3>
      <div slot="body">
        무언가를 입력하세요.
      </div>
    </Modal>
  </div>
</template>

<script>
import Modal from "@/components/common/Modal";

export default {
  name: "TodoInput",
  data() {
    return {
      newTodoItem: "",
      showModal: false,
    }
  },
  methods: {
    addTodo() {
      if (this.newTodoItem !== '') {
        // this.$emit('addTodoItem', this.newTodoItem);
        const text = this.newTodoItem.trim();
        this.$store.commit('addOneItem', text);
        this.clearInput();
      } else {
        this.showModal = !this.showModal;
      }
    },
    clearInput() {
      this.newTodoItem = '';
    },
  },
  components: {
    Modal,
  }
}
</script>

<style scoped>
.input:focus {
  outline: none;
}
.inputBox {
  background-color: #fff;
  height: 50px;
  line-height: 50px;
  border-radius: 5px;
}
.inputBox input {
  border-style: none;
  font-size: 0.9rem;
}
.addContainer {
  float: right;
  display: block;
  background: linear-gradient(to right, #6478fb, #8763fb);
  width: 3rem;
  border-radius: 0 5px 5px 0;
}
.addBtn {
  color: #ffffff;
  vertical-align: middle;
}
.closeModalBtn {
  color: #42b983;
}
</style>
src/App.vue
<template>
  <div id="app">
    <TodoHeader></TodoHeader>
    <TodoInput></TodoInput>
    <TodoList v-bind:propsdata="todoItems" v-on:removeItem="removeOneItem" v-on:toggleItem="toggleOneItem"></TodoList>
    <TodoFooter v-on:clearAll="clearAllItems"></TodoFooter>
  </div>
</template>

<script>
import TodoFooter from "@/components/TodoFooter";
import TodoHeader from "@/components/TodoHeader";
import TodoInput from "@/components/TodoInput";
import TodoList from "@/components/TodoList";

export default {
  data() {
    return {
      todoItems: [],
    }
  },
  methods: { // methods는 store의 mutations와 같다.
    // addOneItem(todoItem) {
    //   const obj = {completed: false, item: todoItem};
    //   localStorage.setItem(todoItem, JSON.stringify(obj));
    //   this.todoItems.push(obj);
    // },
    removeOneItem(todoItem, index) {
      localStorage.removeItem(todoItem.item);
      this.todoItems.splice(index, 1);
    },
    toggleOneItem(todoItem, index) {
      this.todoItems[index].completed = !this.todoItems[index].completed;
      // todoItem.completed = !todoItem.completed; // deep copy를 해서 값을 변형시킨게 아니라 참조값을 변형시킨것이므로 todoItems 값에 변형이 가해진다.
                                                // 때문에 todoItems 값을 따로 업데이트 안해도된다. 그렇기 때문에 바로바로 화면 렌더링이 일어난다.
      localStorage.removeItem(todoItem.item); // 해당 키로 삭제
      localStorage.setItem(todoItem.item, JSON.stringify(todoItem)); // 키와 값 다시 재등록
    },
    clearAllItems() {
      localStorage.clear();
      this.todoItems = [];
    }
  },
  components: {
    // 컴포넌트 태그명 : 컴포넌트 내용
    TodoHeader,
    TodoInput,
    TodoList,
    TodoFooter
  }
}
</script>

<style>
body {
  text-align: center;
  background-color: #f6f6f6;
}
input {
  border-style: groove;
  width: 200px;
}
button {
  border-style: groove;
}
.shadow {
  box-shadow: 5px 10px 10px rgba(0, 0, 0, 0.03);
}
</style>
12.6 [리팩토링&퀴즈] mutations 퀴즈 풀이 및 할일 지우기 기능 구현
내가 푼답 - 다 수정한듯?
src/store/store.js
import Vue from "vue";
import Vuex from "vuex";

// vue 플러그인을 사용하는 코드
// use는 vue의 플러그인을 등록하는 기능을한다.
// use를 쓰는 이유는 일반적으로 vue를 사용할 때, 전역으로.. 그러니가 vue를 사용하는 모든 영역에 특정 기능을 추가하고 싶을 때,
// 글로벌 펑셔널리티를 추가하고싶을 때, 사용합니다.
Vue.use(Vuex);

const storage = {
    fetch() {
        const arr = [];
        if (localStorage.length > 0) {
            for (let i=0; i < localStorage.length; i++) {
                if (localStorage.key(i) !== 'loglevel:webpack-dev-server') {
                    arr.push(JSON.parse(localStorage.getItem(localStorage.key(i))));
                }
            }
        }
        return arr;
    }
}

export const store = new Vuex.Store({
    state: {
        todoItems: storage.fetch()
    },
    mutations: {
        addOneItem(state, todoItem) {
            const obj = {completed: false, item: todoItem};
            localStorage.setItem(todoItem, JSON.stringify(obj));
            state.todoItems.push(obj);
        },
        removeOneItem(state, {todoItem, index}) {
            localStorage.removeItem(todoItem.item);
            state.todoItems.splice(index, 1);
        },
        toggleOneItem(state, {todoItem, index}) {
            state.todoItems[index].completed = !state.todoItems[index].completed;
            // todoItem.completed = !todoItem.completed; // deep copy를 해서 값을 변형시킨게 아니라 참조값을 변형시킨것이므로 todoItems 값에 변형이 가해진다.
            // 때문에 todoItems 값을 따로 업데이트 안해도된다. 그렇기 때문에 바로바로 화면 렌더링이 일어난다.
            localStorage.removeItem(todoItem.item); // 해당 키로 삭제
            localStorage.setItem(todoItem.item, JSON.stringify(todoItem)); // 키와 값 다시 재등록
        },
        clearAllItems(state) {
            localStorage.clear();
            state.todoItems = [];
        }
    }
});

// 간단한 설치와함께 Vuex 등록까지 마친상태
src/App.vue
<template>
  <div id="app">
    <TodoHeader></TodoHeader>
    <TodoInput></TodoInput>
    <TodoList></TodoList>
    <TodoFooter></TodoFooter>
  </div>
</template>

<script>
import TodoFooter from "@/components/TodoFooter";
import TodoHeader from "@/components/TodoHeader";
import TodoInput from "@/components/TodoInput";
import TodoList from "@/components/TodoList";

export default {
  components: {
    // 컴포넌트 태그명 : 컴포넌트 내용
    TodoHeader,
    TodoInput,
    TodoList,
    TodoFooter
  }
}
</script>

<style>
body {
  text-align: center;
  background-color: #f6f6f6;
}
input {
  border-style: groove;
  width: 200px;
}
button {
  border-style: groove;
}
.shadow {
  box-shadow: 5px 10px 10px rgba(0, 0, 0, 0.03);
}
</style>
src/components/TodoFooter.vue
<template>
  <div class="clearAllContainer">
    <span class="clearAllBtn" v-on:click="clearTodo">
      Clear All
    </span>
  </div>
</template>

<script>
export default {
  name: "TodoFooter",
  methods: {
    clearTodo() {
      this.$store.commit('clearAllItems');
    }
  }
}
</script>

<style scoped>
.clearAllContainer {
  width: 8.5rem;
  height: 50px;
  line-height: 50px;
  background-color: #ffffff;
  border-radius: 5px;
  margin: 0 auto;
}
.clearAllBtn {
  color: #e20303;
  display: block;
}
</style>
src/components/TodoList.vue
<template>
  <div>
    <transition-group name="list" tag="ul">
      <li v-for="(todoItem, index) in this.$store.state.todoItems" v-bind:key="todoItem.item" class="shadow">
        <i class="checkBtn fas fa-check"
           v-bind:class="{checkBtnCompleted: todoItem.completed}"
           v-on:click="toggleComplete(todoItem, index)"></i>
        <span v-bind:class="{textCompleted: todoItem.completed}">{{todoItem.item}}</span>
        <span class="removeBtn" v-on:click="removeTodo(todoItem, index)">
            <i class="fas fa-trash-alt"></i>
        </span>
      </li>
    </transition-group>
  </div>
</template>

<script>
export default {
  name: "TodoList",
  methods: {
    removeTodo(todoItem, index) {
      this.$store.commit('removeOneItem', {todoItem, index});
    },
    toggleComplete(todoItem, index) {
      this.$store.commit('toggleOneItem', {todoItem, index});
    }
  },
}
</script>

<style scoped>
ul {
  list-style-type: none;
  padding-left: 0;
  margin-top: 0;
  text-align: left;
}
li {
  display: flex;
  min-height: 50px;
  height: 50px;
  line-height: 50px;
  margin: 0.5rem 0;
  padding: 0 0.9rem;
  background-color: #ffffff;
  border-radius: 5px;
}
.checkBtn {
  line-height: 45px;
  color: #62acde;
  margin-right: 5px;
}
.checkBtnCompleted {
  color: #b3adad;
}
.textCompleted {
  text-decoration: line-through;
  color: #b3adad;
}
.removeBtn {
  margin-left: auto;
  color: #de4343;
}
/* 리스트아이템 트랜지션 효과 */
.list-item {
  display: inline-block;
  margin-right: 10px;
}
.list-enter-active, .list-leave-active {
  transition: all 1s;
}
.list-enter, .list-leave-to /* .list-leave-active below version 2.1.8 */ {
  opacity: 0;
  transform: translateY(30px);
}
</style>
src/components/TodoInput.vue
<template>
  <div class="inputBox shadow">
    <!-- v-model은 2 way binding, v-bind는 1 way binding인 개념인듯? -->
    <input type="text" v-model="newTodoItem" v-on:keyup.enter="addTodo">
    <span class="addContainer" v-on:click="addTodo">
      <i class="fas fa-plus addBtn"></i>
    </span>
    <Modal v-bind:propsdata="showModal">
      <h3 slot="header">
        경고!
        <!-- @는 v-on의 간소화된 문법입니다. short hand -->
        <i class="fas fa-times closeModalBtn" @click="showModal=false"></i>
      </h3>
      <div slot="body">
        무언가를 입력하세요.
      </div>
    </Modal>
  </div>
</template>

<script>
import Modal from "@/components/common/Modal";

export default {
  name: "TodoInput",
  data() {
    return {
      newTodoItem: "",
      showModal: false,
    }
  },
  methods: {
    addTodo() {
      if (this.newTodoItem !== '') {
        const text = this.newTodoItem.trim();
        this.$store.commit('addOneItem', text);
        this.clearInput();
      } else {
        this.showModal = !this.showModal;
      }
    },
    clearInput() {
      this.newTodoItem = '';
    },
  },
  components: {
    Modal,
  }
}
</script>

<style scoped>
.input:focus {
  outline: none;
}
.inputBox {
  background-color: #fff;
  height: 50px;
  line-height: 50px;
  border-radius: 5px;
}
.inputBox input {
  border-style: none;
  font-size: 0.9rem;
}
.addContainer {
  float: right;
  display: block;
  background: linear-gradient(to right, #6478fb, #8763fb);
  width: 3rem;
  border-radius: 0 5px 5px 0;
}
.addBtn {
  color: #ffffff;
  vertical-align: middle;
}
.closeModalBtn {
  color: #42b983;
}
</style>
12.7 [리팩토링] mutations로 할 일 추가, 완료, 모두 삭제 구현
이미 위에서 수정 다 함.
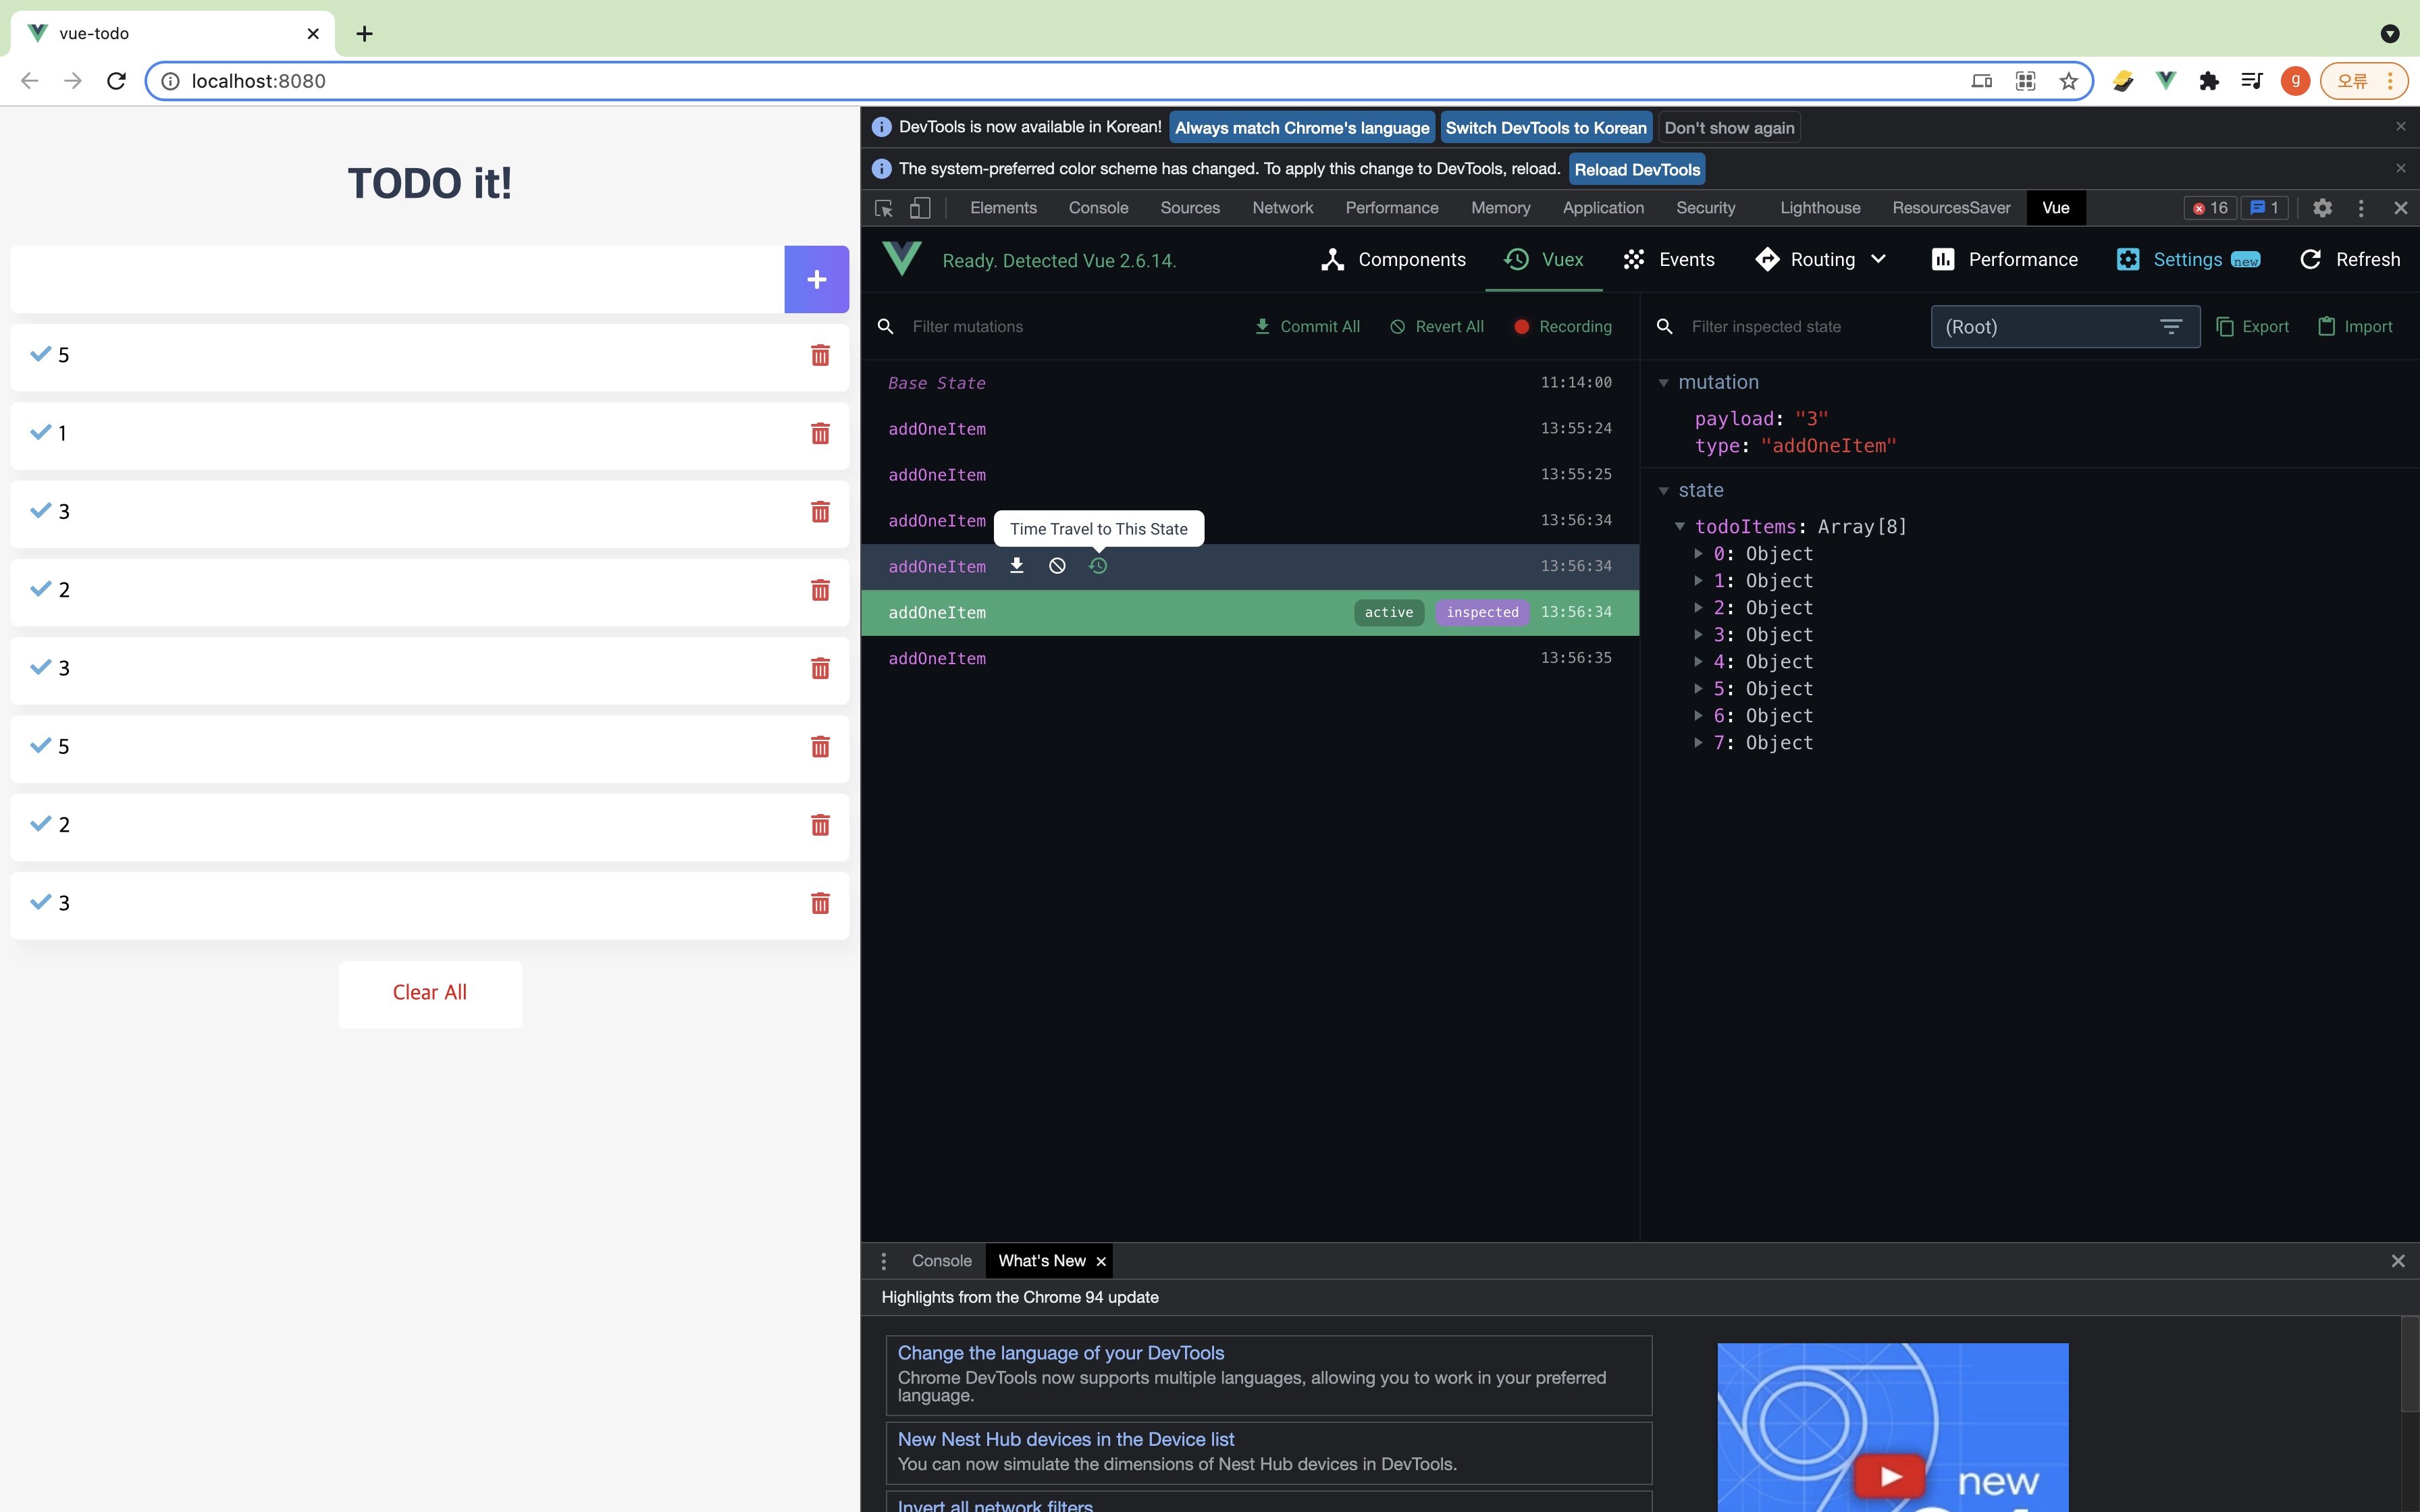
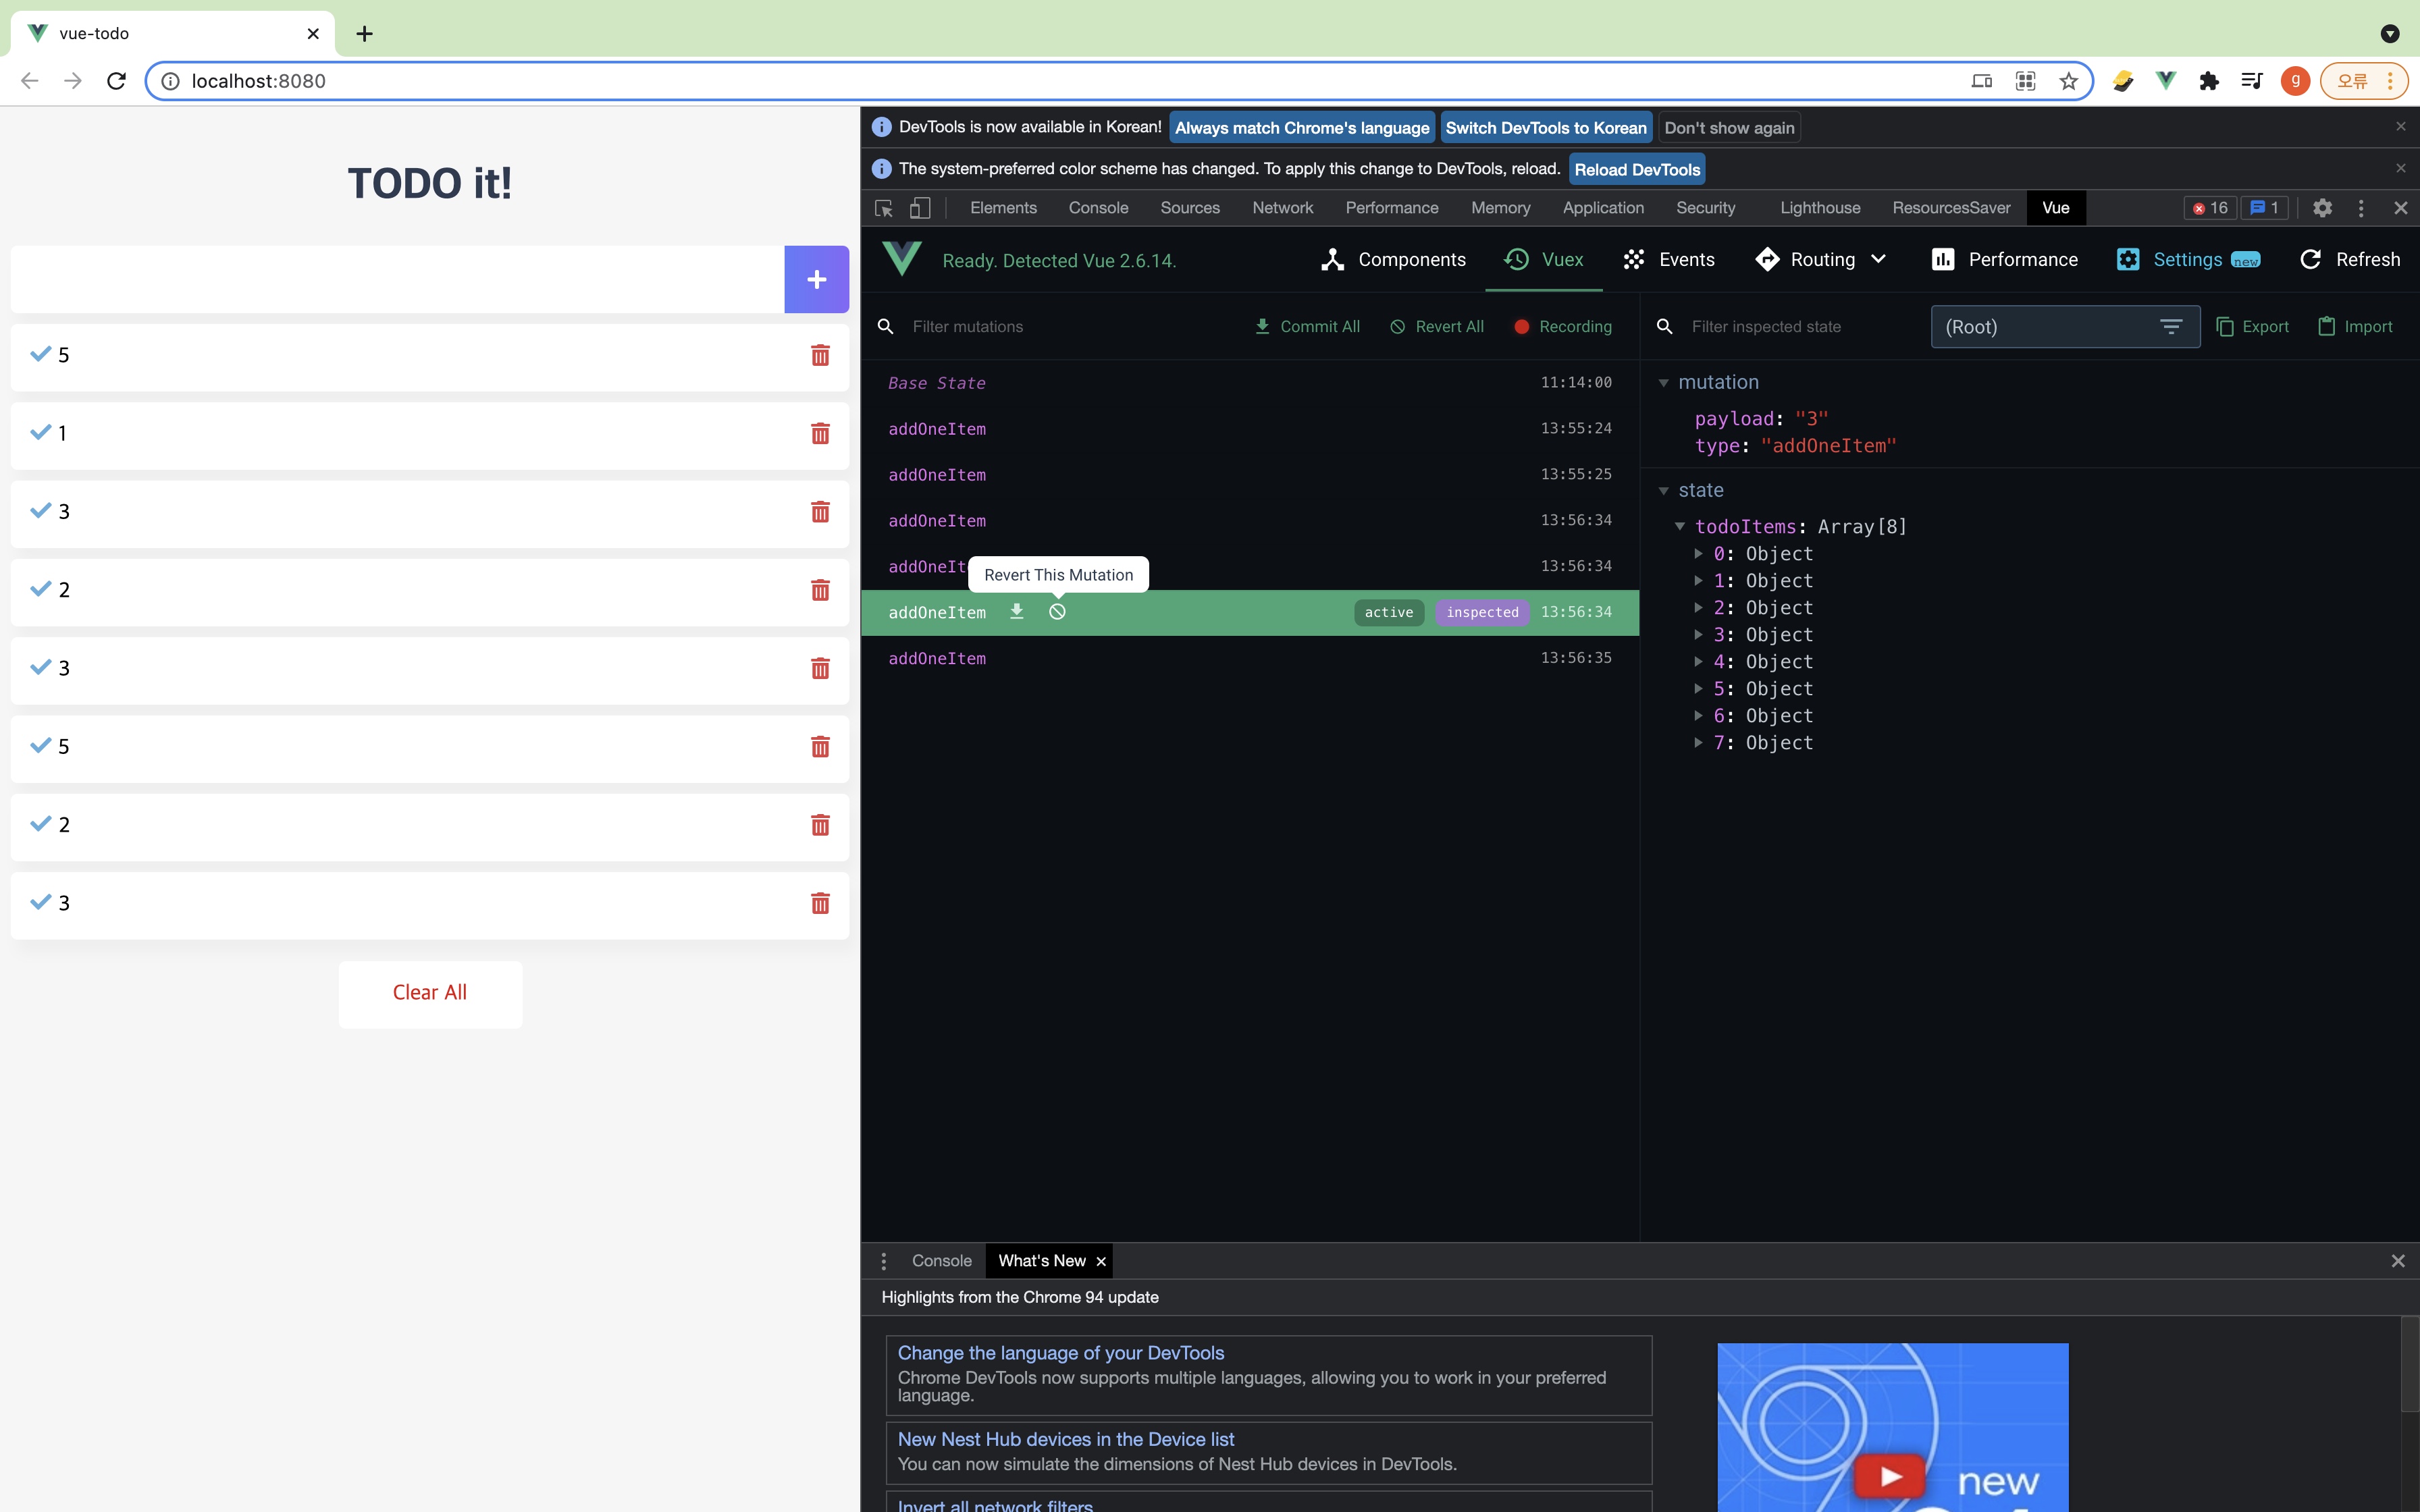
git 사용할 때 특정 시점으로 돌아가거나 revert하는 것처럼 위와 같이 Vuex 개발자 탭에서도 특정 시점으로 돌아가거나 revert하는 기능을 제공한다.
왜 state는 mutations으로.. commit이라는 API를 활용해서 mutations을 통해 state에 접근을 해야되는지,
왜 state로 직접 접근해서.. this.$store.state.todoItems 처럼 직접 접근할 수도 있을텐데,
왜 굳이 commit을 사용해서 접근해야되는지, 왜 state에 직접 접근을 안하는지,
이런거에 대해서 다음 시간에 설명하도록 하겠습니다.
12.8 왜 mutations로 상태를 변경해야 하는가? 왜 mutations에 commit이란 API로 접근해야하는가?
기존 App.vue에서 관리하던 애플리케이션 로직들을 전부 다 Vuex store로 들고와서 store에서 처리되게끔 했습니다.
state는 왜 직접 변경하지 않고 mutations로 변경할까?
-
여러 개의 컴포넌트에서 아래와 같이 state 값을 변경하는 경우 어느 컴포넌트에서 해당 state를 변경했는지 추적하기가 어렵다.
mutations를 사용하면 vue 개발자창의 vuex 탭에서도 추적하기가 용이해진다.methods: { increaseCounter () { this.$store.state.counter++; } } - 특정 시점에 어떤 컴포넌트가 state를 접근하여 변경한건지 확인하기 어렵기 때문이다.
- 따라서, 뷰의 반응성을 거스르지 않게 명시적으로 상태 변화를 수행. 반응성, 디버깅, 테스팅 혜택.
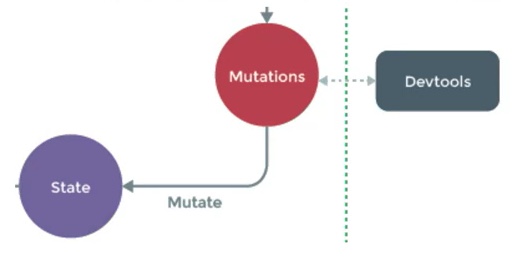
vuex라는 것은 vue 코어팀에서 만든거다보니까, 앞에서 설명드렸던 Flux 패턴을 vue에 맞춰서 구현을 해놨다고 했잖아요?
그래서 vue의 반응성이라던지, 명시적으로 상태변화를 수행하는데있어서 vuex의 mutations를 거치지않으면
전체적으로 반응성을 얻기가 어렵습니다.
vue의 반응성이라고하면, 화면에 어떤 특정 데이터가 변경되었을 때, 그거를 script에서 바로 인지를하고 그런 것들을 얘기하는거죠?
그런것 때문에도 vuex의 mutations를 꼭 써서 state를 변경해야된다라고 보시면됩니다.
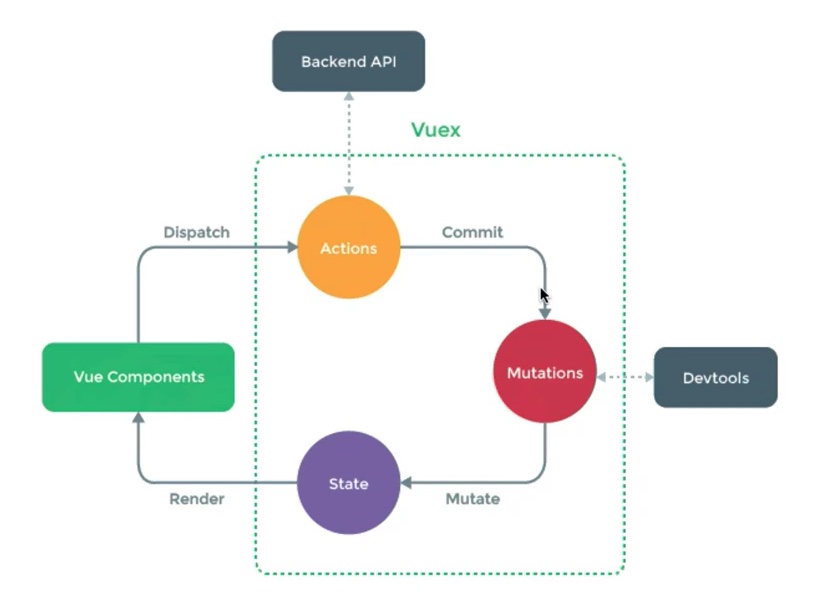
지금까지 actions는 안했습니다.
vue components에서 바로 mutations로 왔습니다.
vue components에서 (actions 건너뛰고..(우리코드엔 actions 아직 안넣음)) 어떤 이벤트를 commit했더니 mutations로 넘어갔죠?
TodoList, TodoFooter에서 특정 이벤트를 commit했을 때, mutations의 특정 메서드가 동작해서, state를 변경했습니다.
mutations가 동작을하면 저희가 계속 사용했었던 vue 개발자도구(Devtools)로 확인할 수 있었습니다.
(payload, mutation type 등등..)
결국 mutations가 하는 역할은 state의 변경입니다.
그 이상 그 이하도 아닙니다.
state가 변경되면 자연스럽게 vue reactivity에 의해서 화면이 다시 렌더링됩니다.
12.9 actions 소개 및 예제
- state
- getters
- mutations
- actions
마지막 actions에 대해 볼차례.
actions란?
-
비동기 처리 로직을 선언하는 메서드. 비동기 로직을 담당하는 mutations라고 보면된다.
예를 들어서 클라이언트 컴퓨터에서 서버로 요청을 보내고 그 응답이 올때까지 자바스크립트가 기다려주지 않잖아요?
그런 부분들을 비동기처리라고 하는데 이러한 비동기 처리 로직을 선언하는 부분이 바로 actions라고 보시면됩니다. -
데이터 요청, Promise, ES6 async와 같은 비동기 처리는 모두 actions에 선언
actions 코드
// store.js
state: {
    num: 10
},
mutations: {
    doubleNumber(state) {
        return state.num * 2;
    },
},
actions: {
    delayDoubleNumber(context) { // context로 store의 메서드와 속성 접근
        // 이런식으로 actions은 중간에 비동기 로직들을 넣어줄 수 있다.
        // 이 예시 코드는 비동기 코드는 아님. 그냥 예시로 만든 코드일뿐.
        context.commit('doubleNumber');
    }
}
<!-- App.vue -->
this.$store.dispatch('delayDoubleNumber');
actions 비동기 코드 예제 1
// store.js
mutations: {
    addCounter(state) {
        state.counter++;
    },
},
actions: {
    delayedAddCounter(context) {
        setTimeout(() => context.commit('addCounter'), 2000);
    }
}
<!-- App.vue -->
methods: {
  incrementCounter() {
    this.$store.dispatch('delayedAddCounter');
  }
}
actions 비동기 코드 예제 2
// store.js
mutations: {
    setData(state, fetchedData) {
        state.product = fetchedData;
    }
},
actions: {
    fetchProductData(context) {
        return axios.get('https://domain.com/products/1')
            .then(response => context.commit('setData', response))
    }
}
<!-- App.vue -->
methods: {
  getProduct() {
    this.$store.dispatch('fetchProductData');
  }
}
vue component -> actions -> mutations -> state 값 수정
12.10 왜 actions에 비동기 로직을 선언해야 하는가?
왜 비동기 처리 로직은 actions에 선언해야 할까?
- 언제 어느 컴포넌트에서 해당 state를 호출하고, 변경했는지 확인하기가 어려움
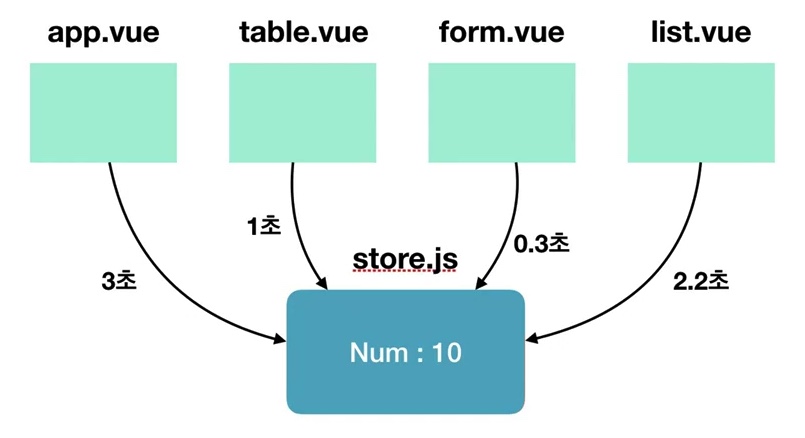
[그림] 여러 개의 컴포넌트에서 mutations로 시간 차를 두고 state를 변경하는 경우
mutations에 비동기 로직이있으면 언제 어떻게 어느시점에서 해당 코드가 실행되어 state를 변경할지를 추적하기 까다롭다.
mutations에 비동기 로직이 들어가있는 상태에서 그 state를 건드는 컴포넌트가 많아지면 많아질수록, 추적하기 까다롭다.
- 결론: state 값의 변화를 추적하기 어렵기 때문에 mutations 속성에는 동기 처리 로직만 넣어야 한다.